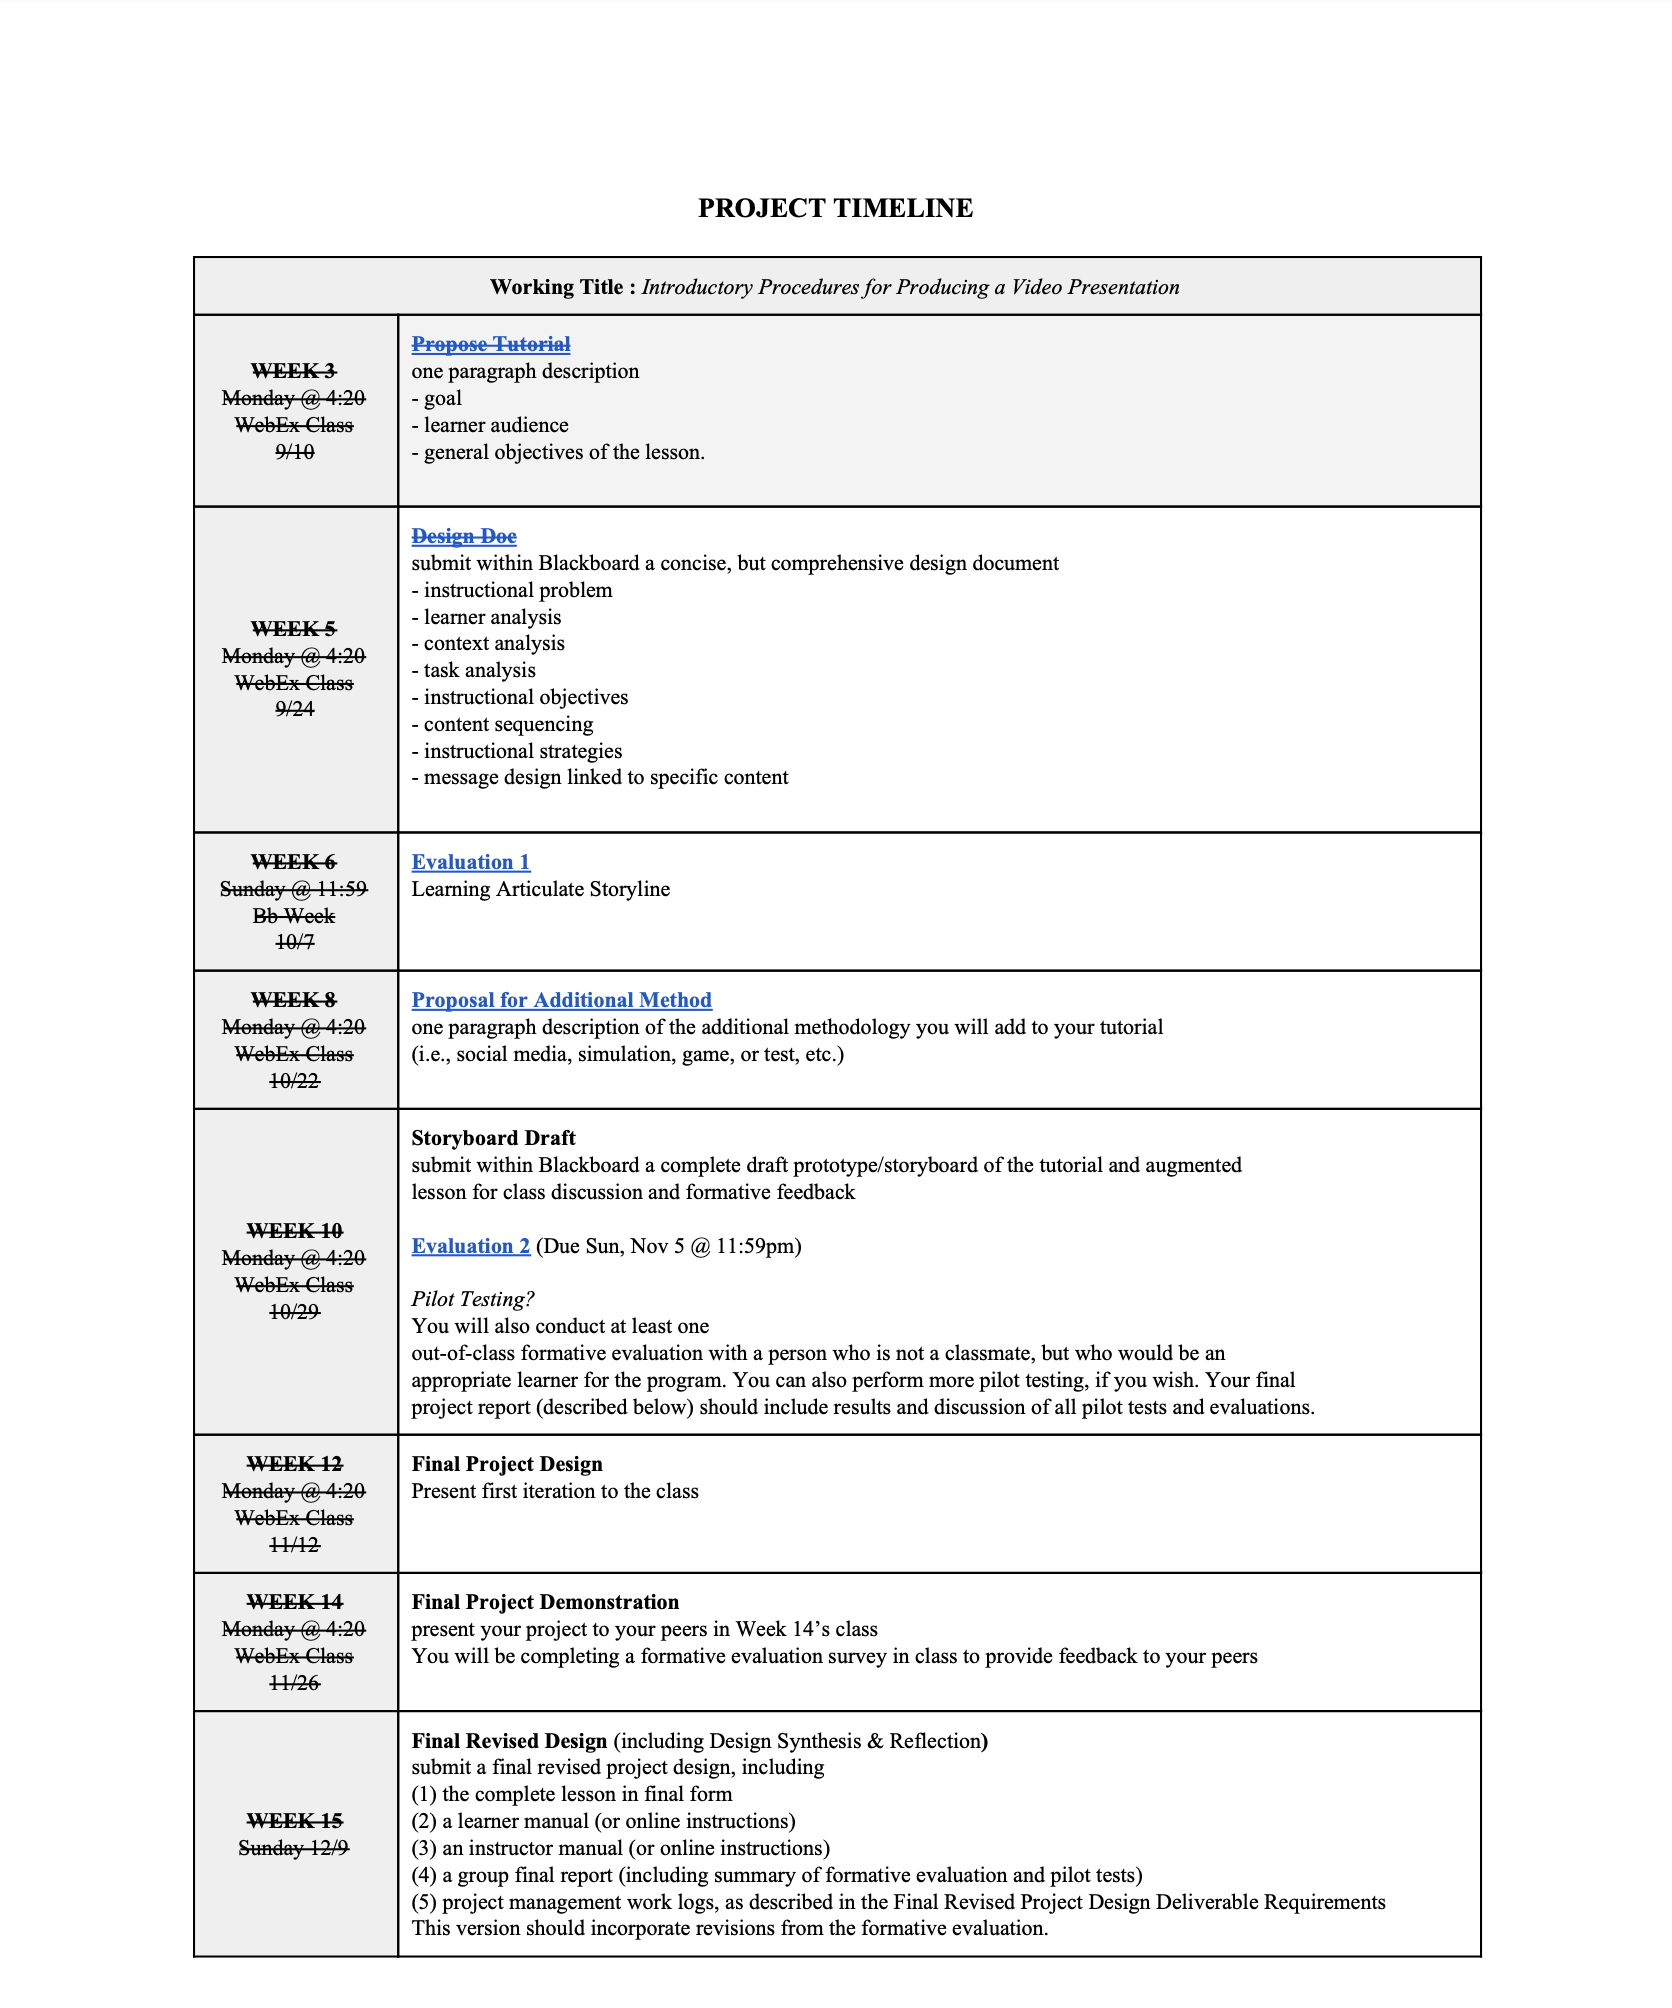
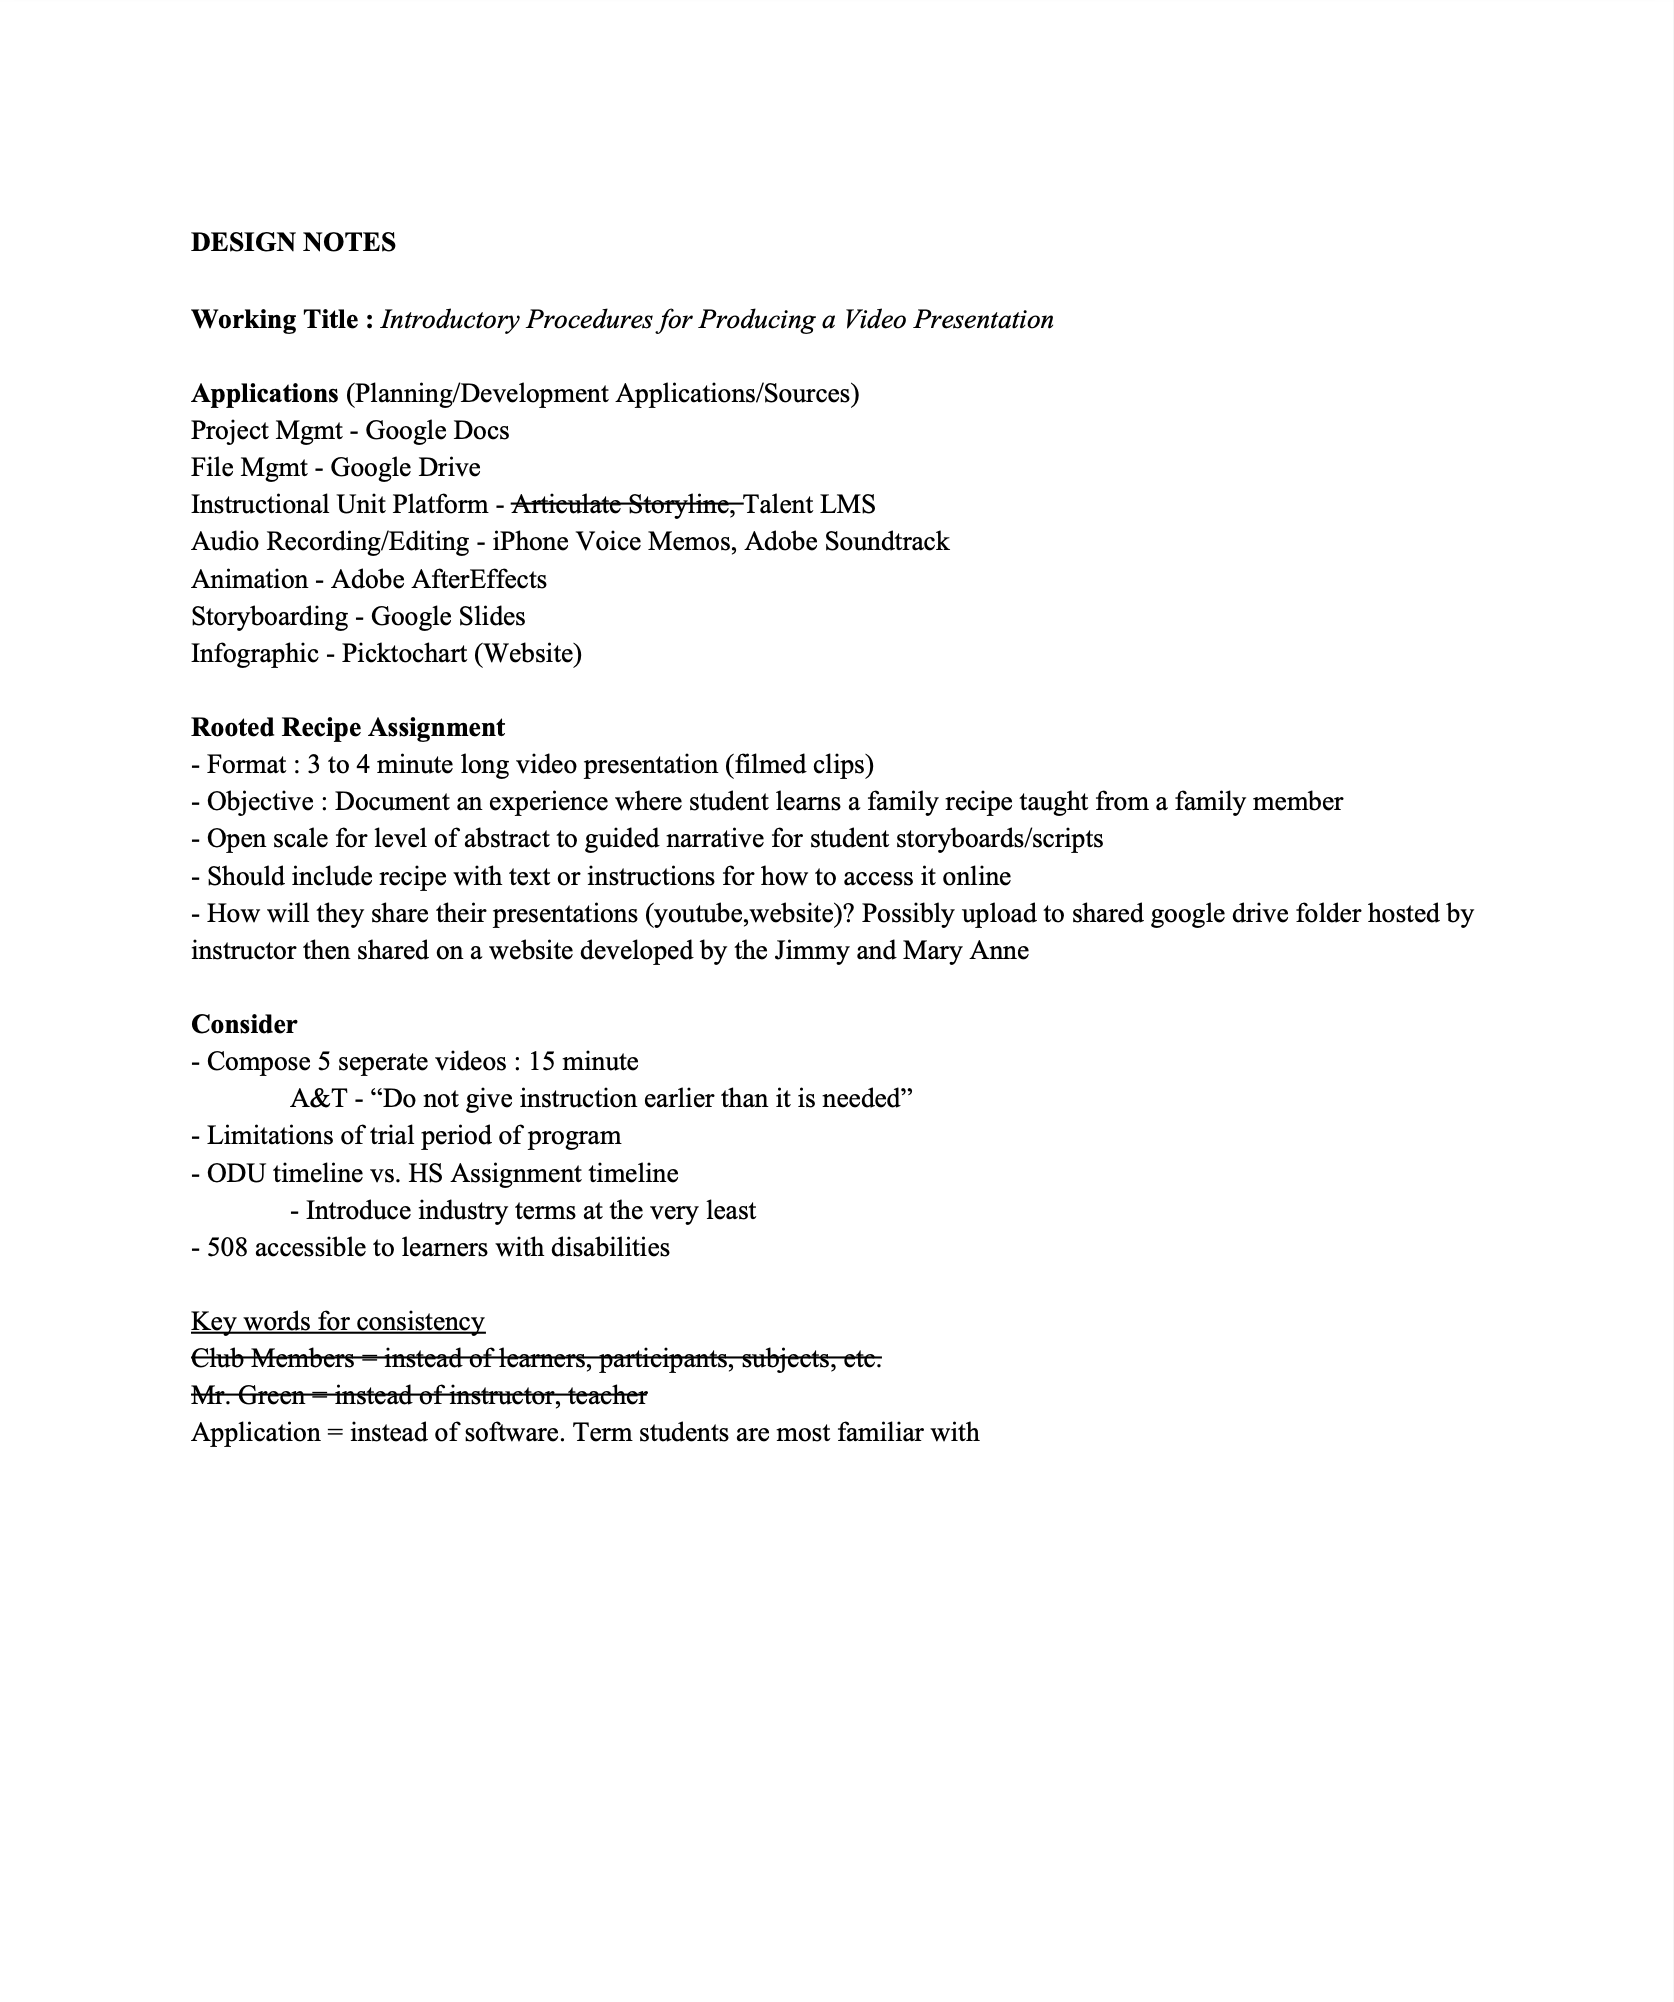
Designing and Developing a Self-Paced Instructional Unit:
How to Create a Video Presentation

Screenshot from Storyboard
Purpose
This computer-based multimedia instructional unit was designed to introduce upper-level high school students to a set of basic principles that support the production of effective and efficient video presentations. The instruction was created in support of an initiative at Virginia Beach Public Schools that encouraged students to become engaged in curriculum beyond the scope of their traditional Standards of Learning (SOL) material. More specifically, this instruction was designed to support the efforts of a Virginia Beach high school teacher, Raymond Obispo, who wanted to utilize the teaching strategy of the “flipped classroom” to maximize engagement in an alternative curriculum.
In support of “flipping the classroom”, the students would be required to present a 2-3 minute video presentation to their instructor and classmates about food and its ties to their family. This multimedia instruction was designed to support the video presentation project and was consequently titled “Creating a Video Presentation. This unit is made up of a series of videos that were packaged using the Articulate Storyline format along with instructional handouts.
Our tasks :
Interviewed the Instructor
Performed a Task Analysis
Created a packet of Facilitator Instructions
Created a packet of handouts for the students
Wrote a script, recorded the voiceovers and edited the audio
Storyboarded and produced the videos
Built the course within Articulate Storyline
Delivered final course to Instructor
Delivered detailed project management report to e-Learning Course Instructor
+ General Nature of Program
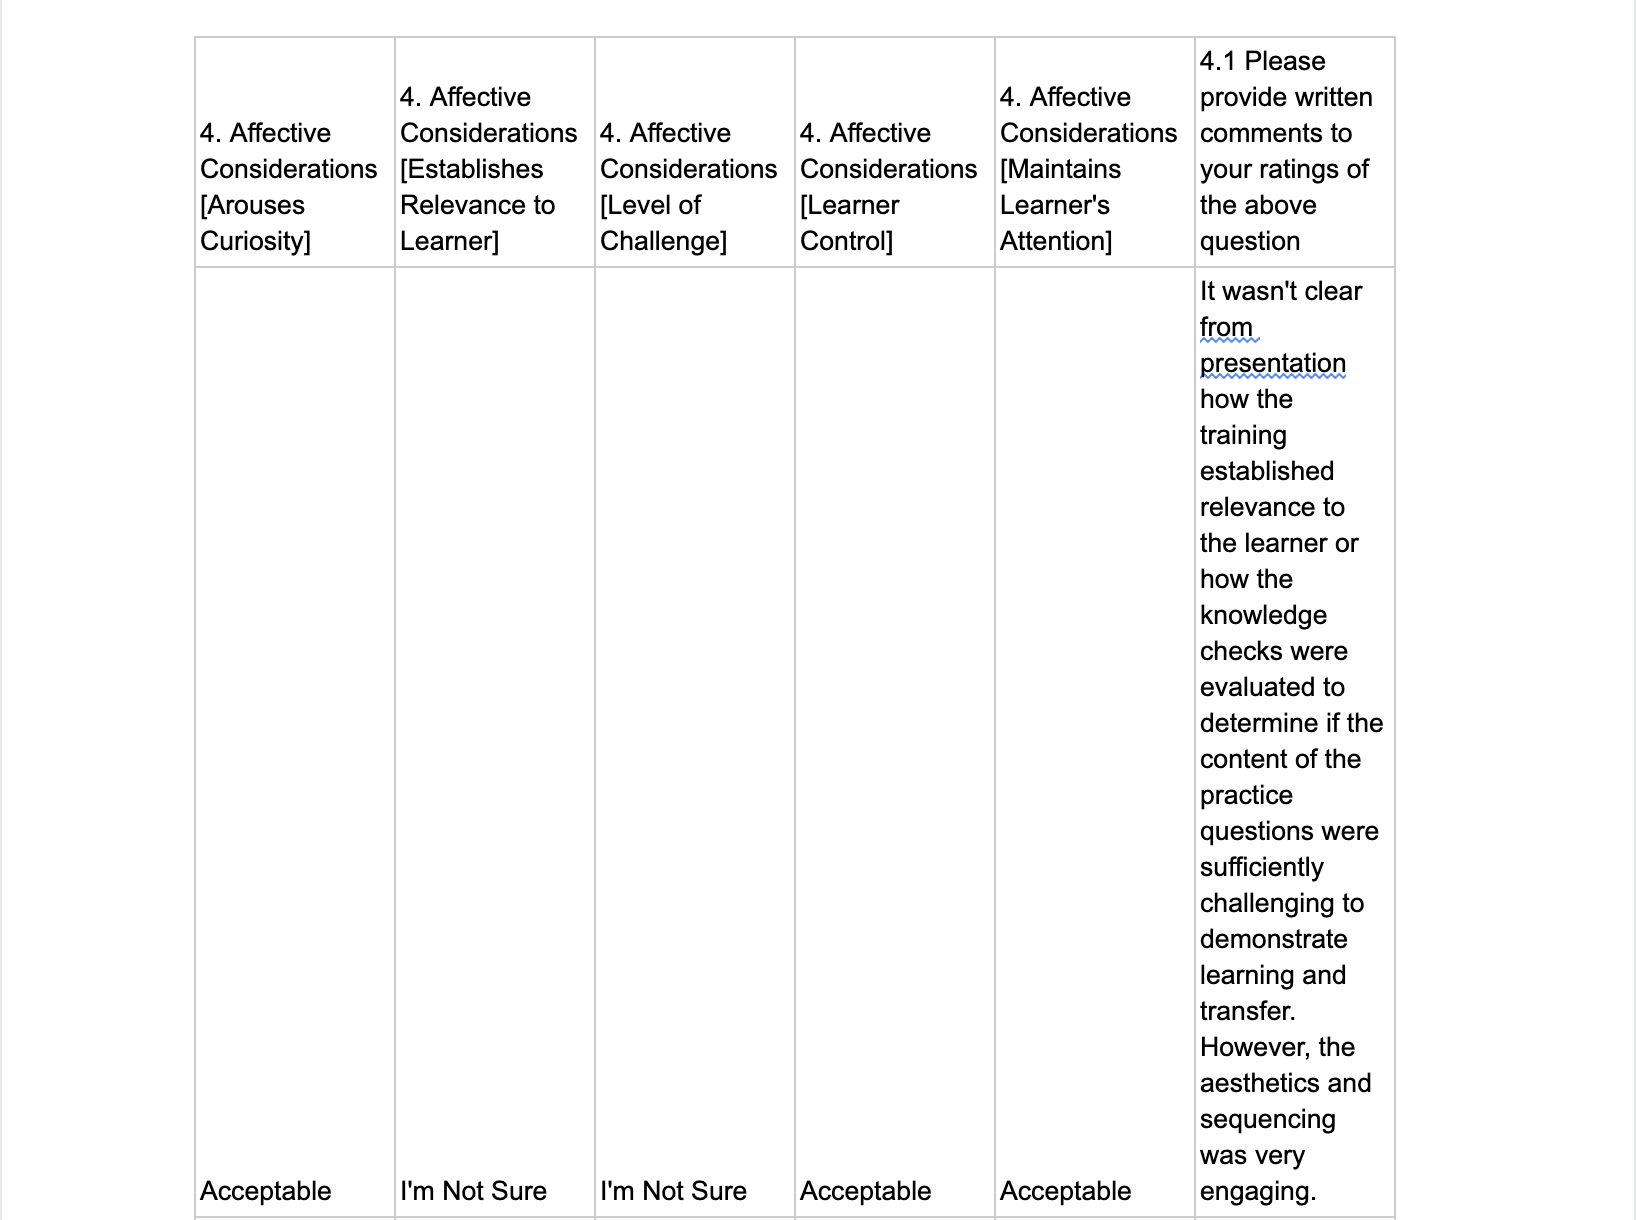
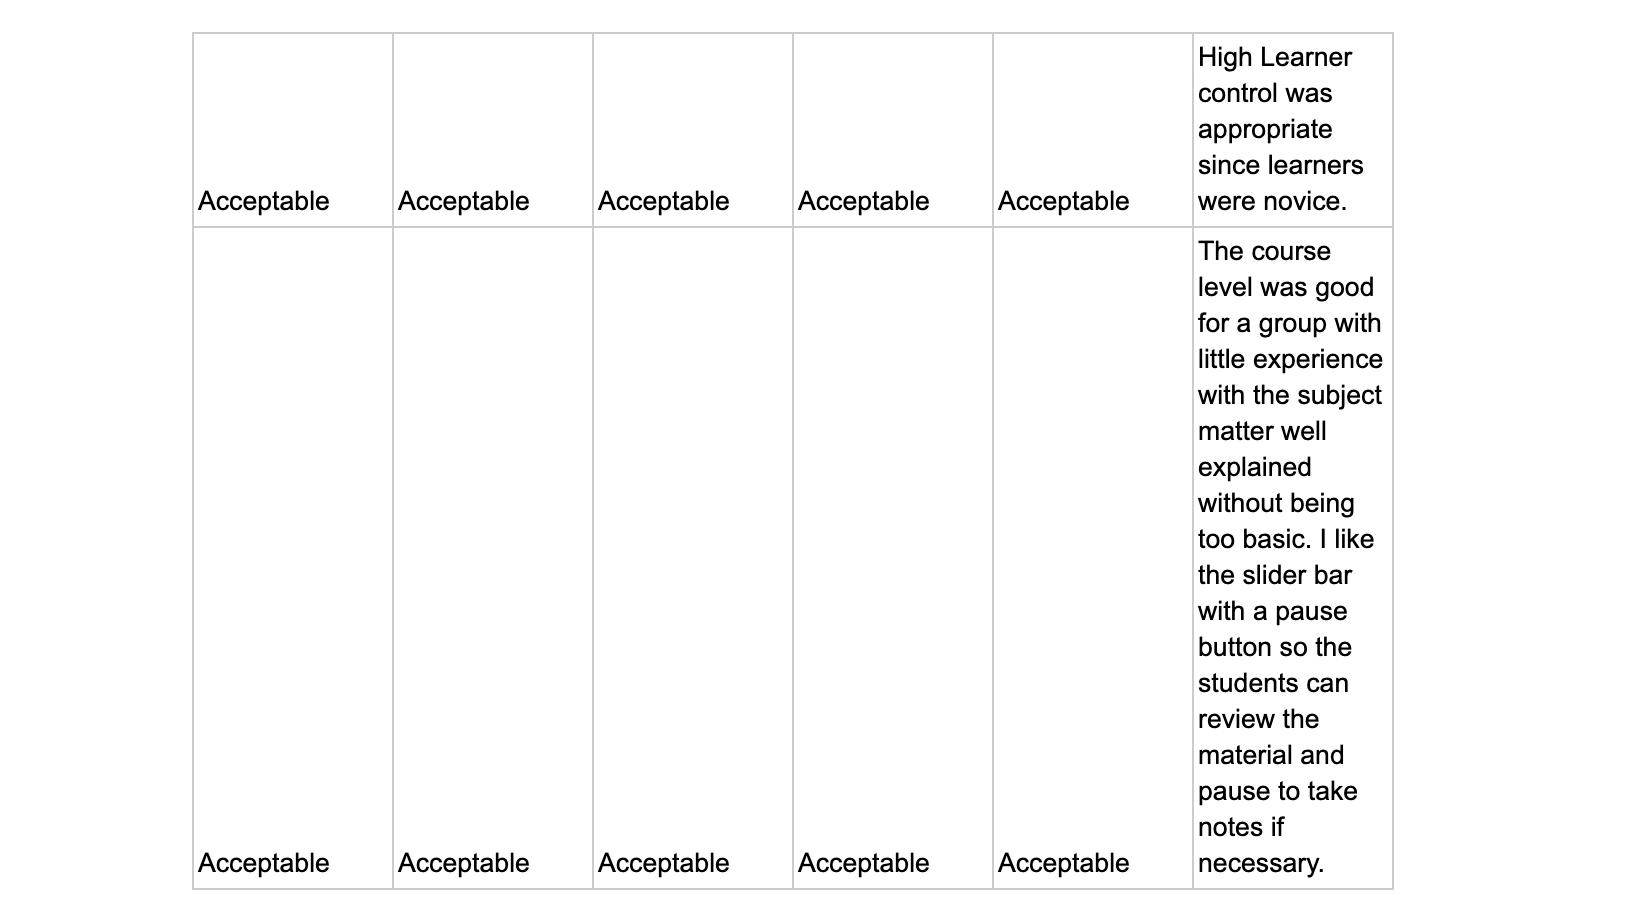
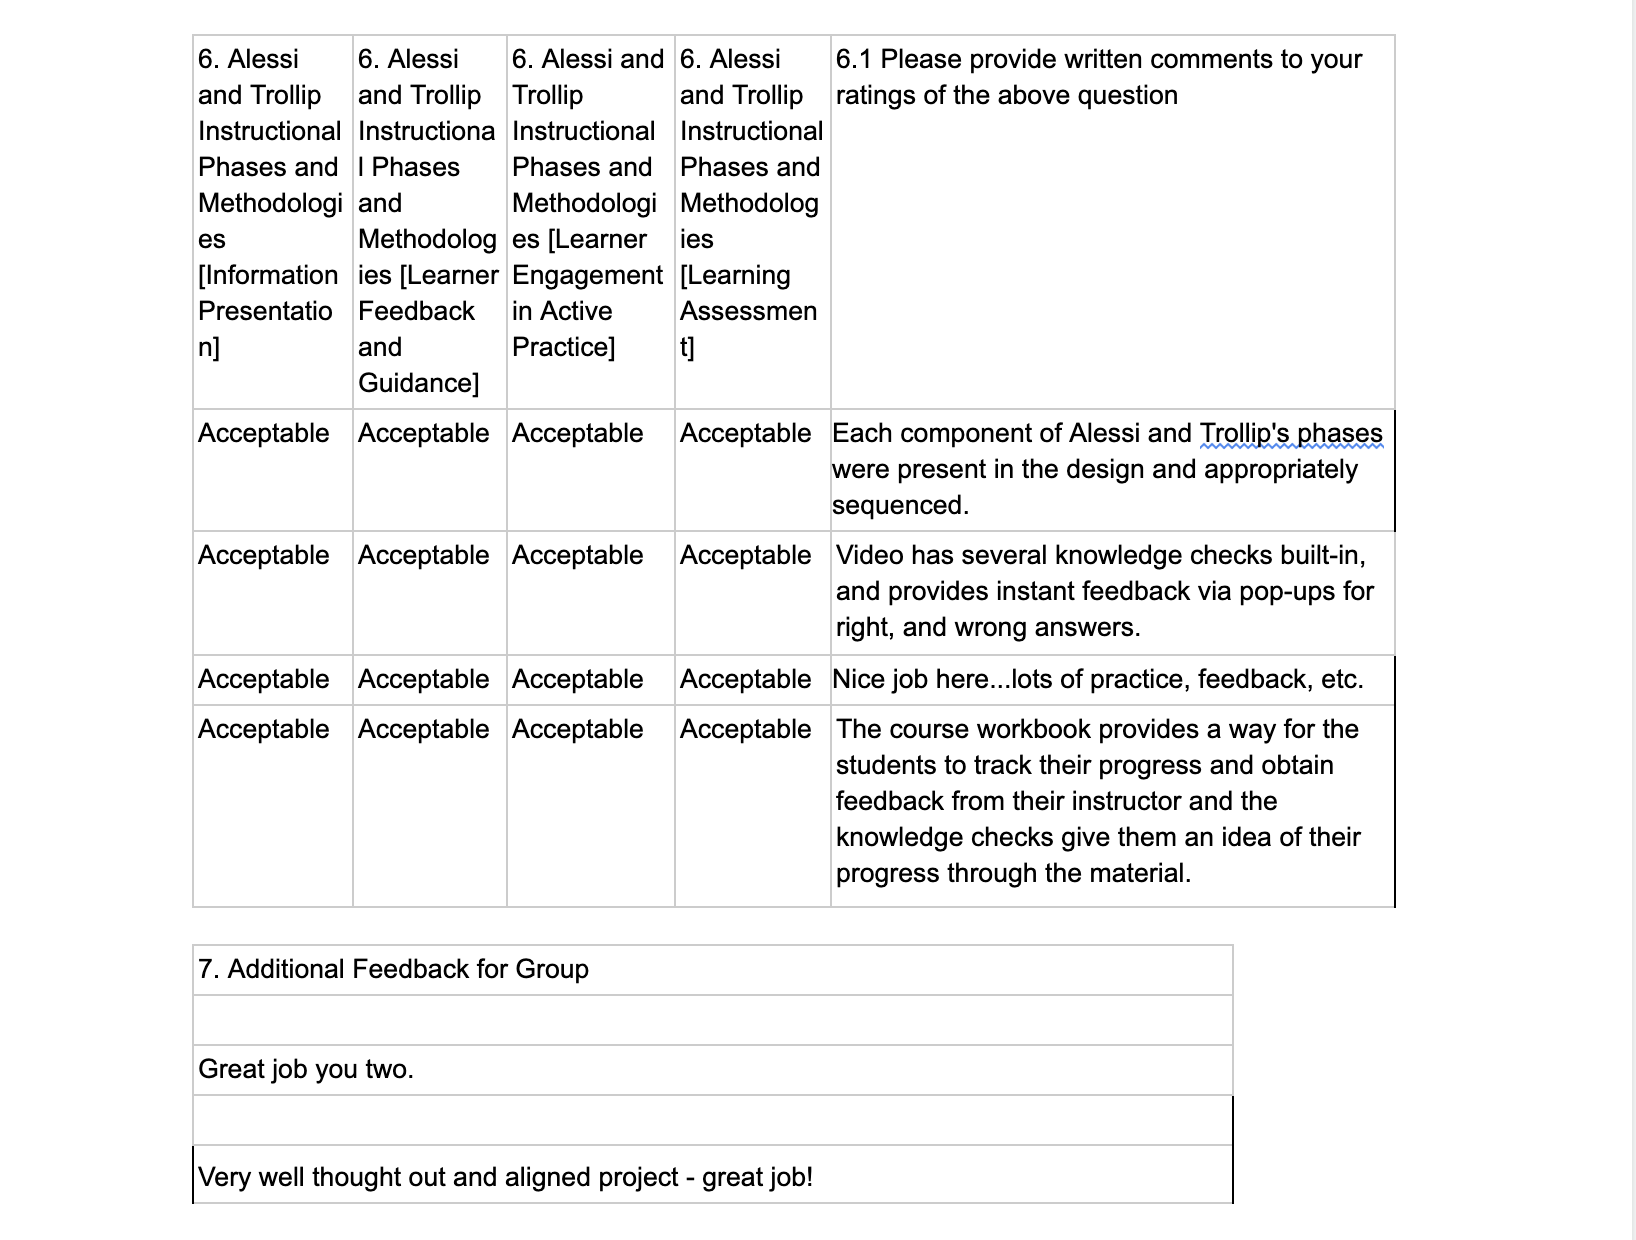
In support of learners who were primarily novices upon the subject, the instructional program was segmented into three distinctive parts in to support the terminal objective of creating a video presentation. The instructional program was segmented into three distinct stages of production as to not overwhelm the learners with new content. This approach was aligned with the work of Clark and Mayer (2016) who shared that “you can help the learner manage the complexity by breaking the lesson into manageable segments—parts that convey just one or two or three steps in the process or procedure” (p. 206). Therefore, the stages of planning, editing, and production were introduced so that the learners could engage new concepts that were broken into manageable chunks, thus reducing the chance of cognitive overload.
The course was also designed to be self-paced in that the learners could engage in instruction at a pace in which they felt most comfortable. The e-Leaning modules are packaged in a manner in which a learner could visit the material, complete knowledge checks, and perform practical application exercises all in an autonomous environment. Using the same e-Learning courseware, the program of instruction could also be facilitated by an instructor as the instructor guide and practice workbook provides the guidance needed to help students progress through the learning modules.
+ Learning Objectives
TERMINAL LEARNING OBJECTIVE
Learning Objective 1
Upon completion of this instructional unit, the learner will identify an introductory framework for producing a video presentation.
ENABLING LEARNING OBJECTIVES
Learning Objective 2
Given an academic scenario that requires a video tutorial, the learner will identify 3 stages for the video production process that lead to the successful production of a video presentation.
Learning Objective 3
Given an academic scenario that requires a video tutorial, the learner will identify 2 procedures for a video planning stage that lead to the successful production of a video presentation.
Learning Objective 4
Given an academic scenario that requires a video tutorial, the learner will identify 2 procedures for a video production stage that lead to the successful production of a video presentation.
Learning Objective 5
Given an academic scenario that requires a video tutorial, the learner will identify 2 procedures for a video editing stage that lead to the successful production of a video presentation.
+ Development Process
This body of multimedia instruction was development using a variant of the traditional “ADDIE” (analyze, design, develop, implementation, evaluate) instructional design model. The project began with an informal task analysis in order to identify the appropriate performance objectives for the course. Additionally, a procedural task analysis was conducted to identify and sequence the steps needed to perform the objectives of the course. The design of the course began with some preliminary instructional mapping as to present a visual of how a learner might progress through instruction. Prototypes were designed through an iterative process that included rough, polished, and versions while receiving feedback at each stage before coming to a consensus on the final prototypes. The same approach was taken with the storyboards until all stakeholders were happy with the look and feel of where the course design was going. Once prototypes and storyboards were agreed upon, content design on individual course pages was initiated in order to facilitate a smooth transition into the development phase. The design phase also included preparing all of the scripts (narration) which would become instrumental for the delivery of instruction during each module of the course.
The design of the course, specifically the video tutorials, utilized a cooking metaphor to help explain the video development process. The metaphor was the concept of preparing a lasagna dish for others. By describing the steps for preparing a lasagna dish in comparison to the steps for creating a video presentation, the learner could make a connection with something they were already familiar with. Connections between the two concepts were made such as identifying who the lasagna dish is being prepared for and identifying who will being viewing the video presentation. This instructional strategy was designed to help the learner make sense of a new concept by comparing it with something they are already familiar with which helps to initiate the schema needed for deeper learning.
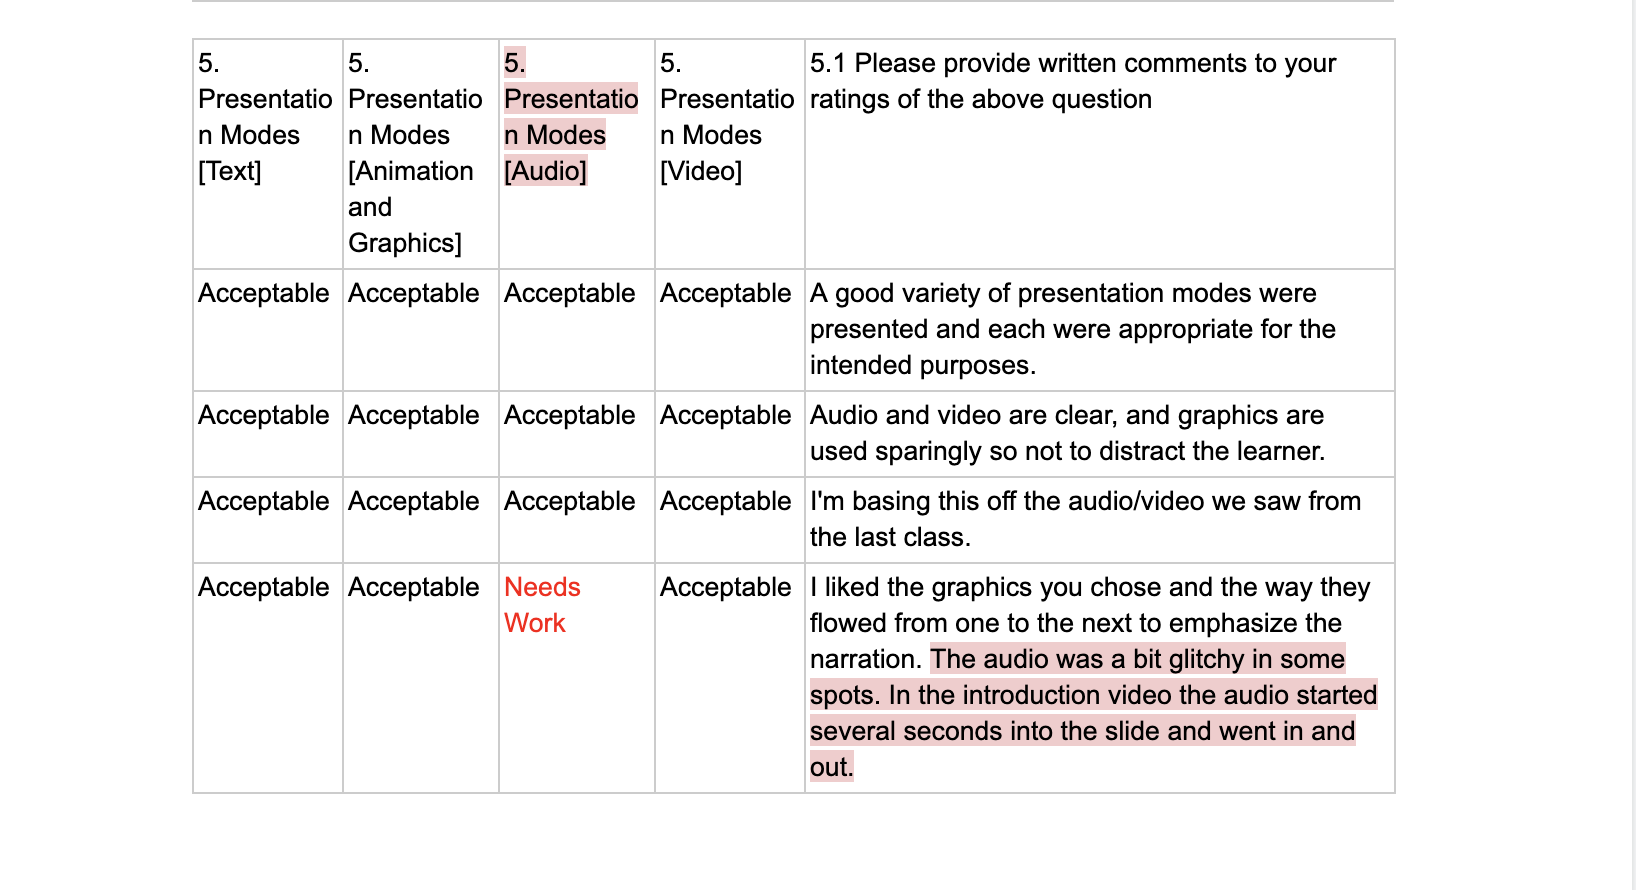
The development phase was the most time intensive as all of the audio and visual (multimedia) elements were being developed for the instructional tutorials. Using the scripts that reflected the key elements of instruction for each learning objective, audio narrations were recorded and edited for inclusion. Video tutorials, which would become the primary vehicle of delivery for the instructional content, were developed using advanced editing software and the same video presentation process as covered in the course. Since most of the instructional content was developed prior to using any authoring software, the process of importing instructional material into the software was streamlined. Using Articulate Storyline 360, instructional modules were created that reflected the development plan as defined earlier in the design document. The development process also included an iterative process between developers as each person had an influential element in the look and feel of the course. A polished instructional product was then published in web packaging for distribution, implementation, and evaluation.
Once a polished instructional product was developed in the authoring software, implementation was initiated with the customer. The product was shared with the primary facilitator of the course so that all of the instructional insights of the course could be shared. Sharing the product with the primary facilitator was enlightening because of the feedback from a different perspective, but also because it provided an opportunity for buy in which is critical to product implementation. This element of implementation also served as an opportunity to see how the course functioned without the knowledge of the design measures. A small group of target learners were used to conduct some pilot testing which resulted in positive feedback as well as the identification of some minor changes. The feedback from the course facilitator aligned with some of the comments from the IDT 7/851 class when the course was shared for some formative evaluation. The formative feedback from the class presentations was instrumental in making some final design decisions. All of the formative evaluation feedback was collected and analyzed and worthy recommendations were implemented into the final product of the course.
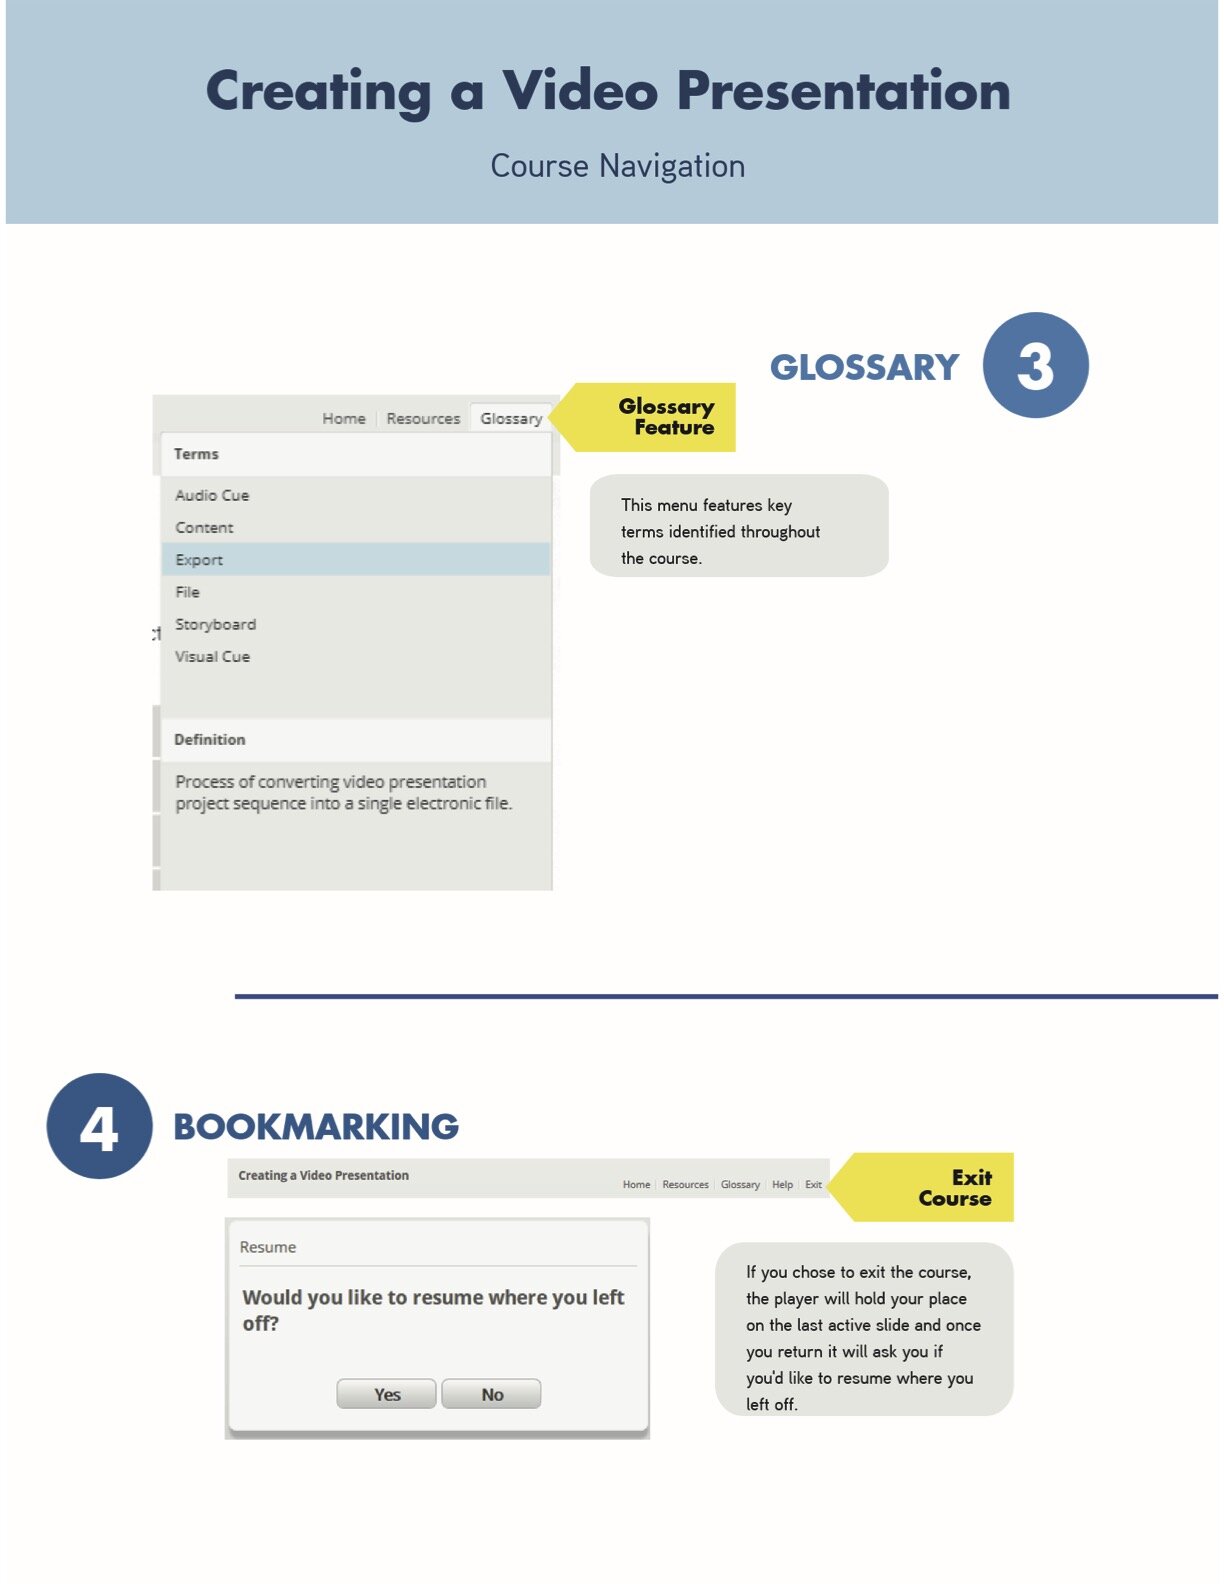
Invisible Features
The design and function of the multimedia course is relatively transparent other than the sequencing of the instructional content. Understanding that the majority of the material is new to the learners, the design of the course restricted some level of learner control. This design approach is consistent with the research of Clark and Mayer (2016) who shared that “one of the most consistent research findings is that learner control has little positive bene t for novice learners” (p. 327). This approach was paramount to ensuring that the learners engaged with the content in a sequence that makes sense and does not promote cognitive overload with essential processing. Other elements of learner control were facilitated as the multimedia course does allow for learner control over pacing and access to resource. Although these design decisions are invisible to the learners, they were utilized so that learners could revisit the material as much as necessary while conducting practical application of what they have learned and with all of the resources needed to be successful with learning transfer.
+ Additional Methodology
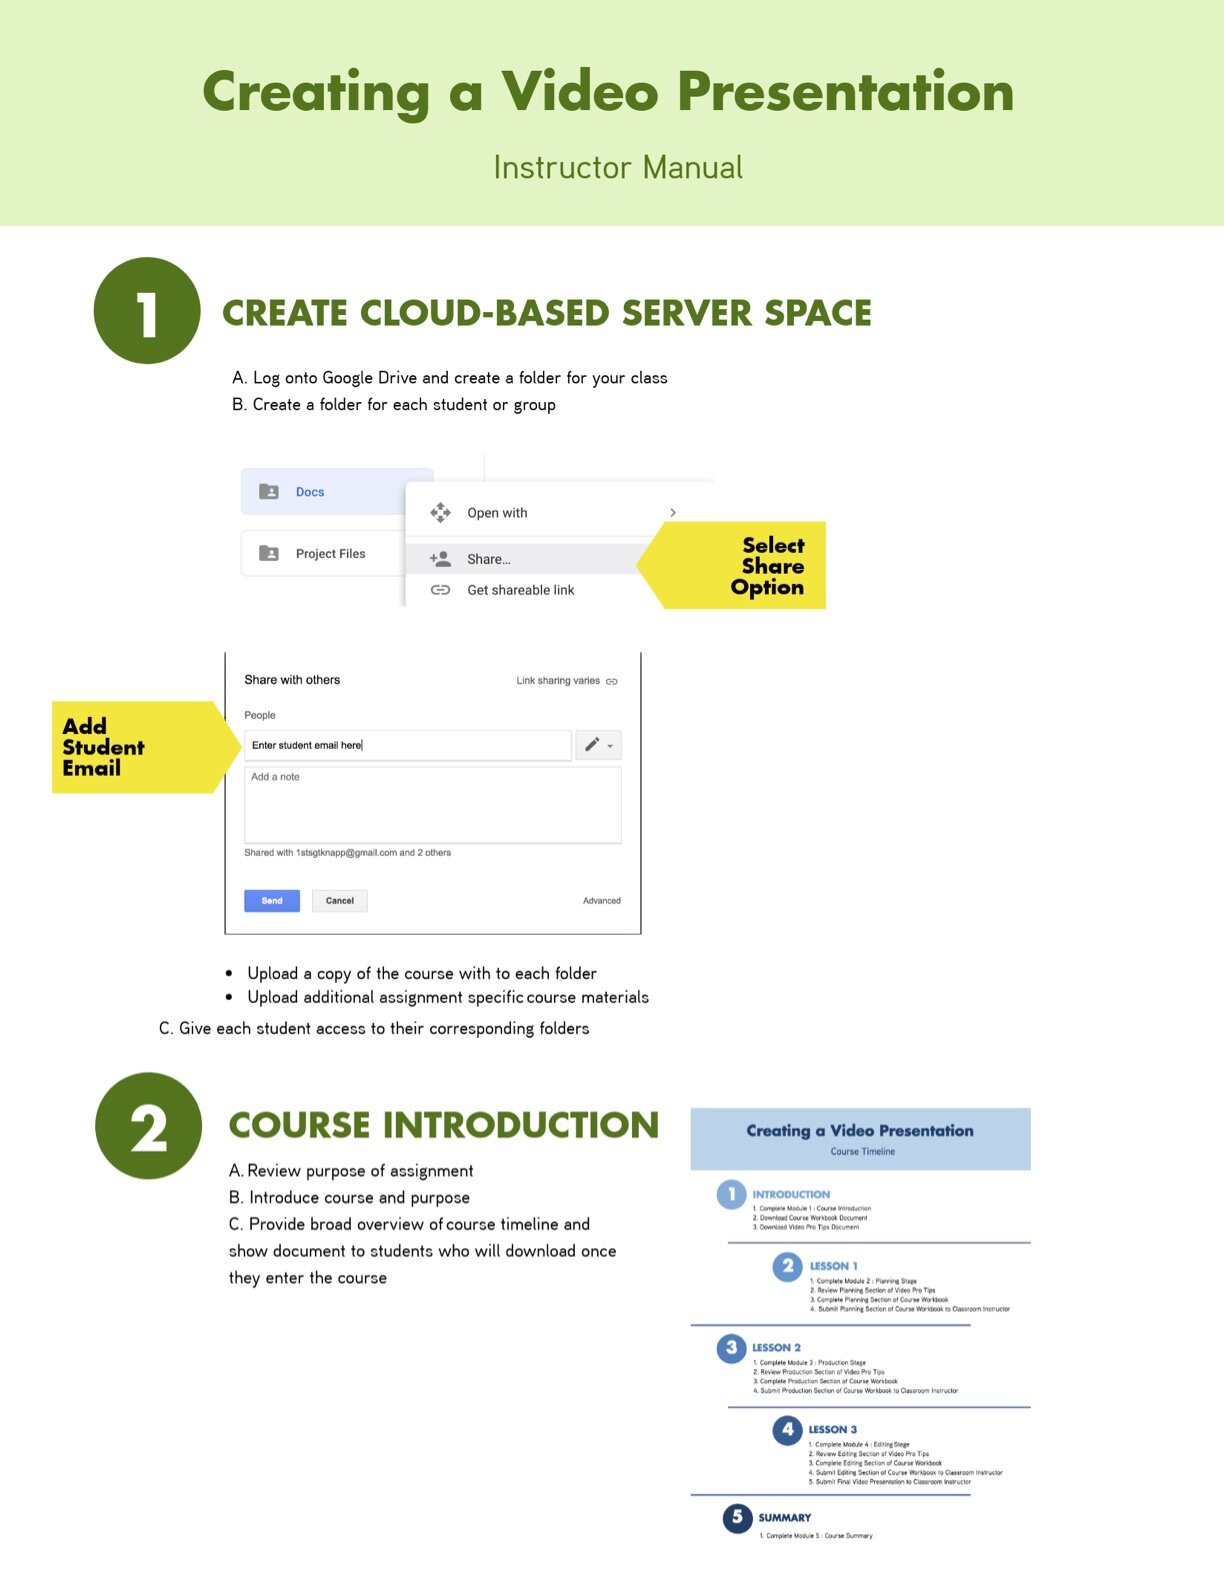
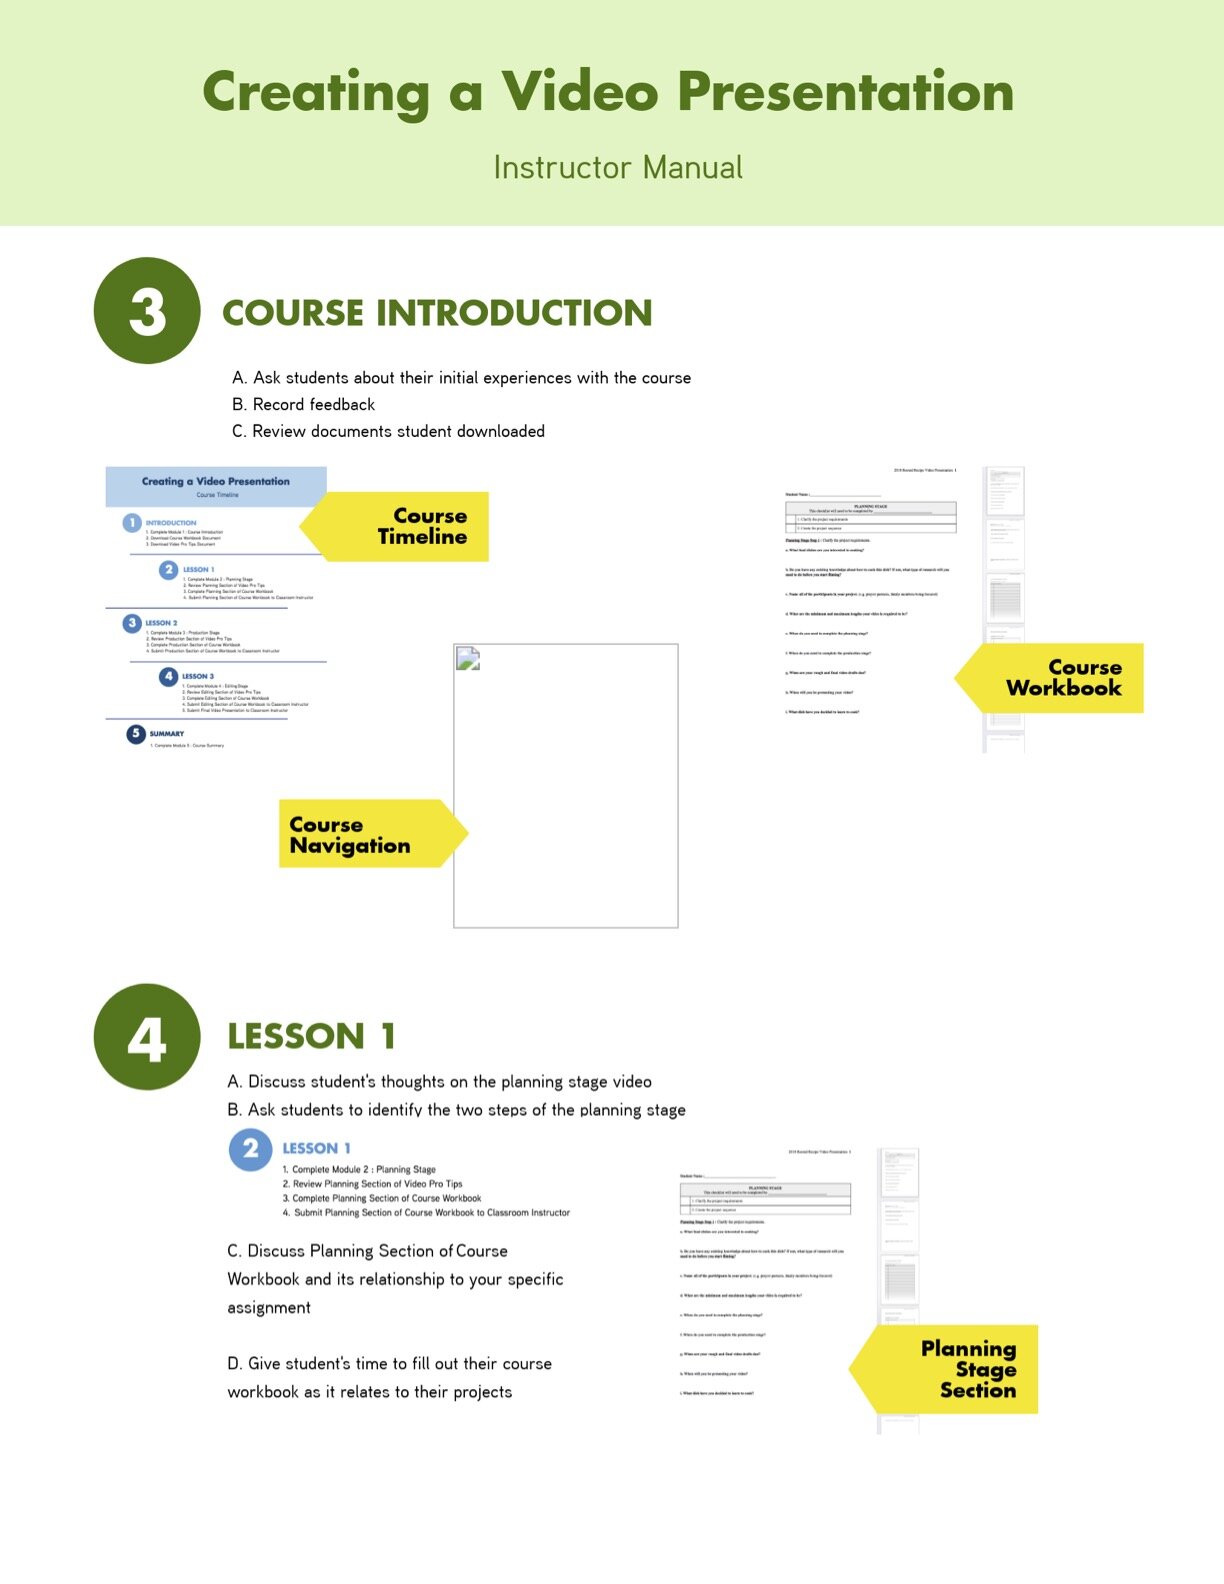
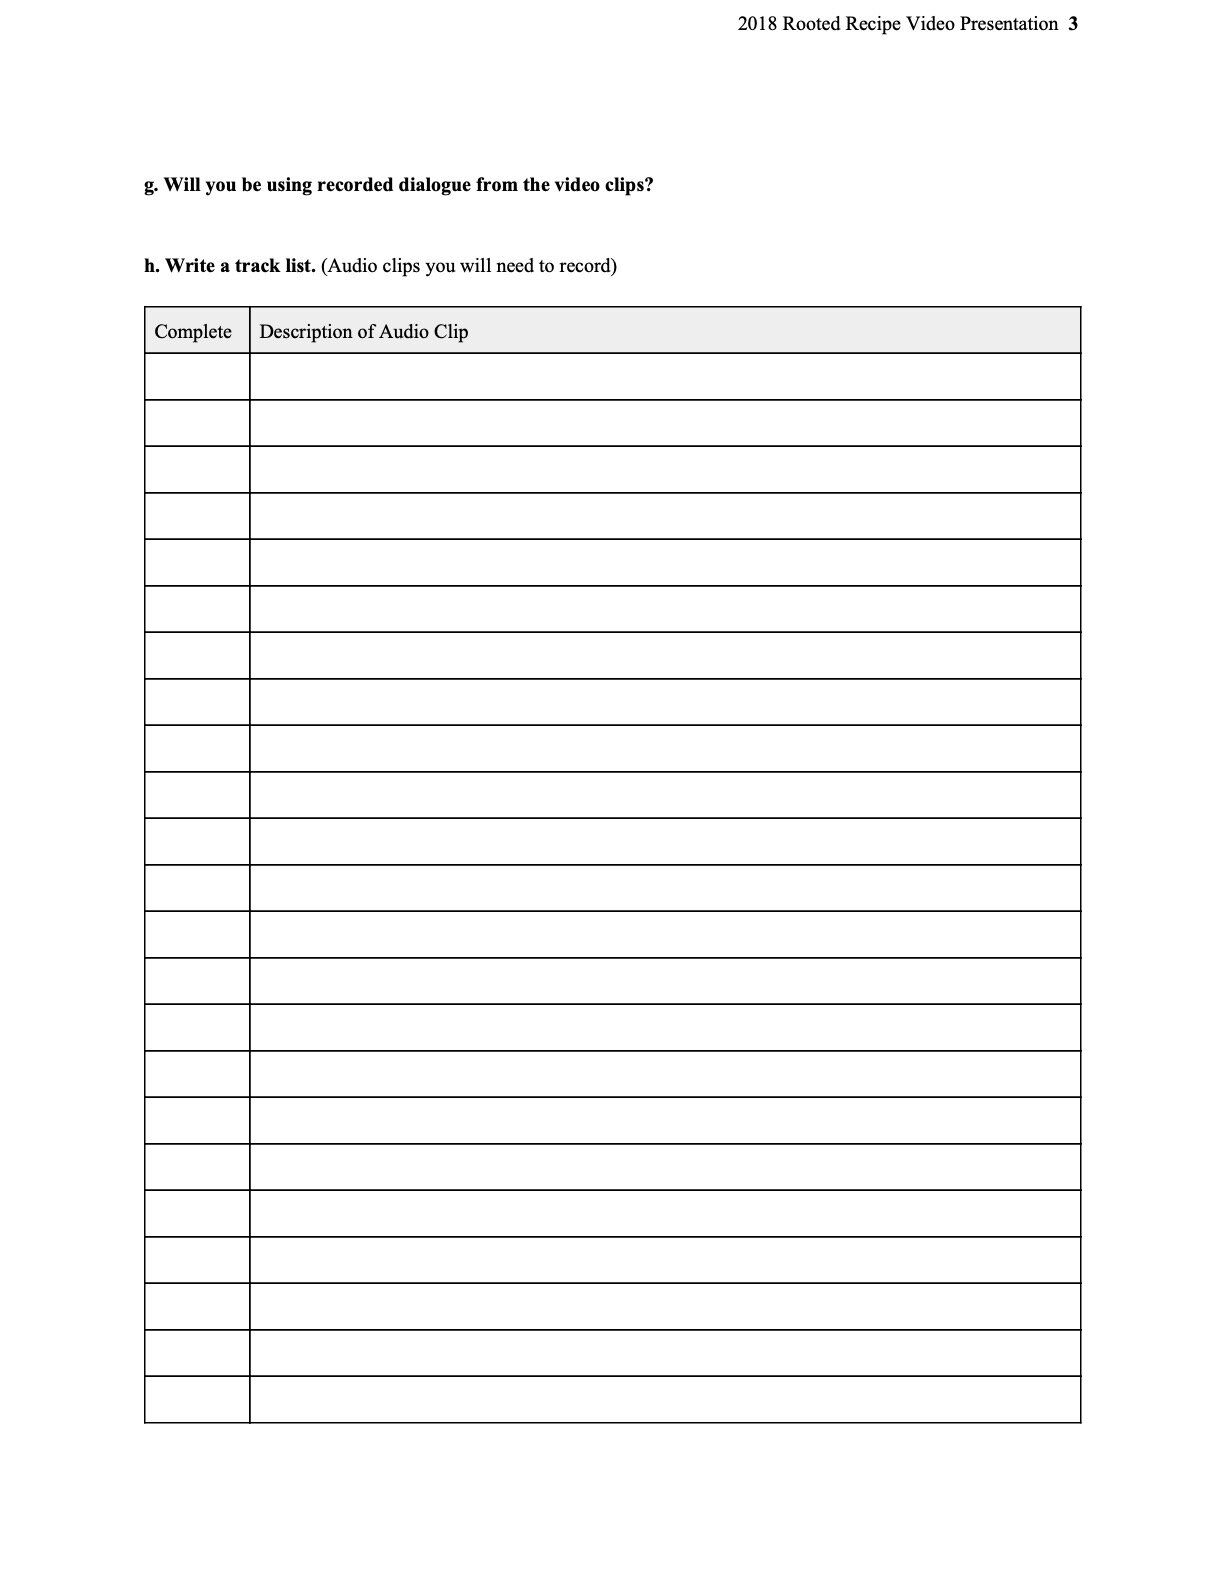
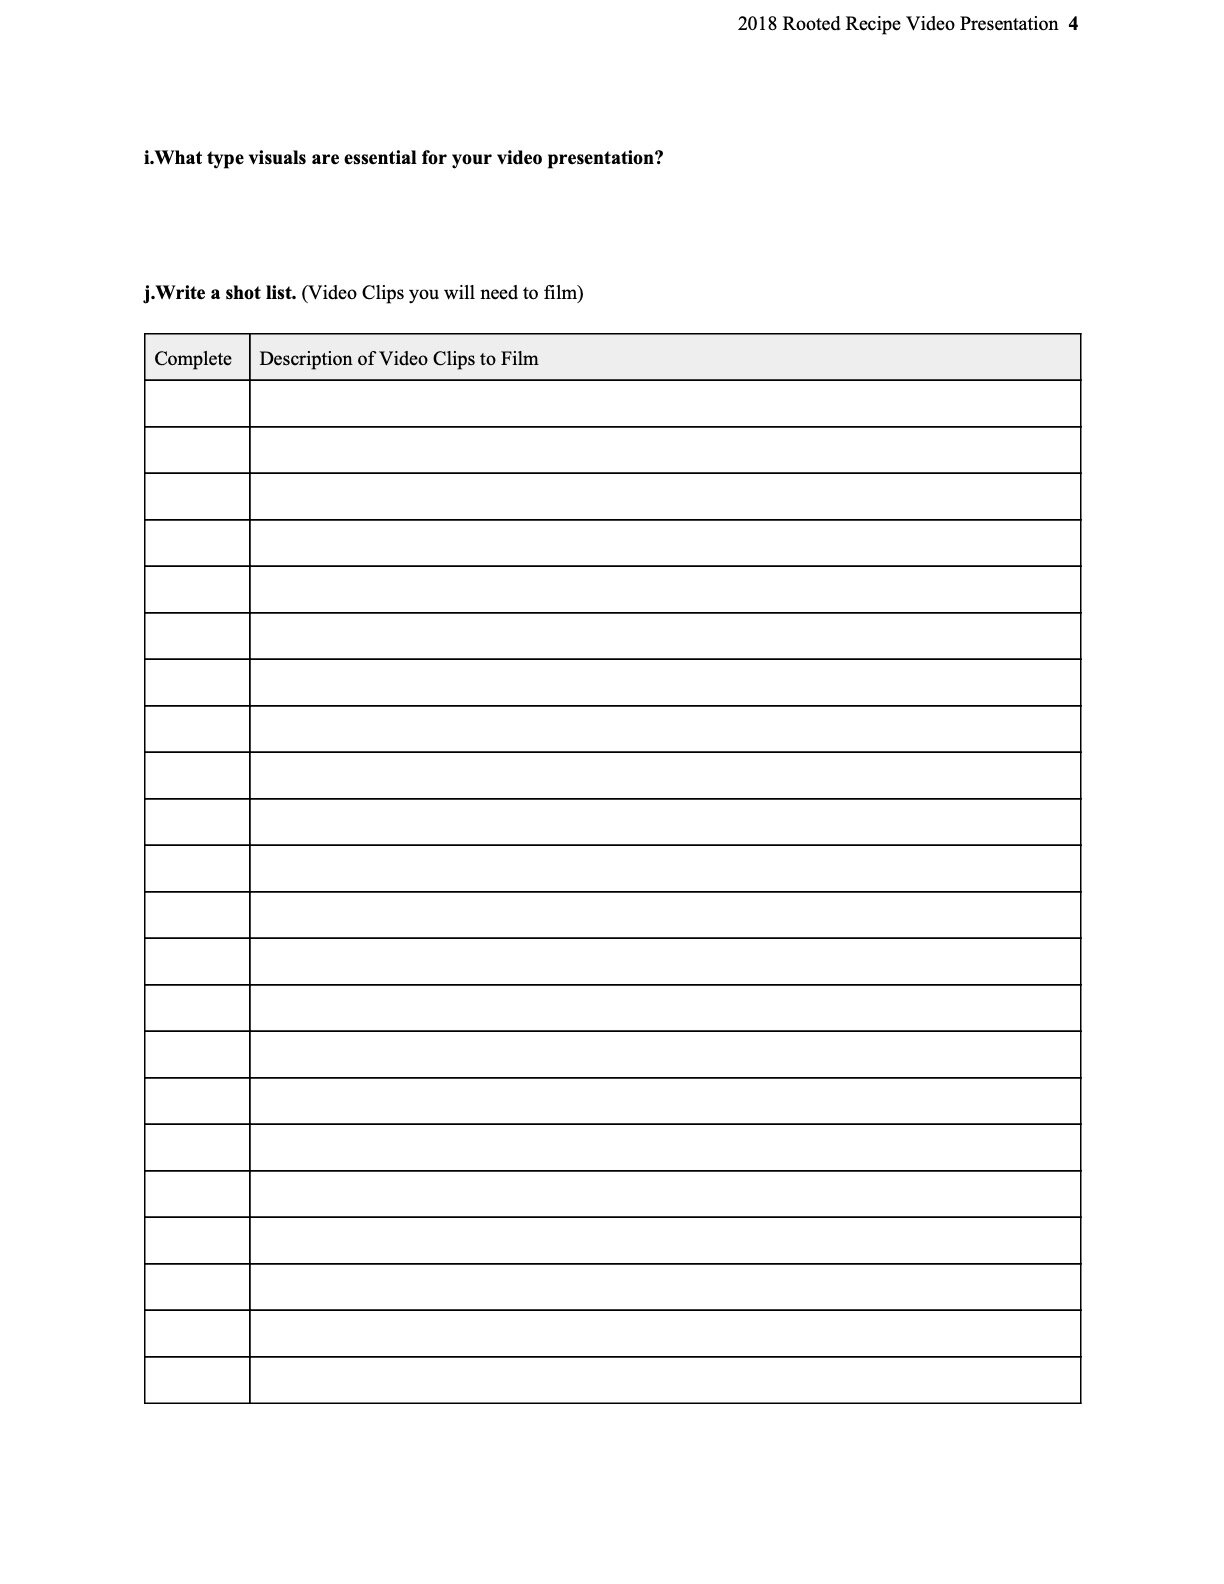
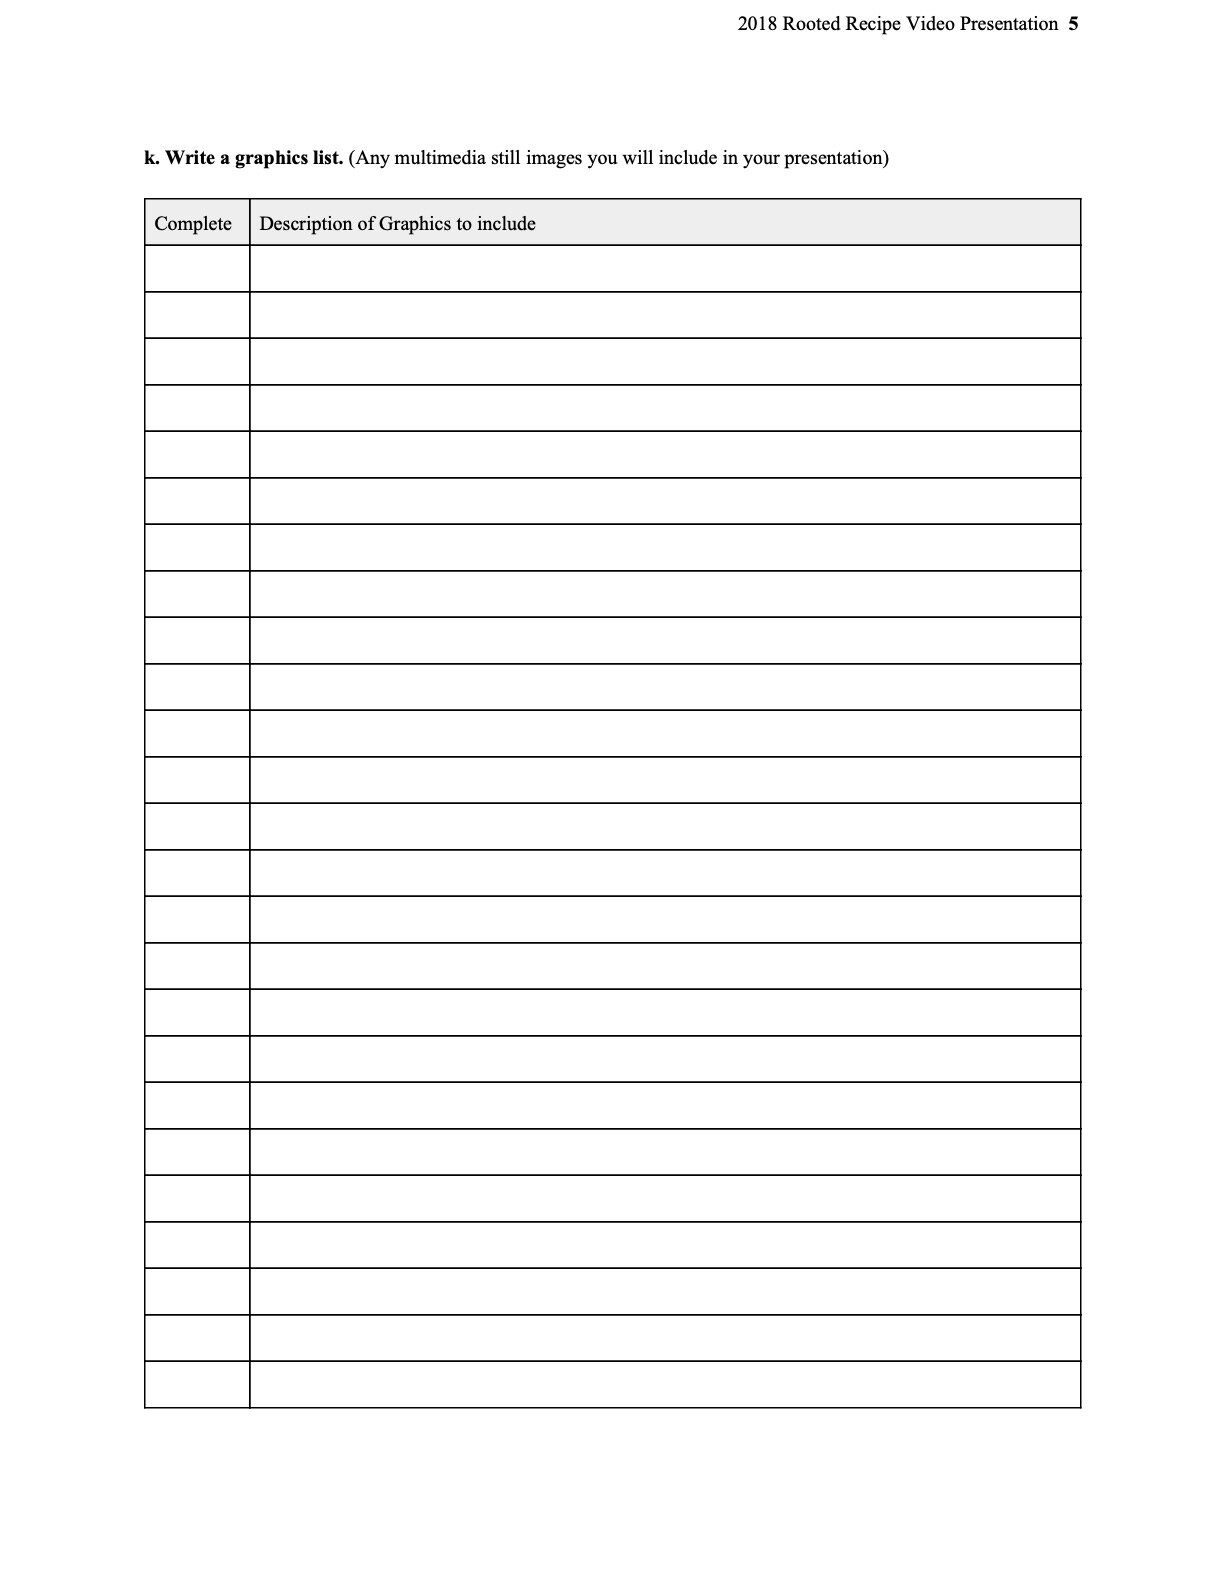
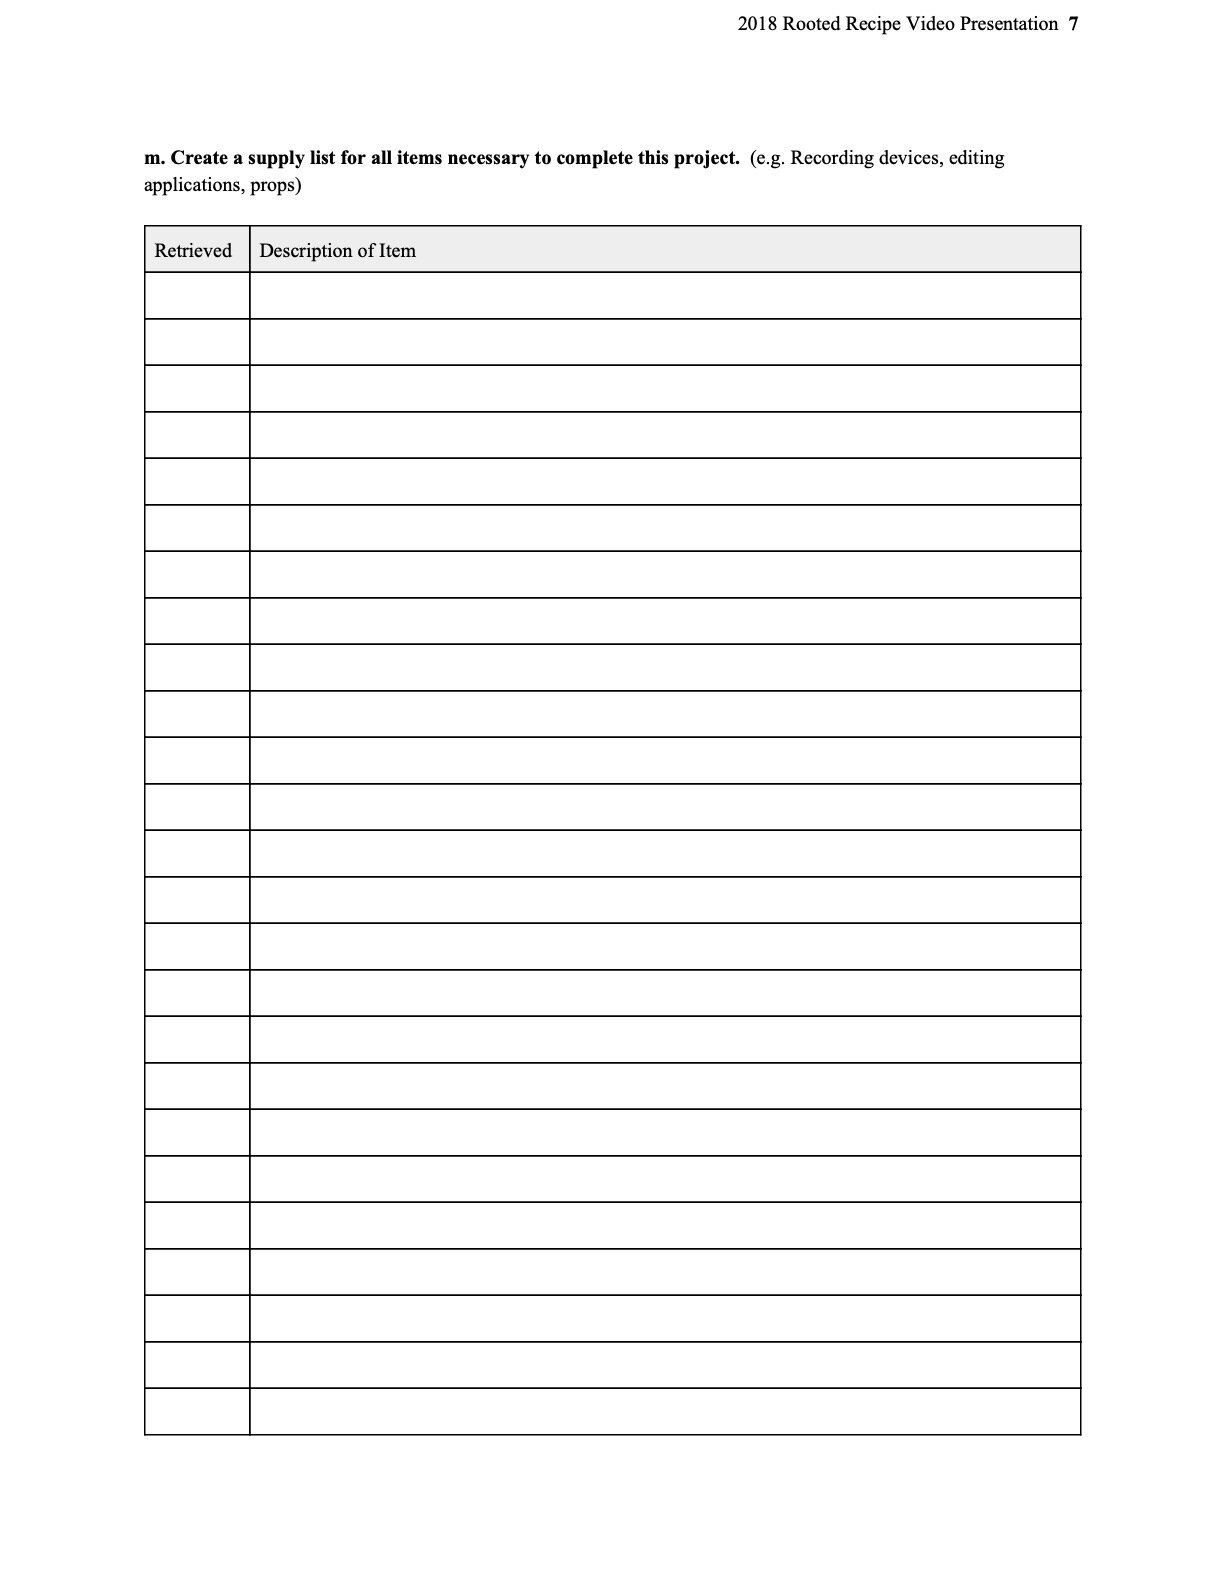
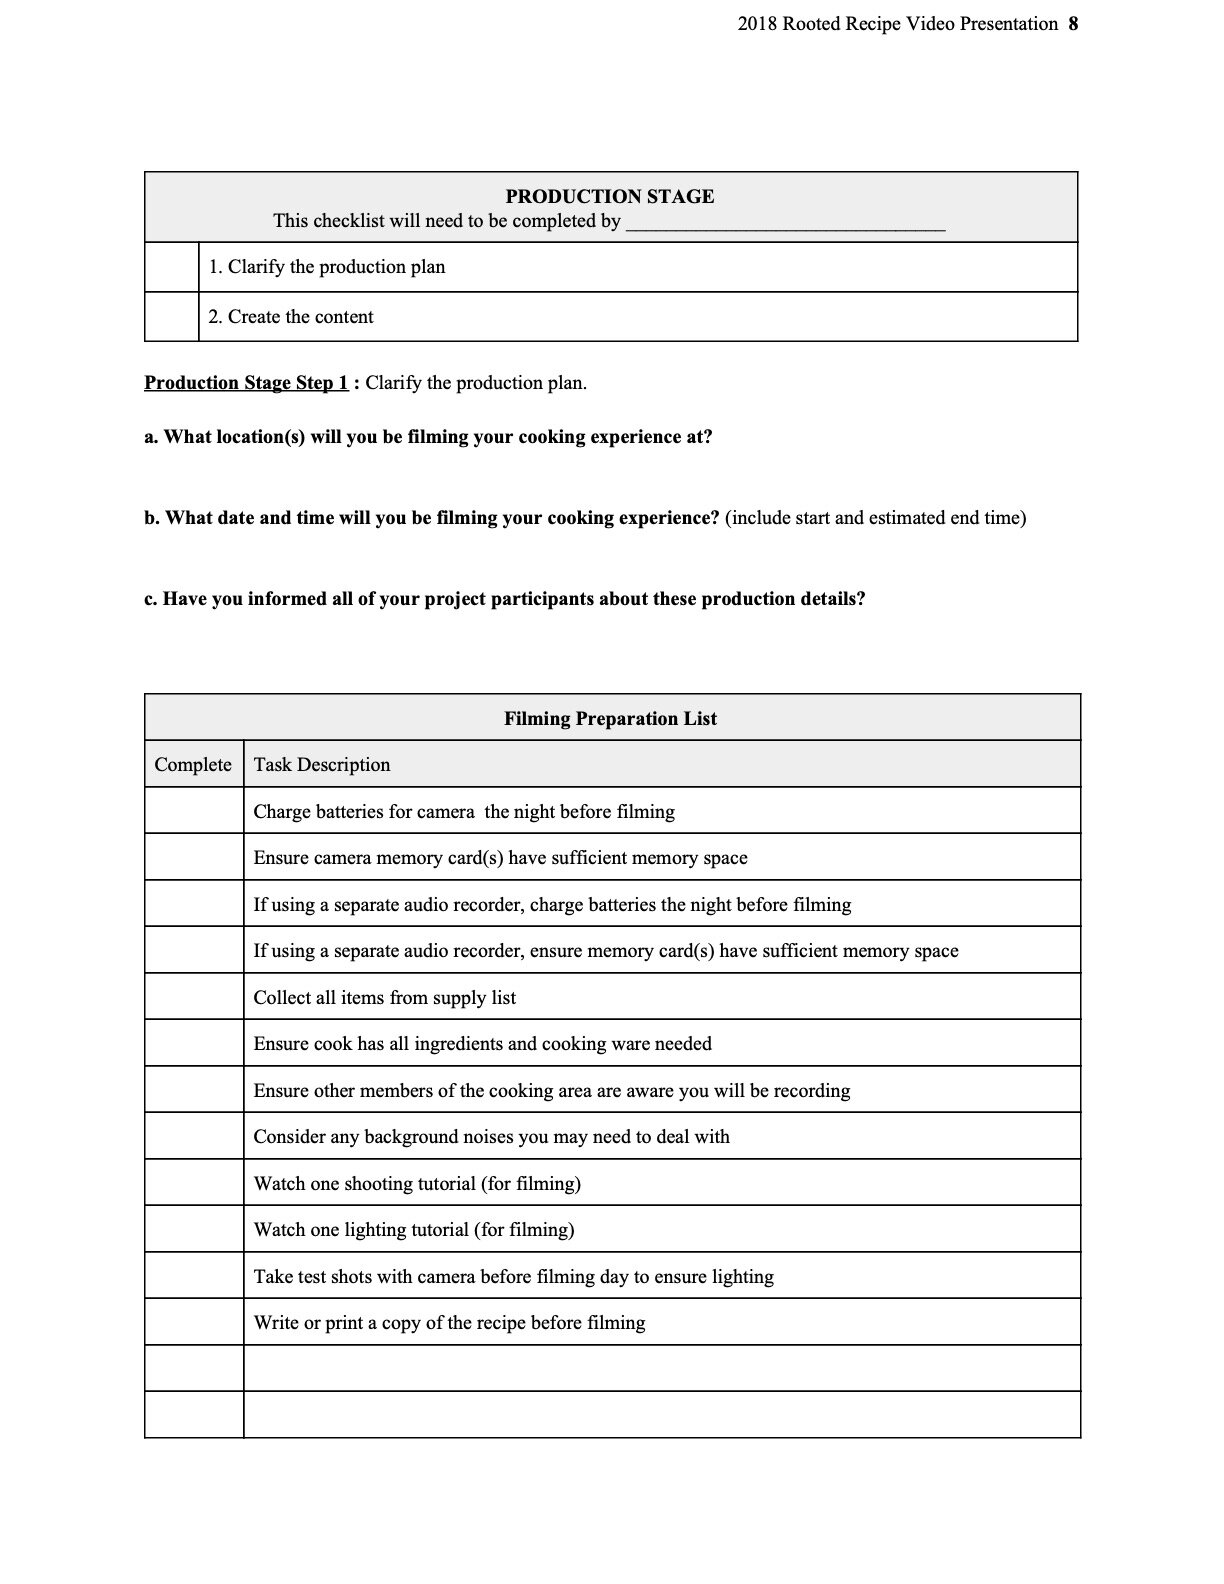
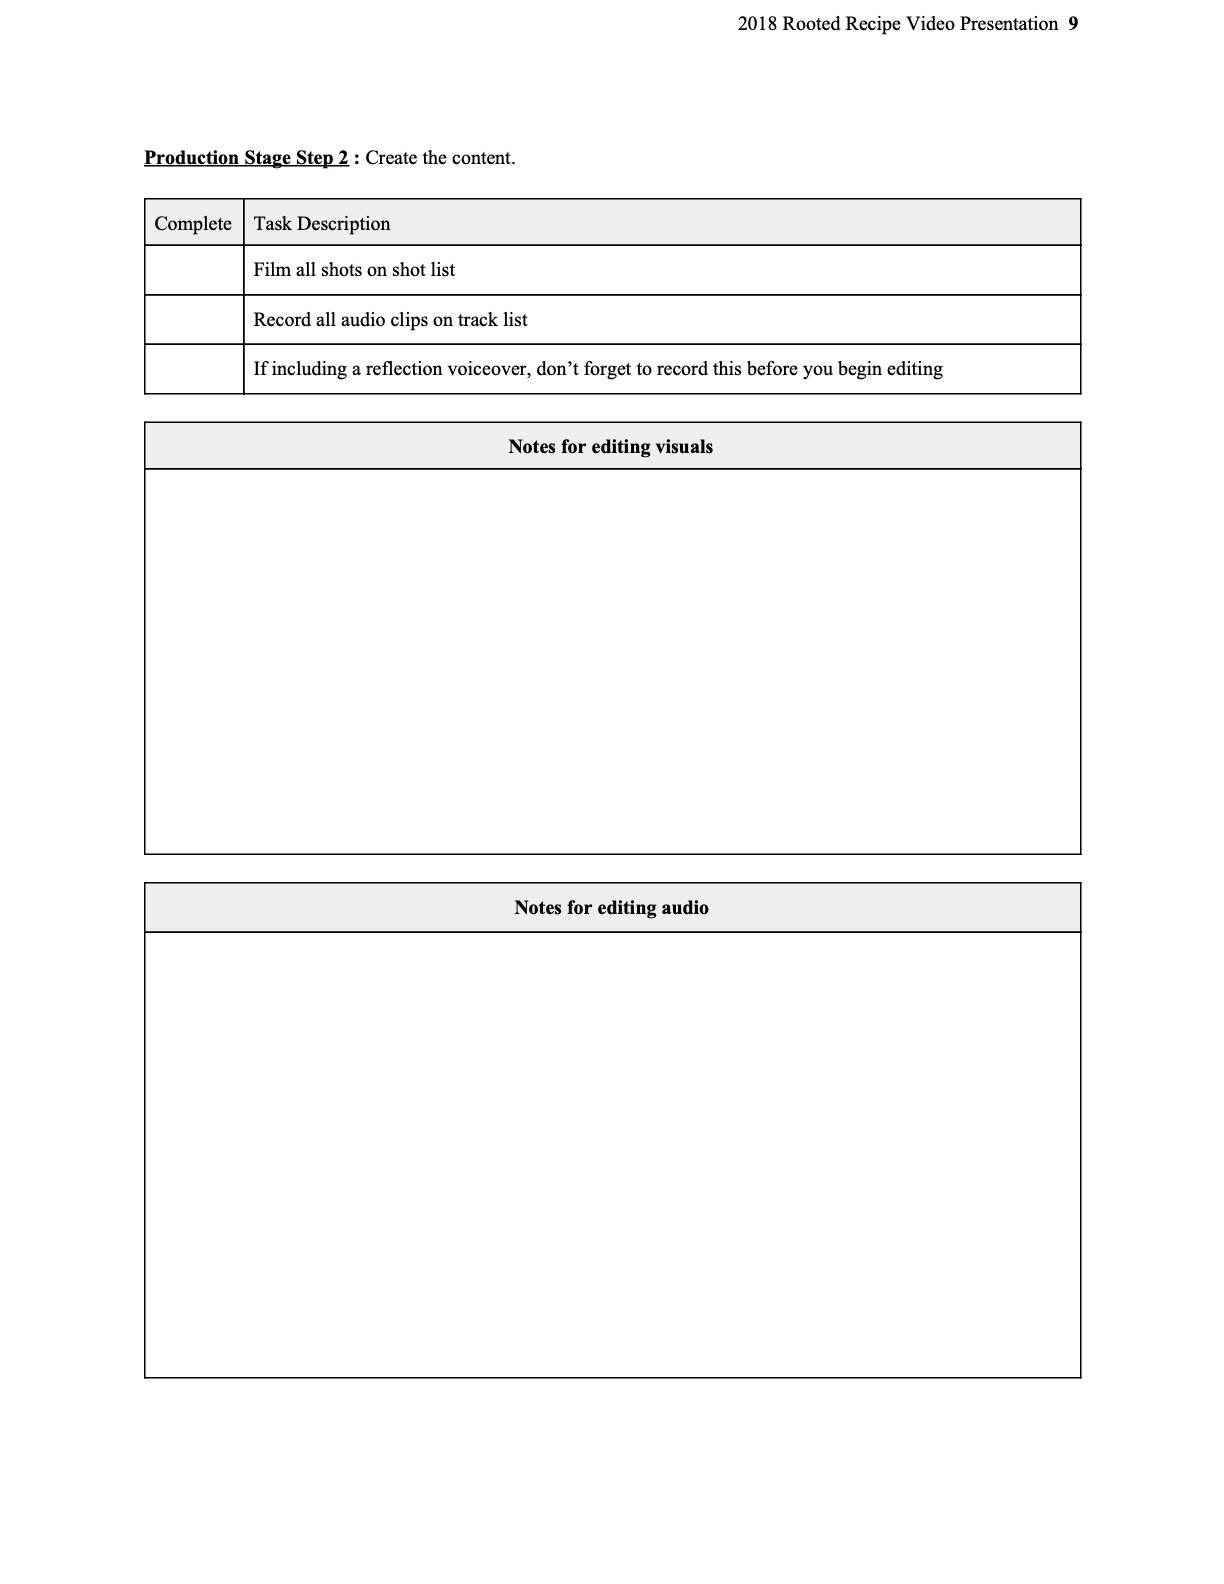
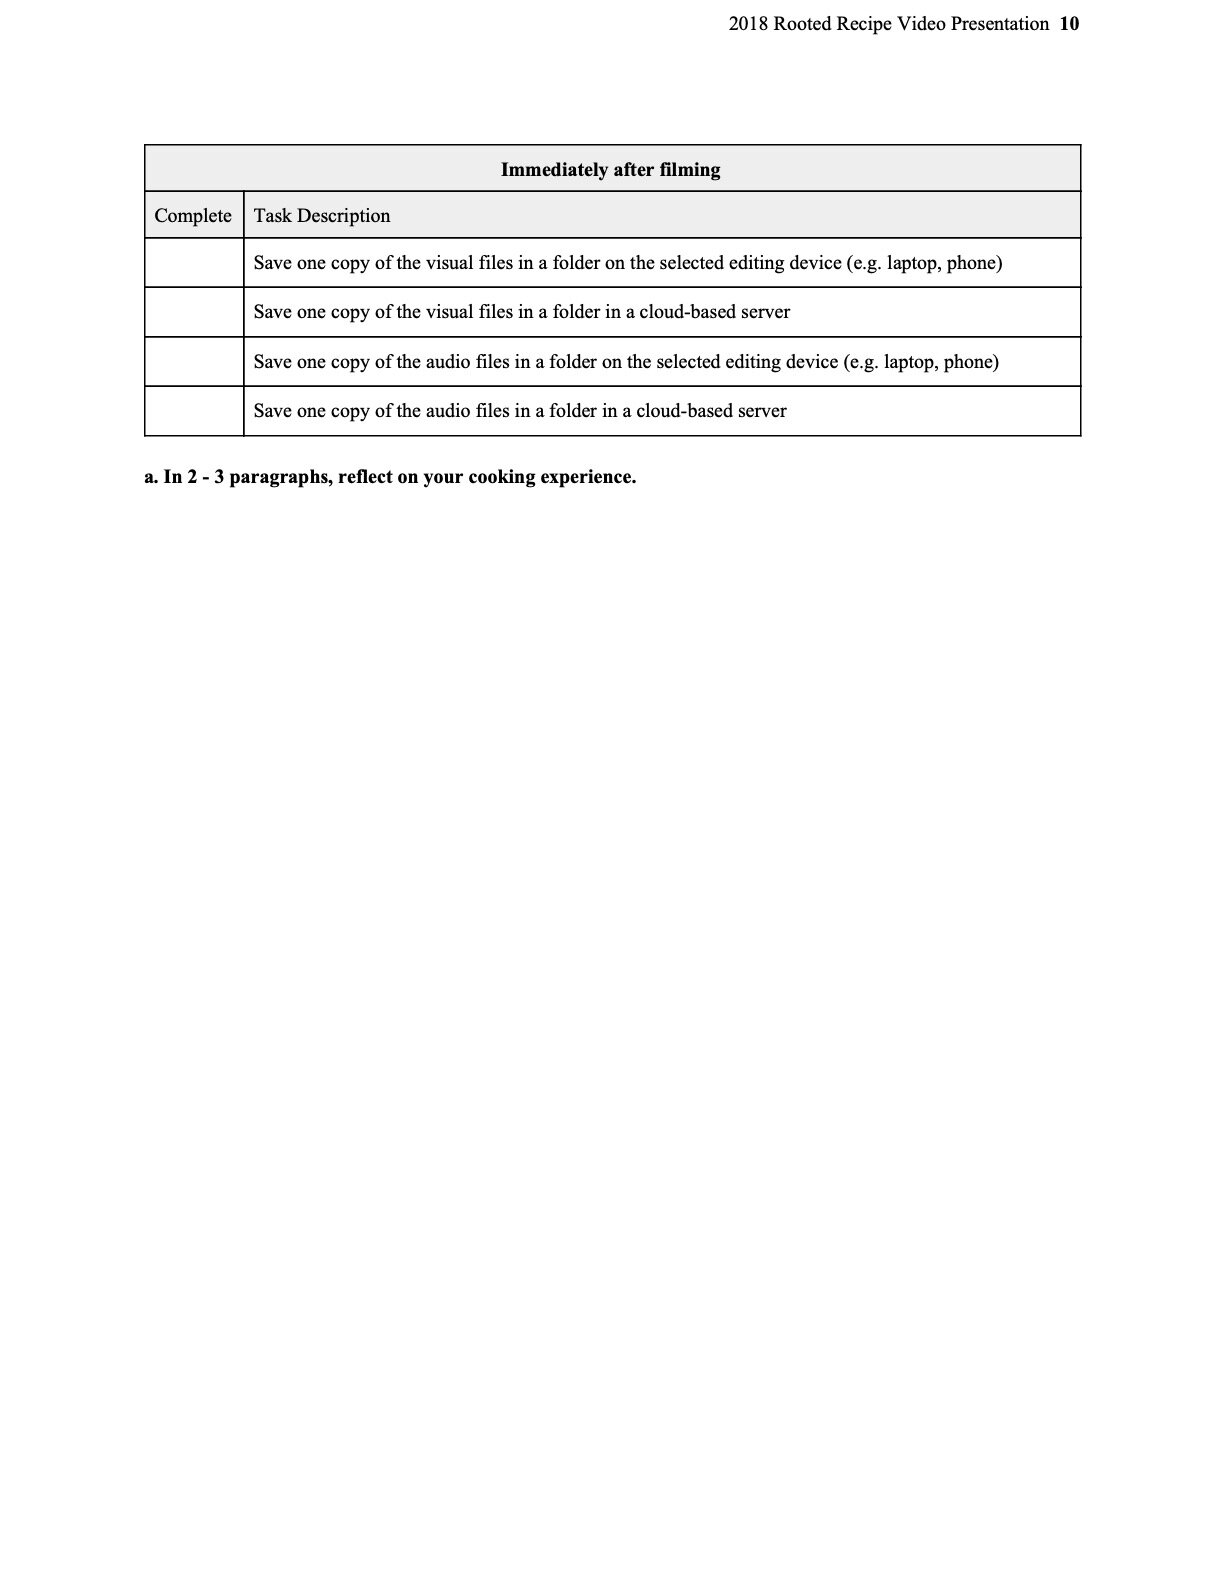
Video Production requires complex processes that are most frequently taught through hands-on training. For the purposes of this project, our instructional unit will present an overview of six introductory procedures for our students. As a reminder, our learners will be viewing our modules as they approach each phase of production as opposed to watching it in one sitting. We have developed an advanced graphic organizer which the students will download to their google drives, a cloud-based server, and fill out as they follow along with the modules. The organizer will also act as an instructional aid for the students during their application exercises. This instructional aid will include a series of checklists that correspond with the requirements of each phase of production. The requirements will be described through text and applicable graphics will be provided as examples so that the learners can evaluate their progress during the application exercises. The use of this additional methodology will allow the learners to self-assess and receive feedback from their instructor by sharing their progress as captured on the instructional aid checklist.
The students use google drive throughout the school year and are familiar with google drive applications. Completing the worksheet on google docs will support the collaborative nature of their projects, safeguard them from losing files, and will allow them to incorporate different types of media into their organizer such as photos or hyper links to reference material. This feature will also allow them the convenience of editing their document from multiple devices. For example, the students can use their phones to edit the organizer in case they forget to bring their chromebooks to the video shoot.
+ Additional Design Notes
INSTRUCTIONAL PROBLEM
This computer-based multimedia instructional unit will introduce upper-level high school students to a set of introductory procedures for producing a video presentation reviewing a topic assigned by their classroom instructor.
CONTEXT / LEARNERS
- Social Studies Teacher, Rooted Recipe Video Assignment
- HS students (Net Generation, constantly exposed to multimedia content)
MESSAGE DESIGN
- Articulate Storyline
- Less learner control, guide the novice learners
- Design to age level attention spans. Simple designs, avoid extraneous material
GENERATIVE LEARNING STRATEGIES
- Graphic Organizer (organization & integration strategy)
- Learning at the moment of need & Module assessments (Recall)
- Sequencing procedures for rehearsal
CONTENT PRESENTATION/SEQUENCE OVERVIEW
- 6 separate, 10 minute modules
- Reviewing relevant information in sequence with assignment deadlines
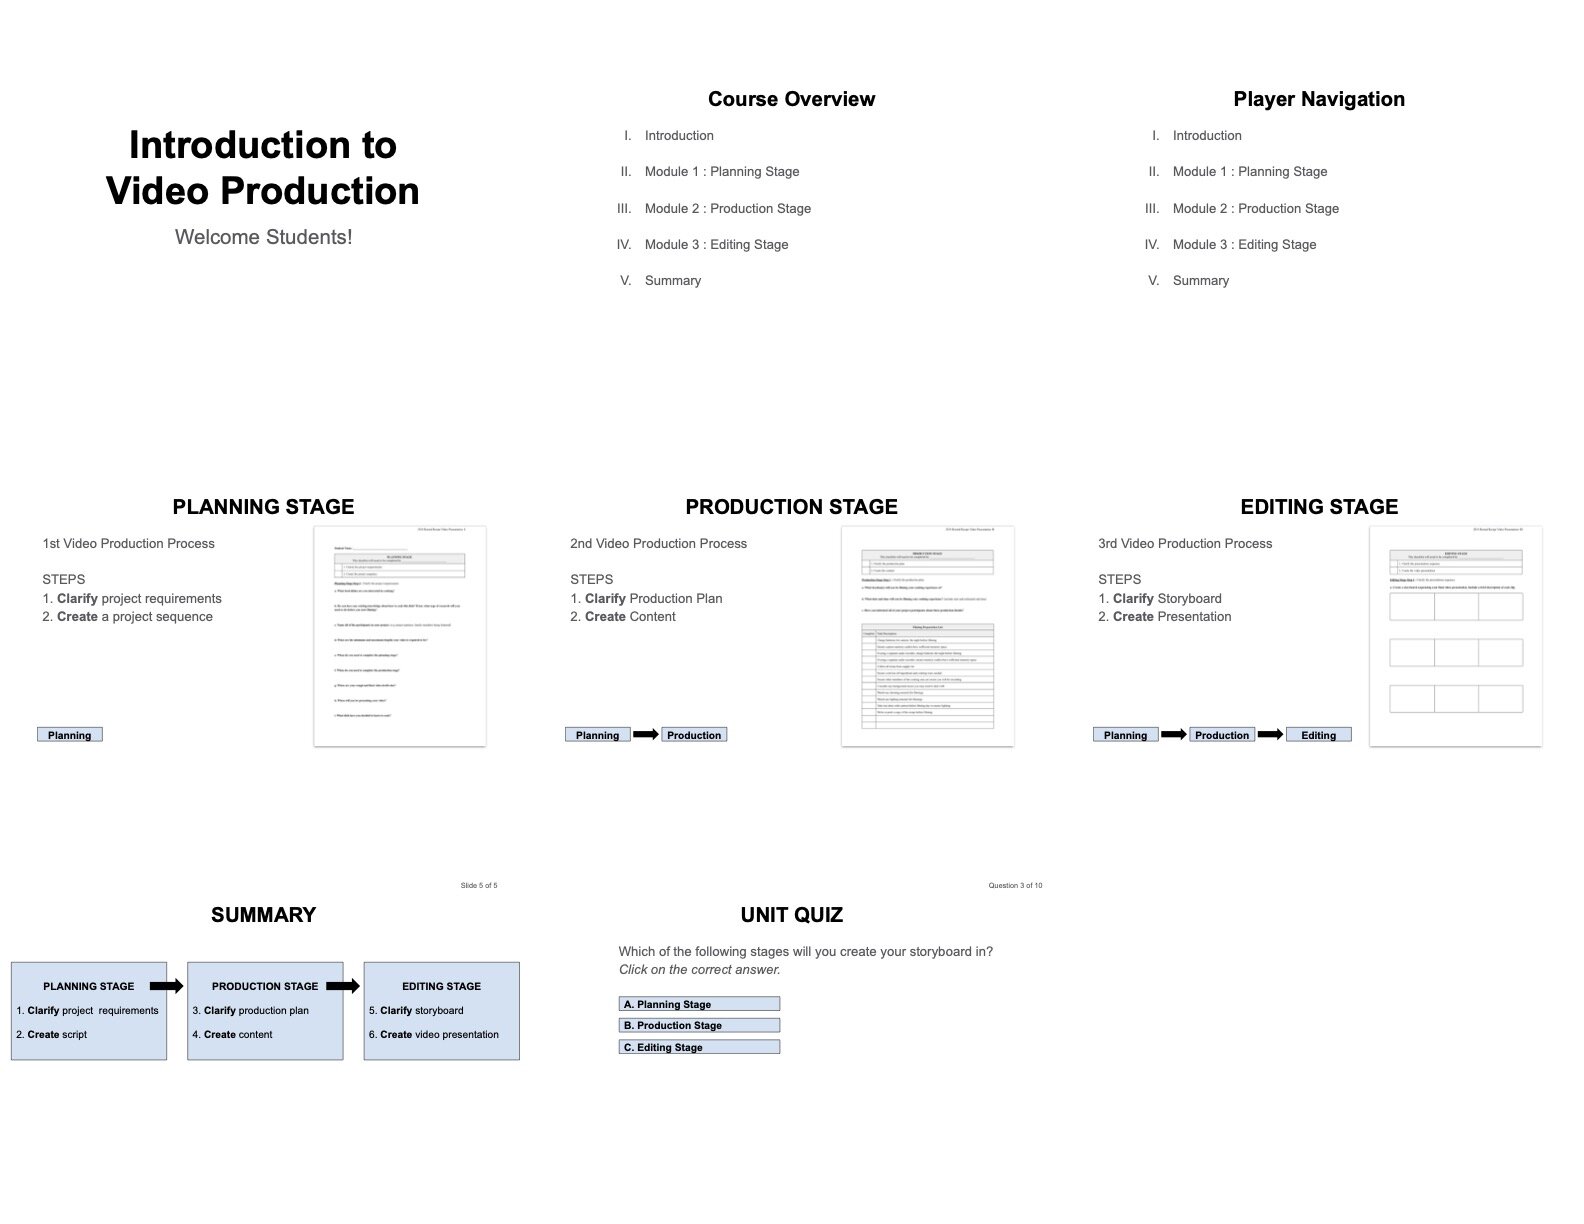
- Introduction Module
- Introduce course
- Provide course overview
- Identify navigation elements
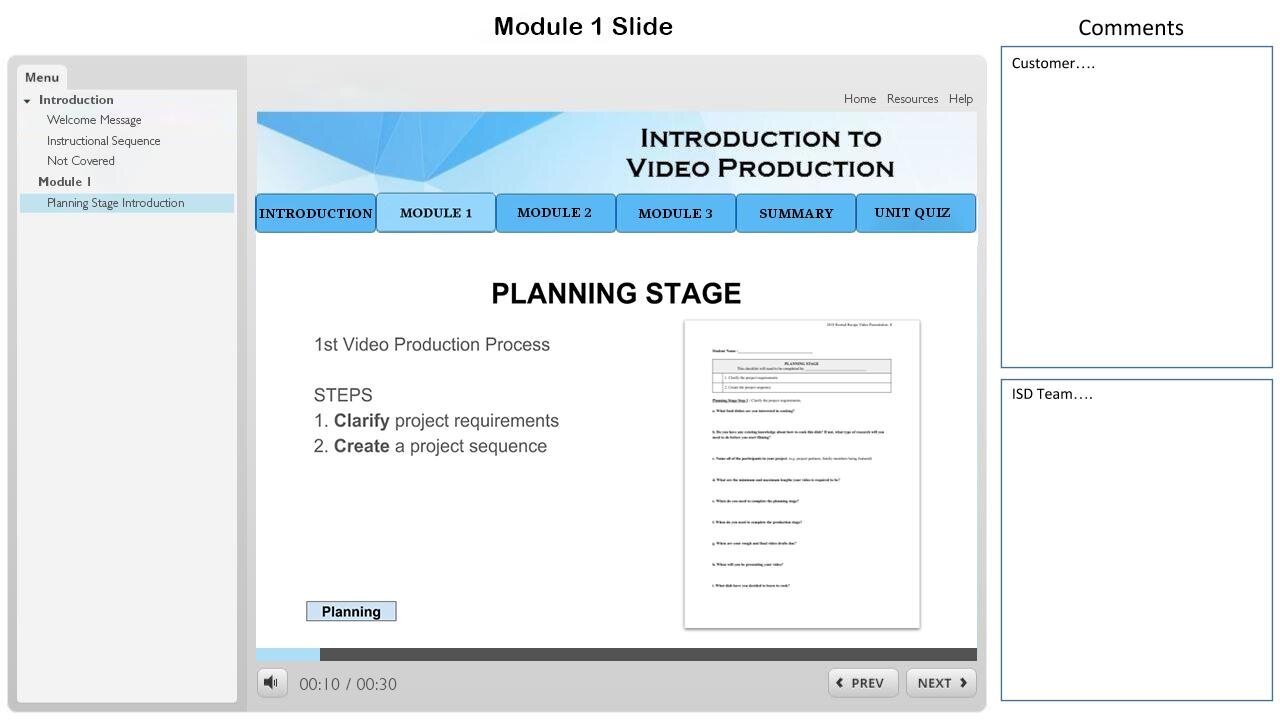
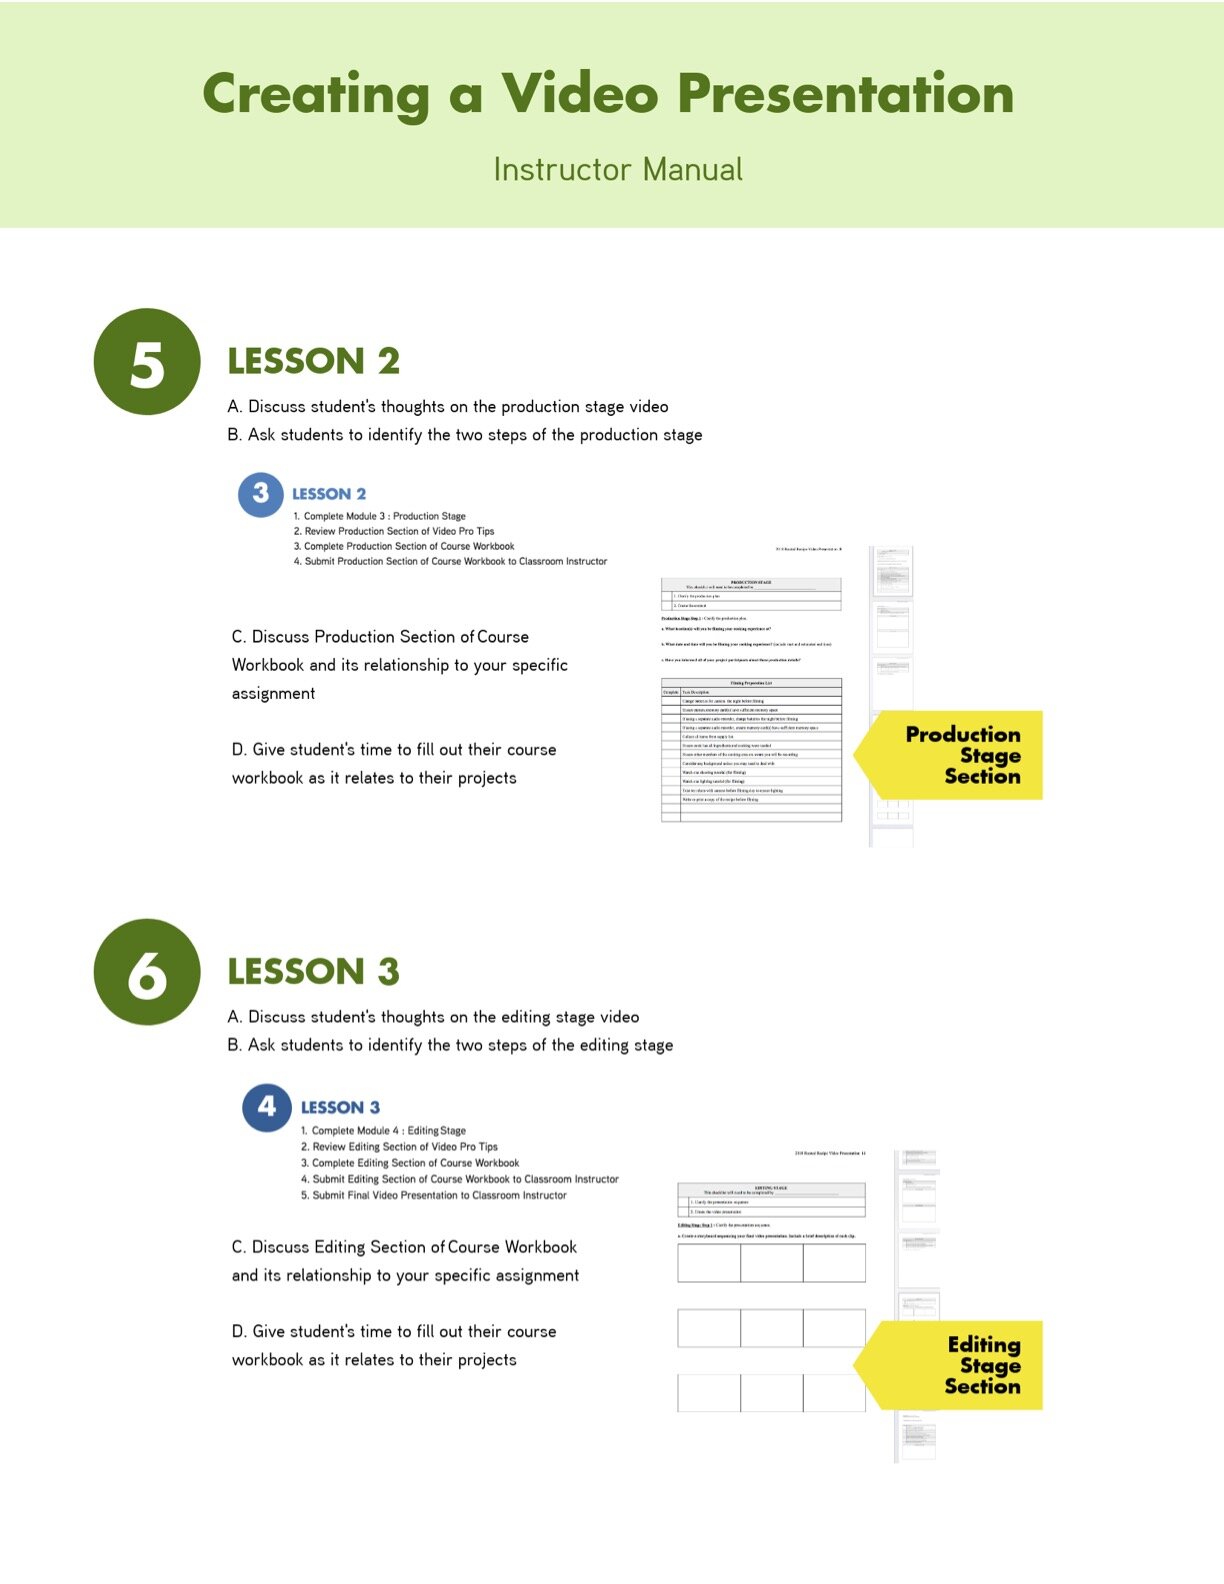
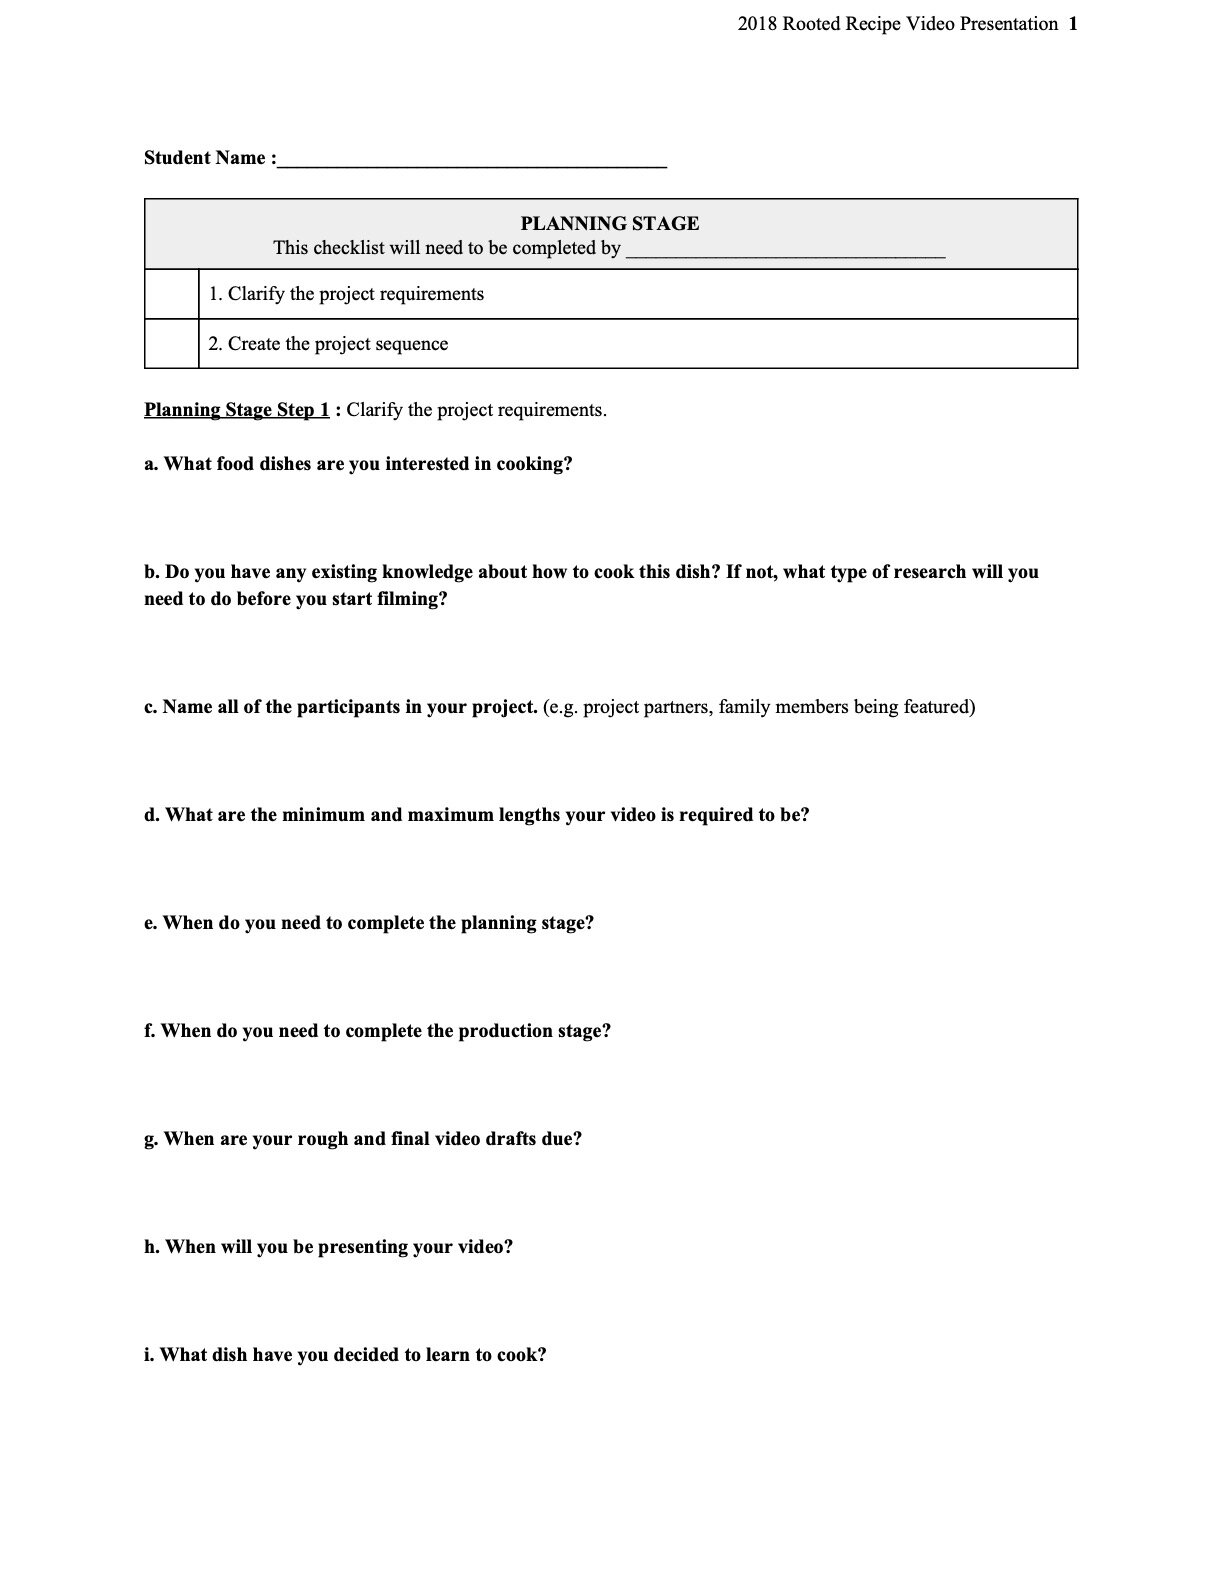
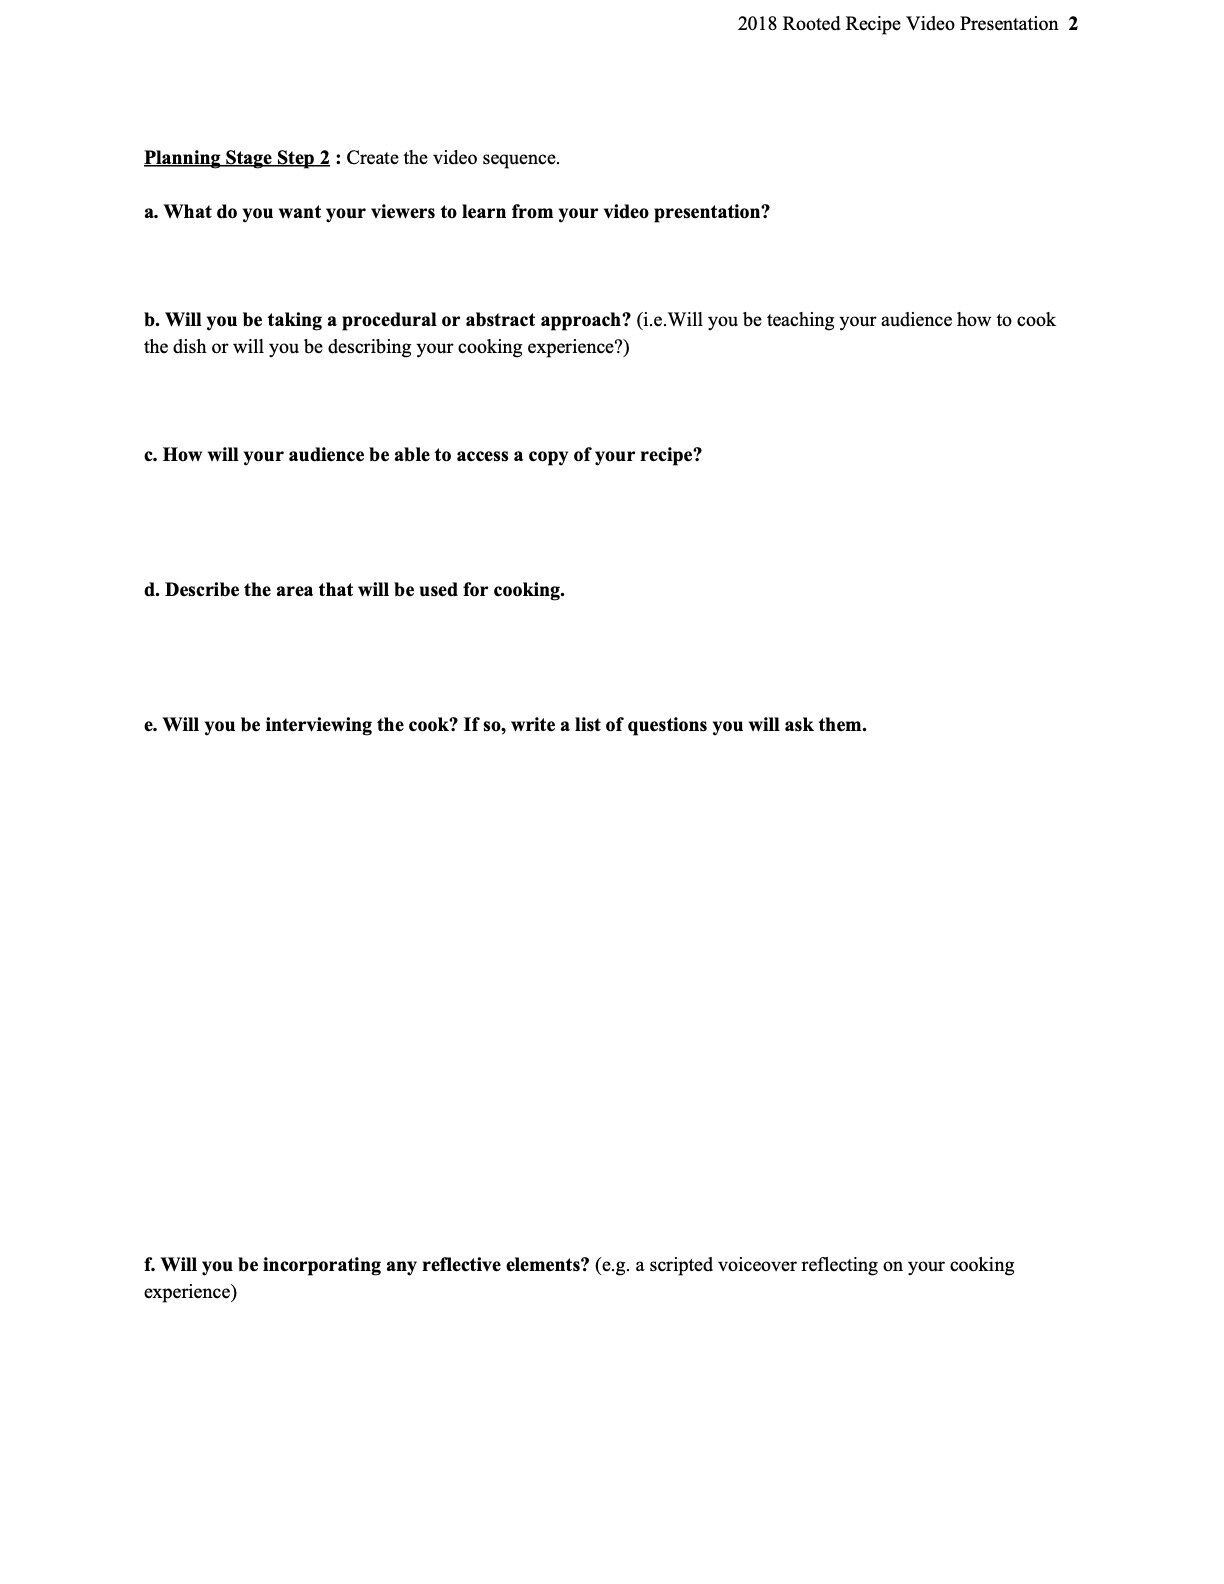
- Planning Stage Module
- Introduce the Planning Stage
- Clarify project requirements
- Create the video sequence
- Planning stage assessment
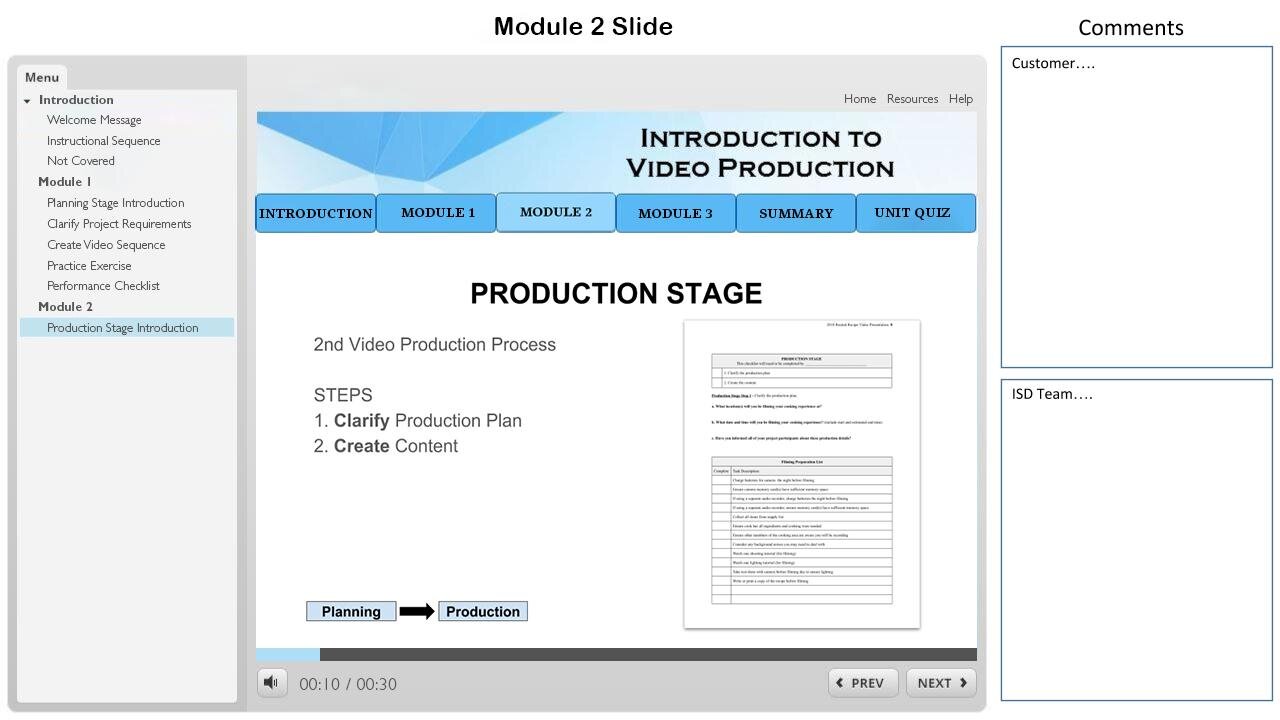
- Production Stage Module
- Introduce the Production Stage
- Clarify production plan
- Create content
- Production stage assessment
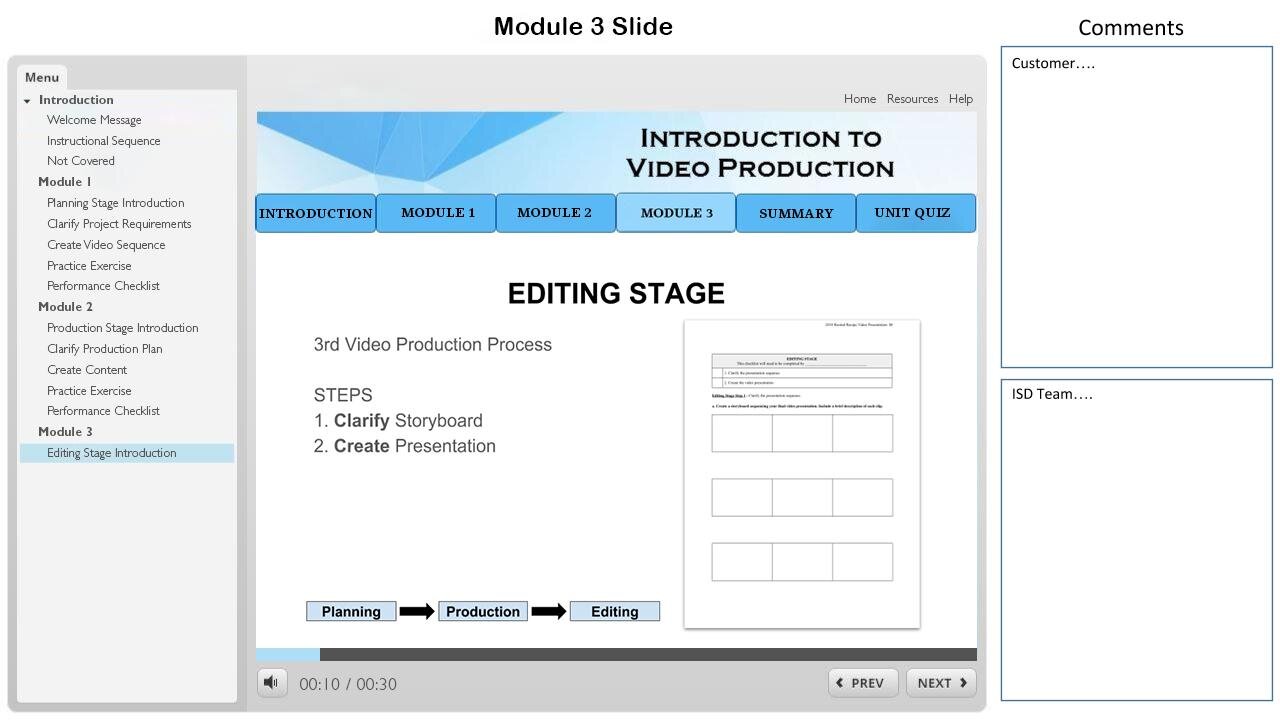
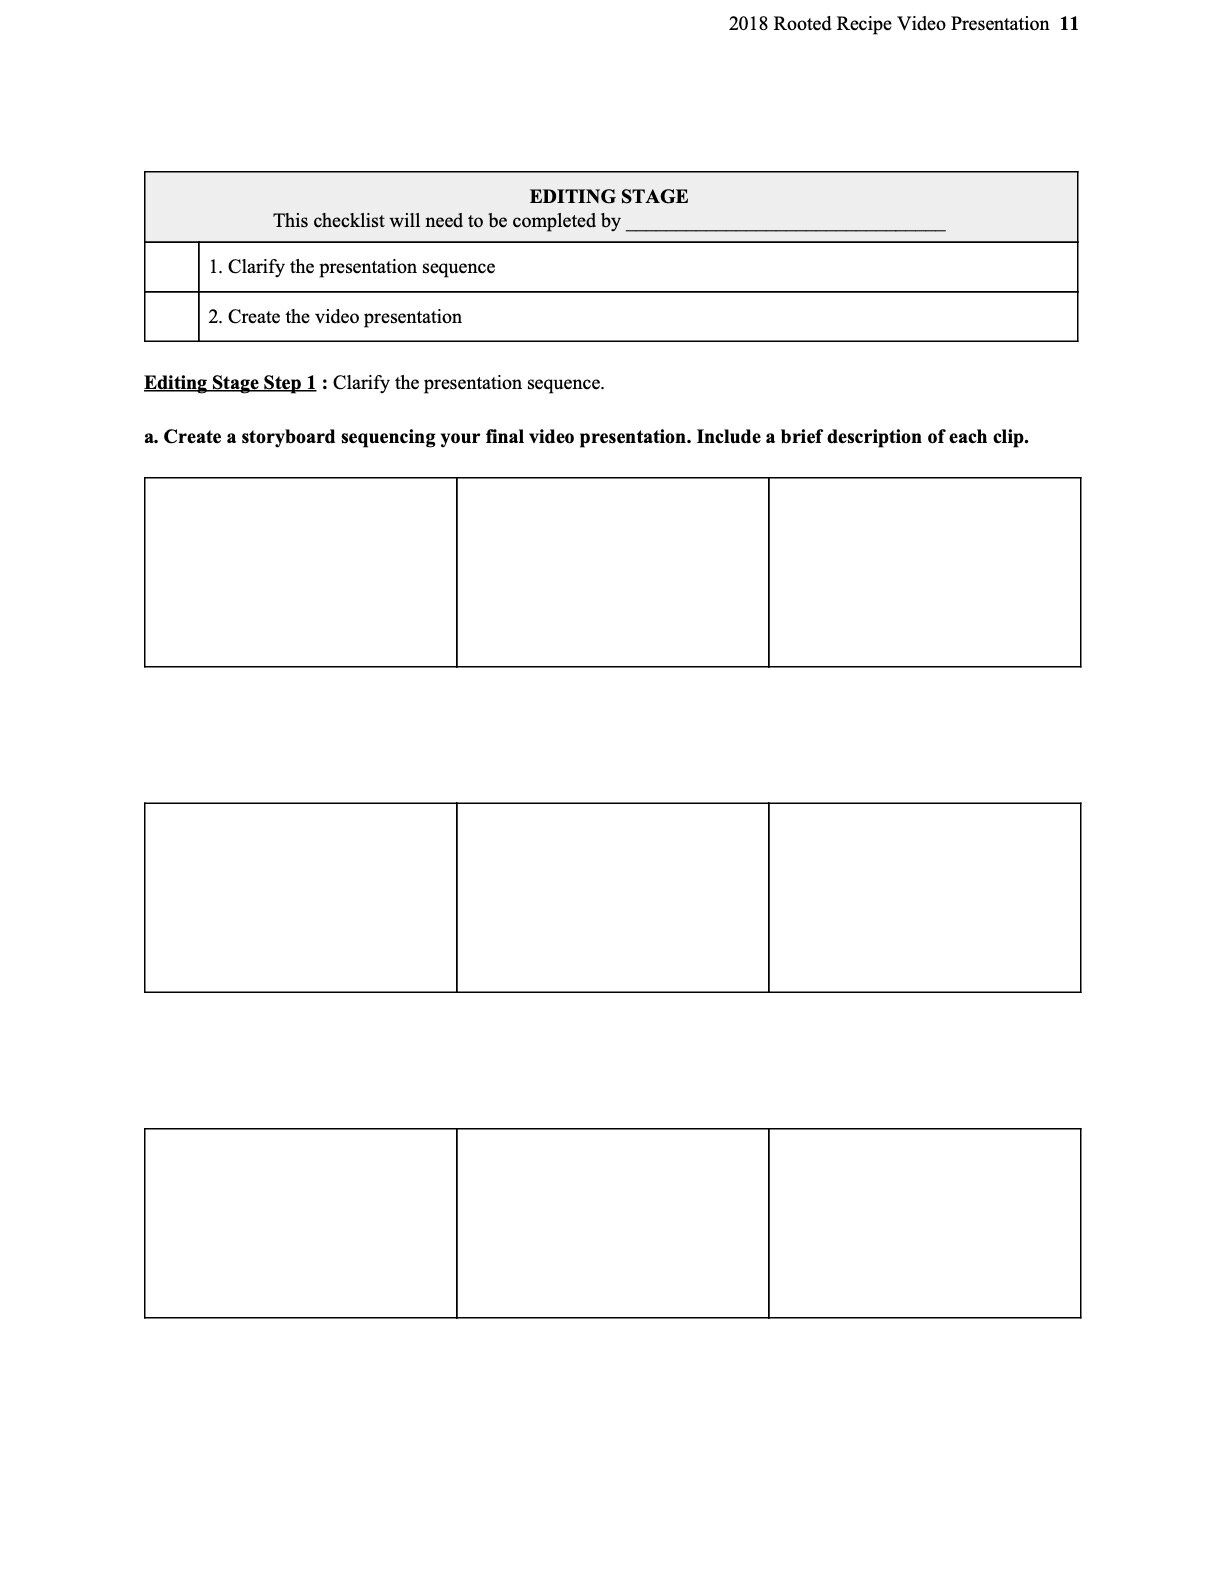
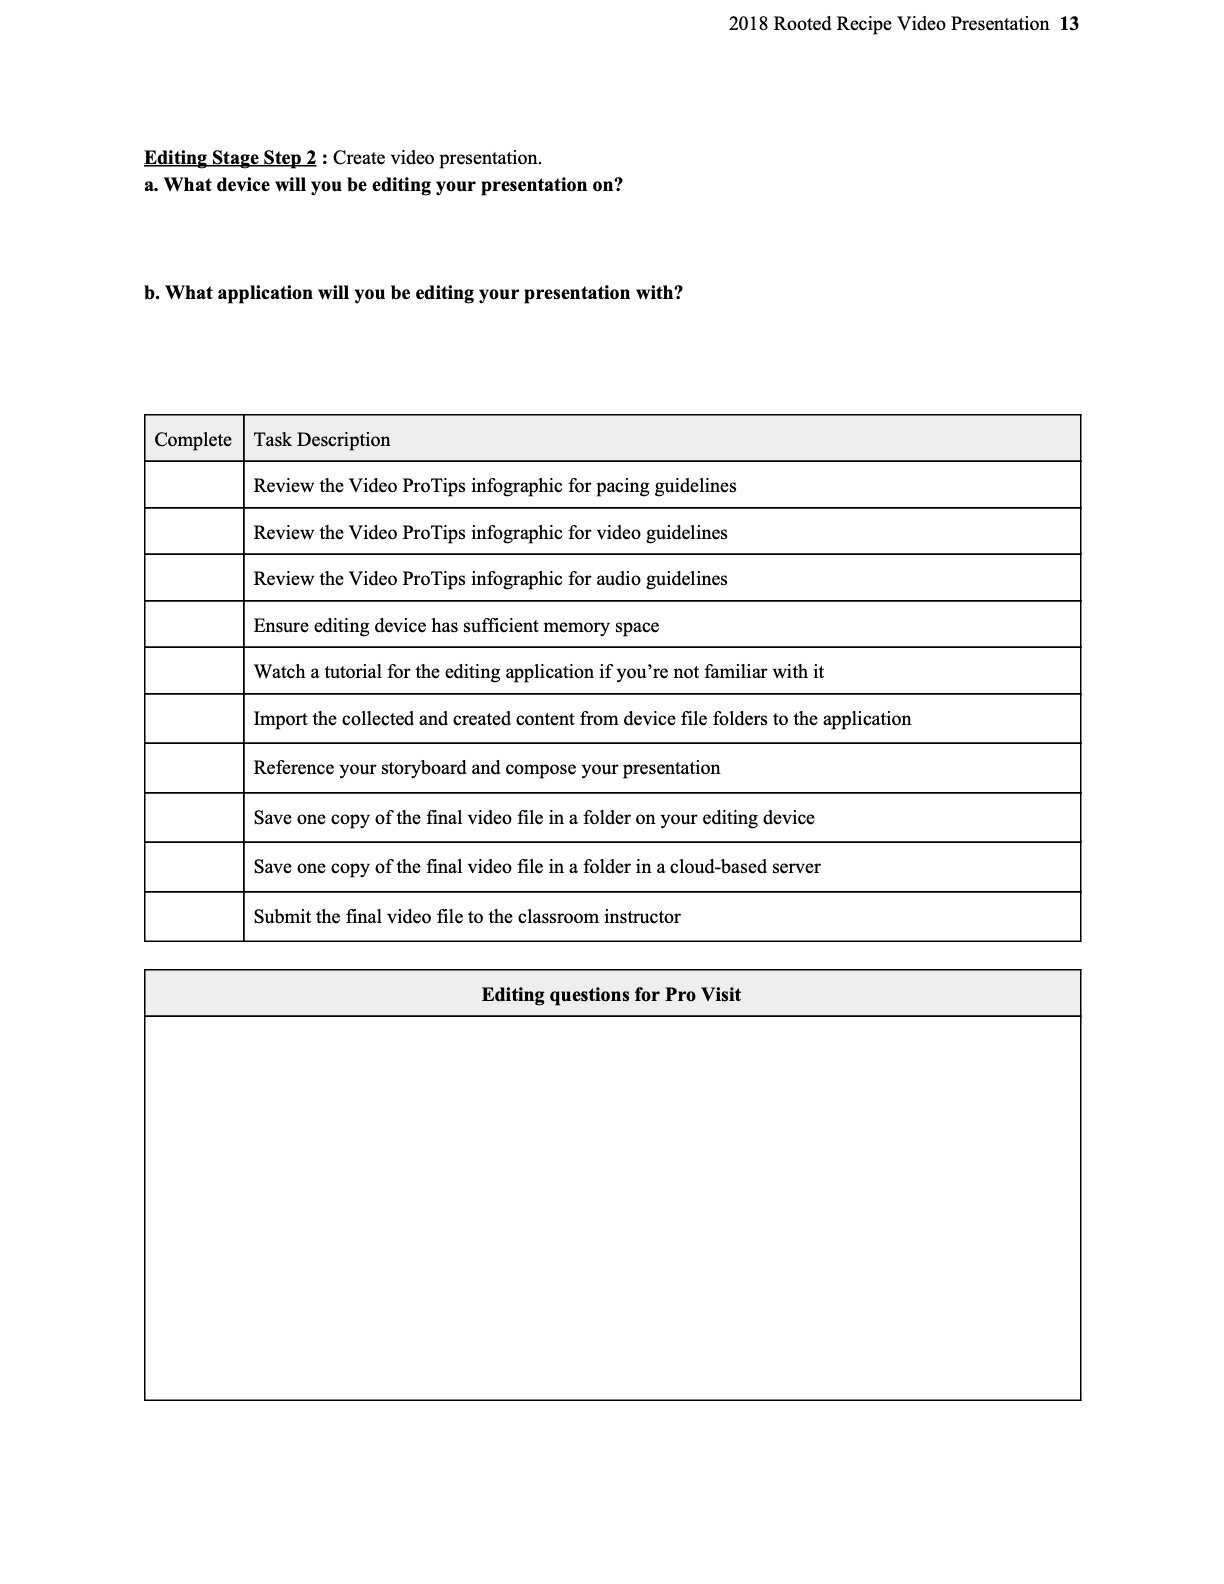
- Editing Stage Module
- Introduce the Editing Stage
- Clarify presentation sequence
- Create video presentation
- Editing stage assessment
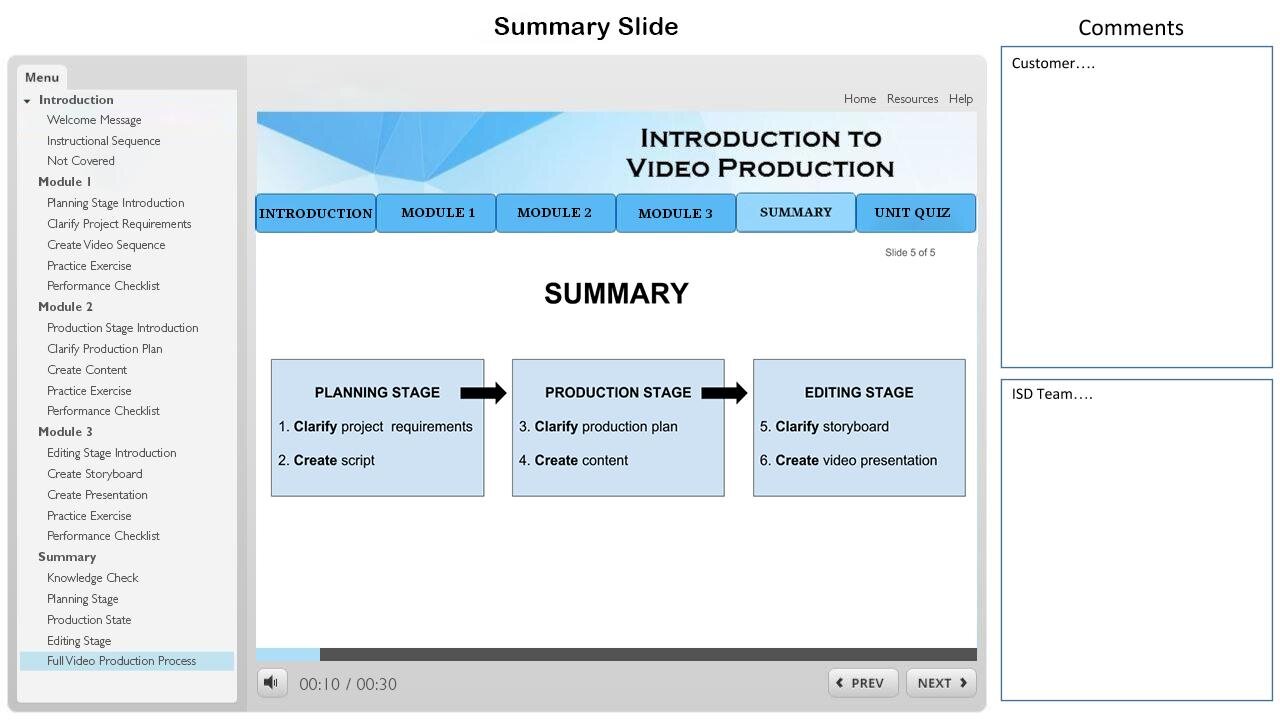
- Summary Module
- Summarize the video production process
- Final assessment
- Identify resources for further research
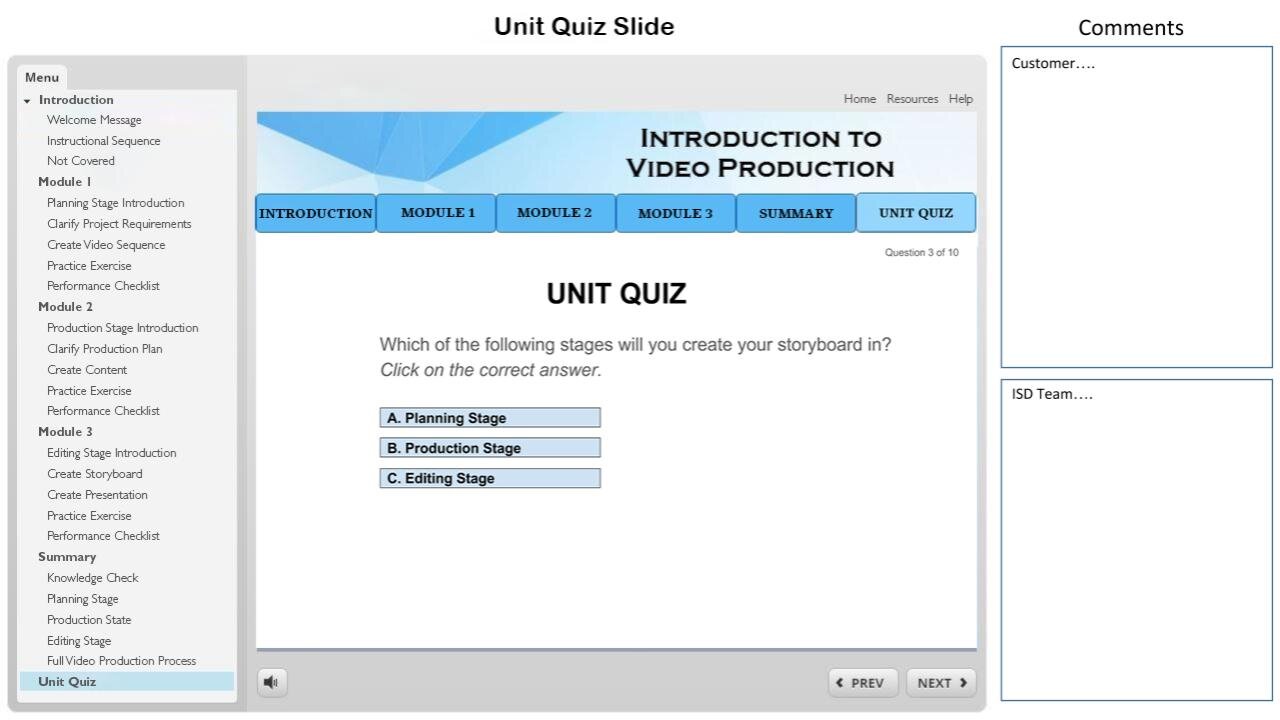
- Unit Quiz
+ References
Alessi, S.M., & Trollip, S.R. (2011). Multimedia for Learning: Methods and Development (3rd Ed). Boston, MA: Allyn & Bacon.
Clark, R.C., & Mayer, R. (2016). e-Learning and the Science of Instruction: Proven Guidelines for Consumers and Designers of Multimedia Learning (4th Ed). Hoboken, NJ: John Wiley & Sons.
Project Management
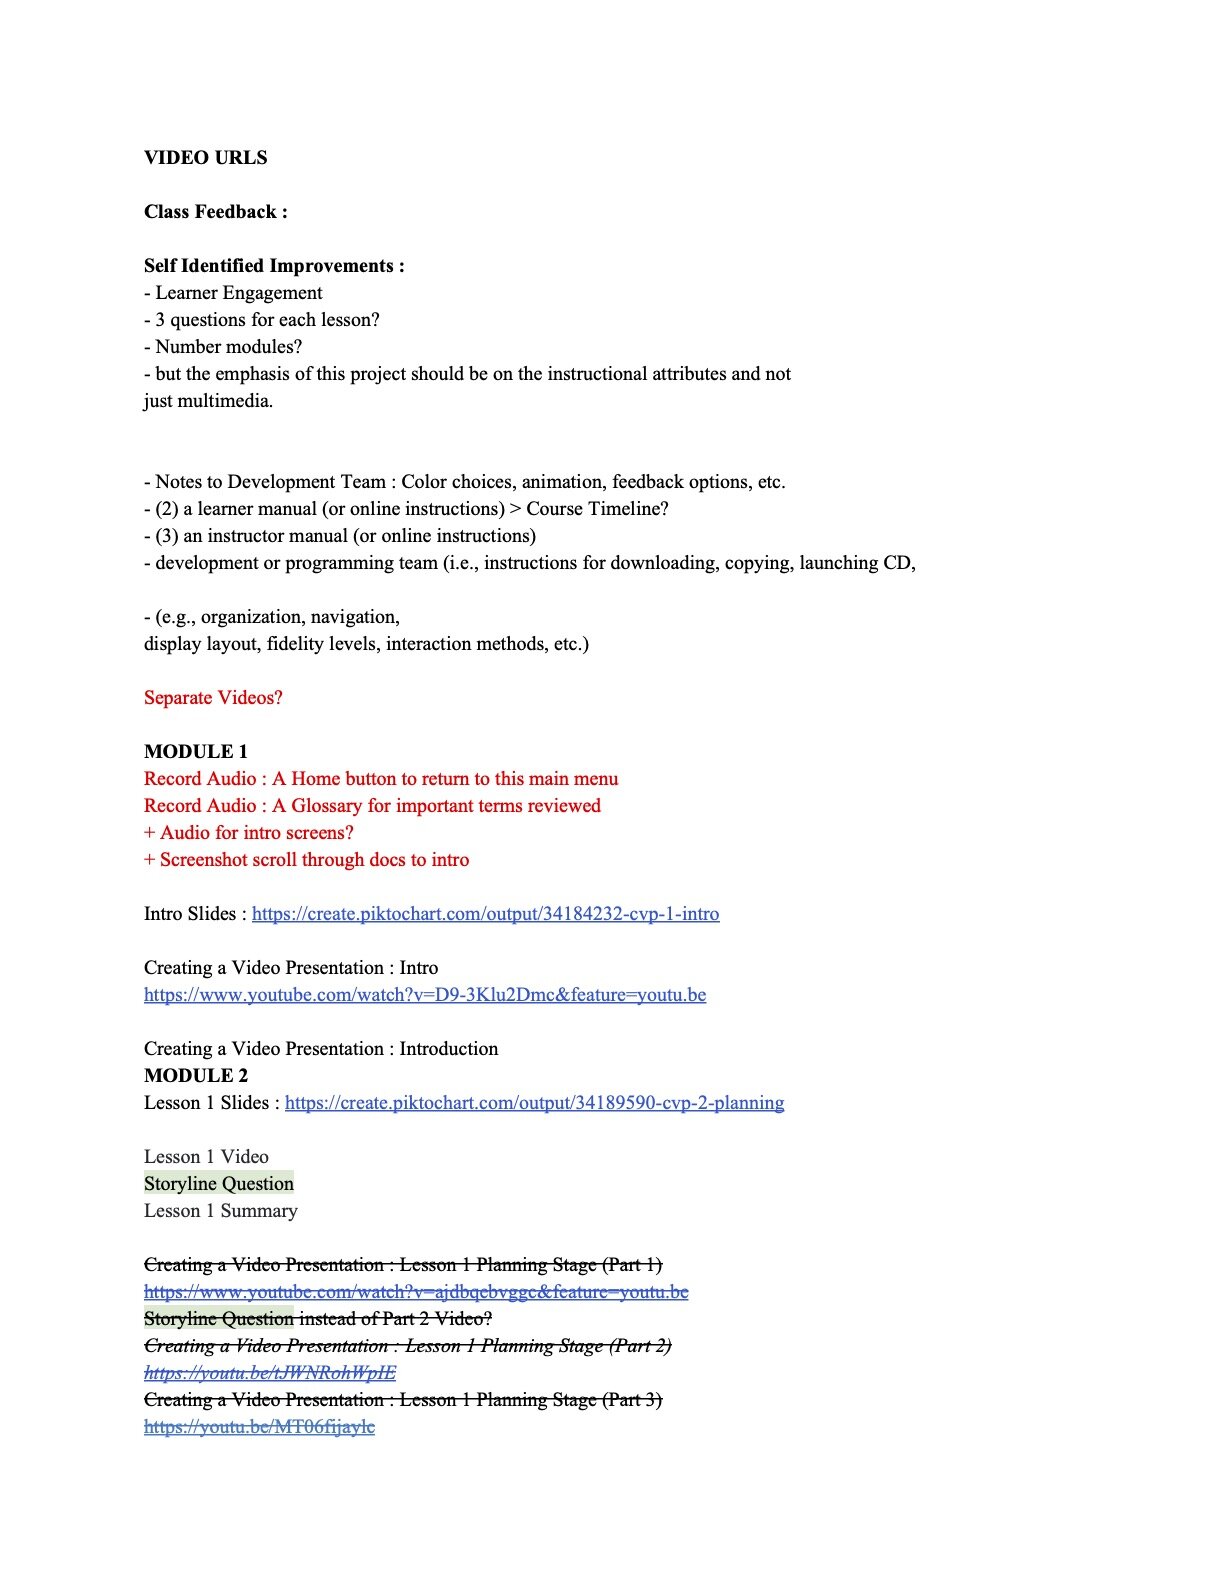
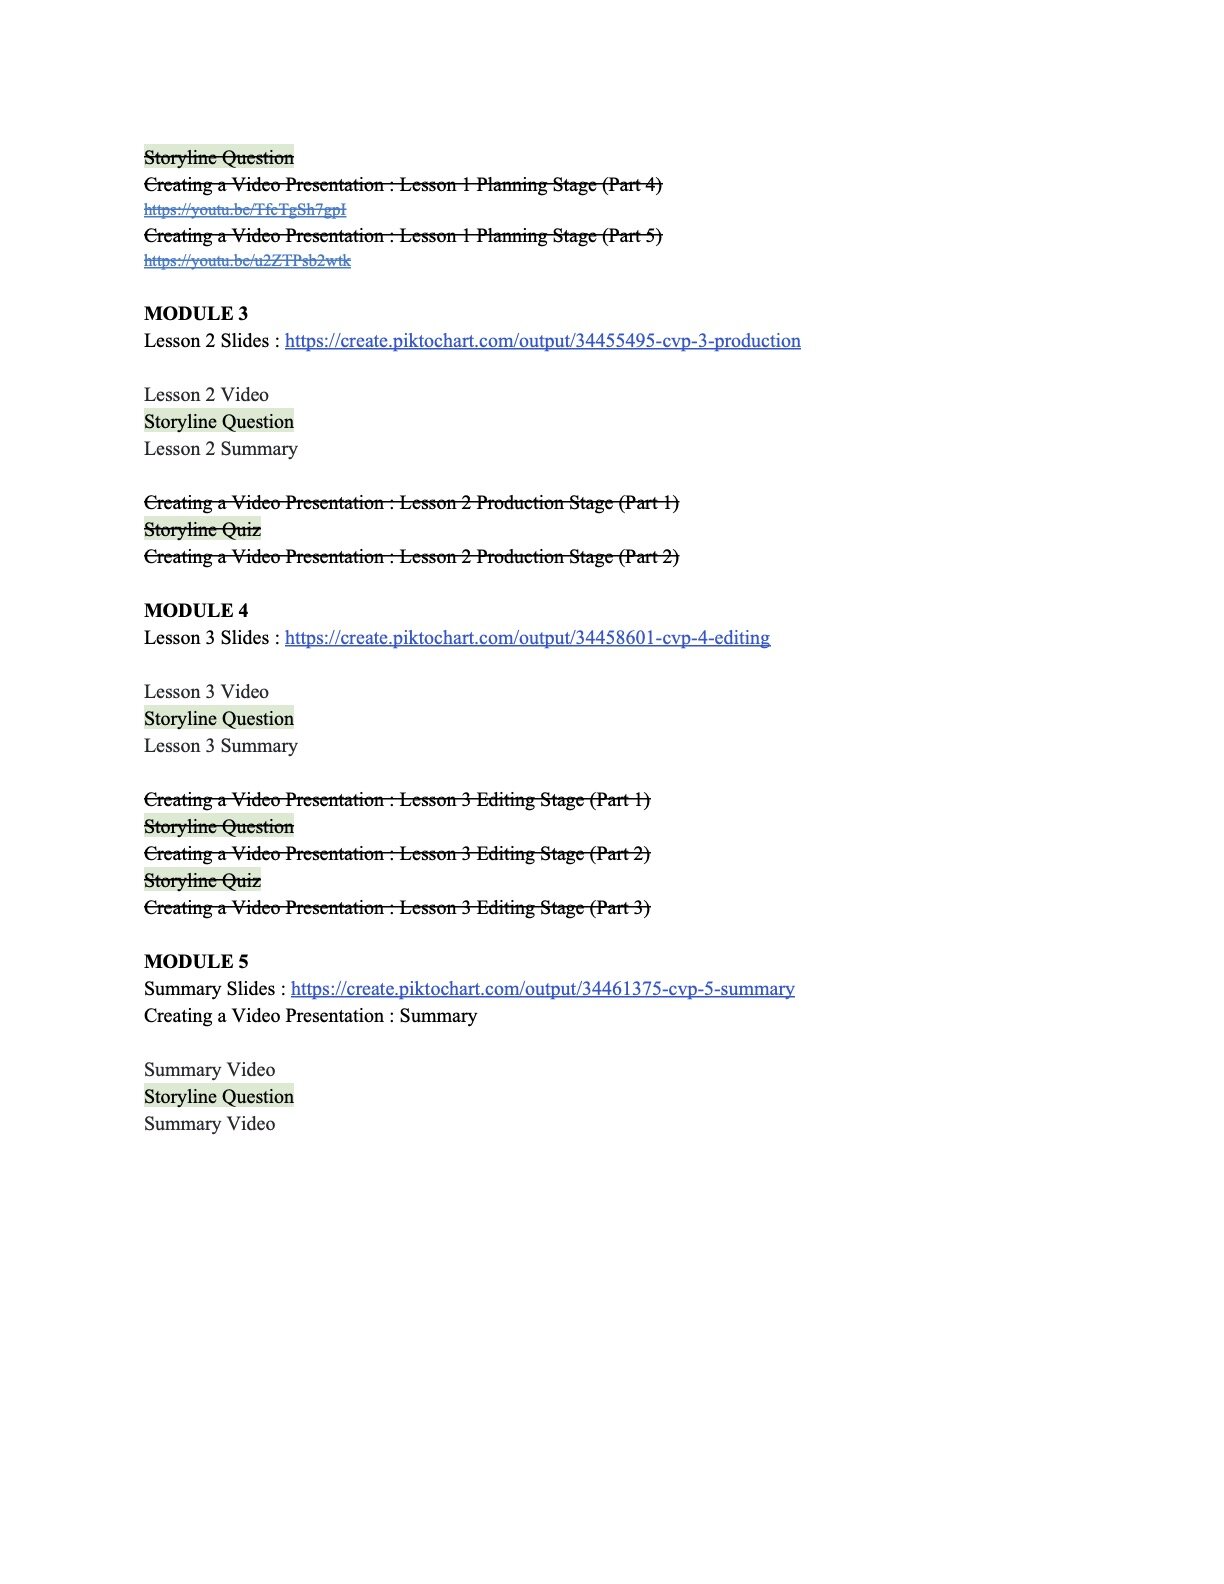
The gallery below includes excerpts from the collaborative planning document we created on google docs. Our cover page listed bookmarks with links to sections that in retrospect, could have been automatically generated by google’s outline feature if we used correct accessibility headers for each section. On this document we listed design notes, charts, timelines, feedback, etc.

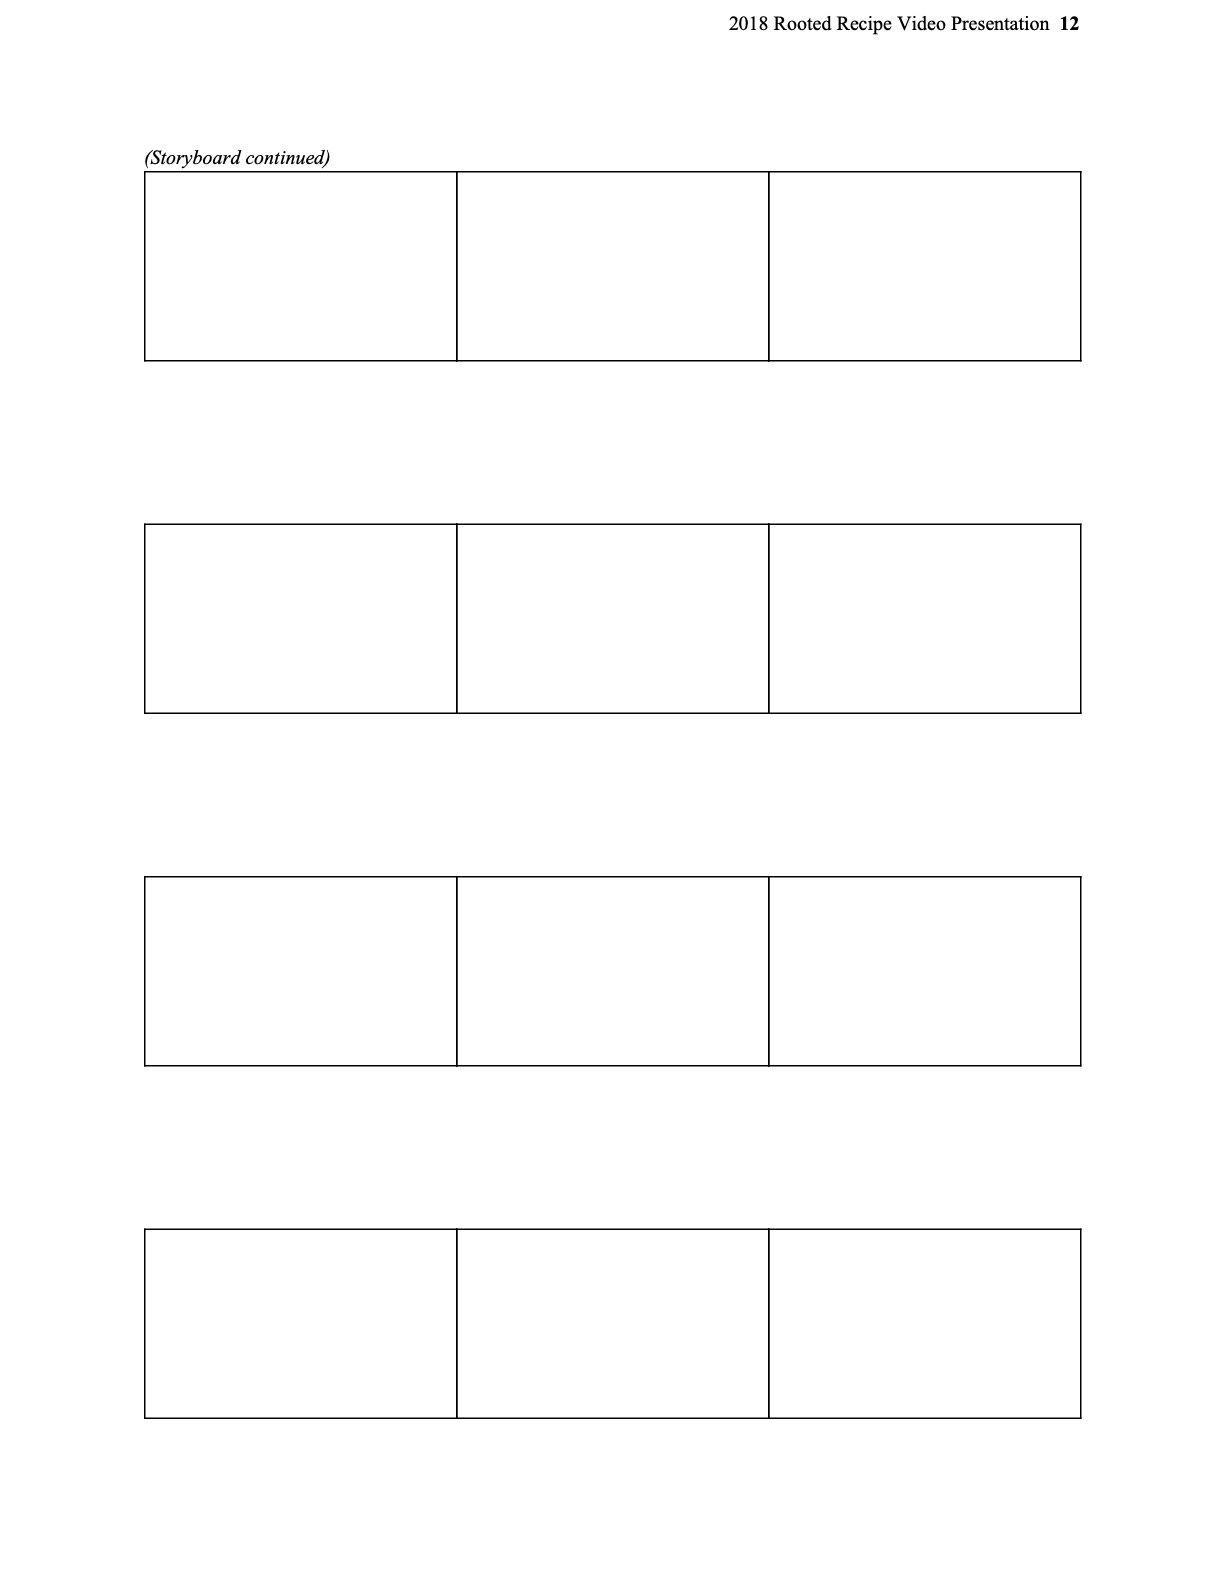
Storyboard
We had to create storyboards for each of the five lesson videos as well as for the learning platform. We used Google slides to create the slides so that we could collaborate on creating the content.
We presented the storyboard featured below to our class to receive feedback about our user interface and other instructional elements. Participants used an online survey to provide their feedback.
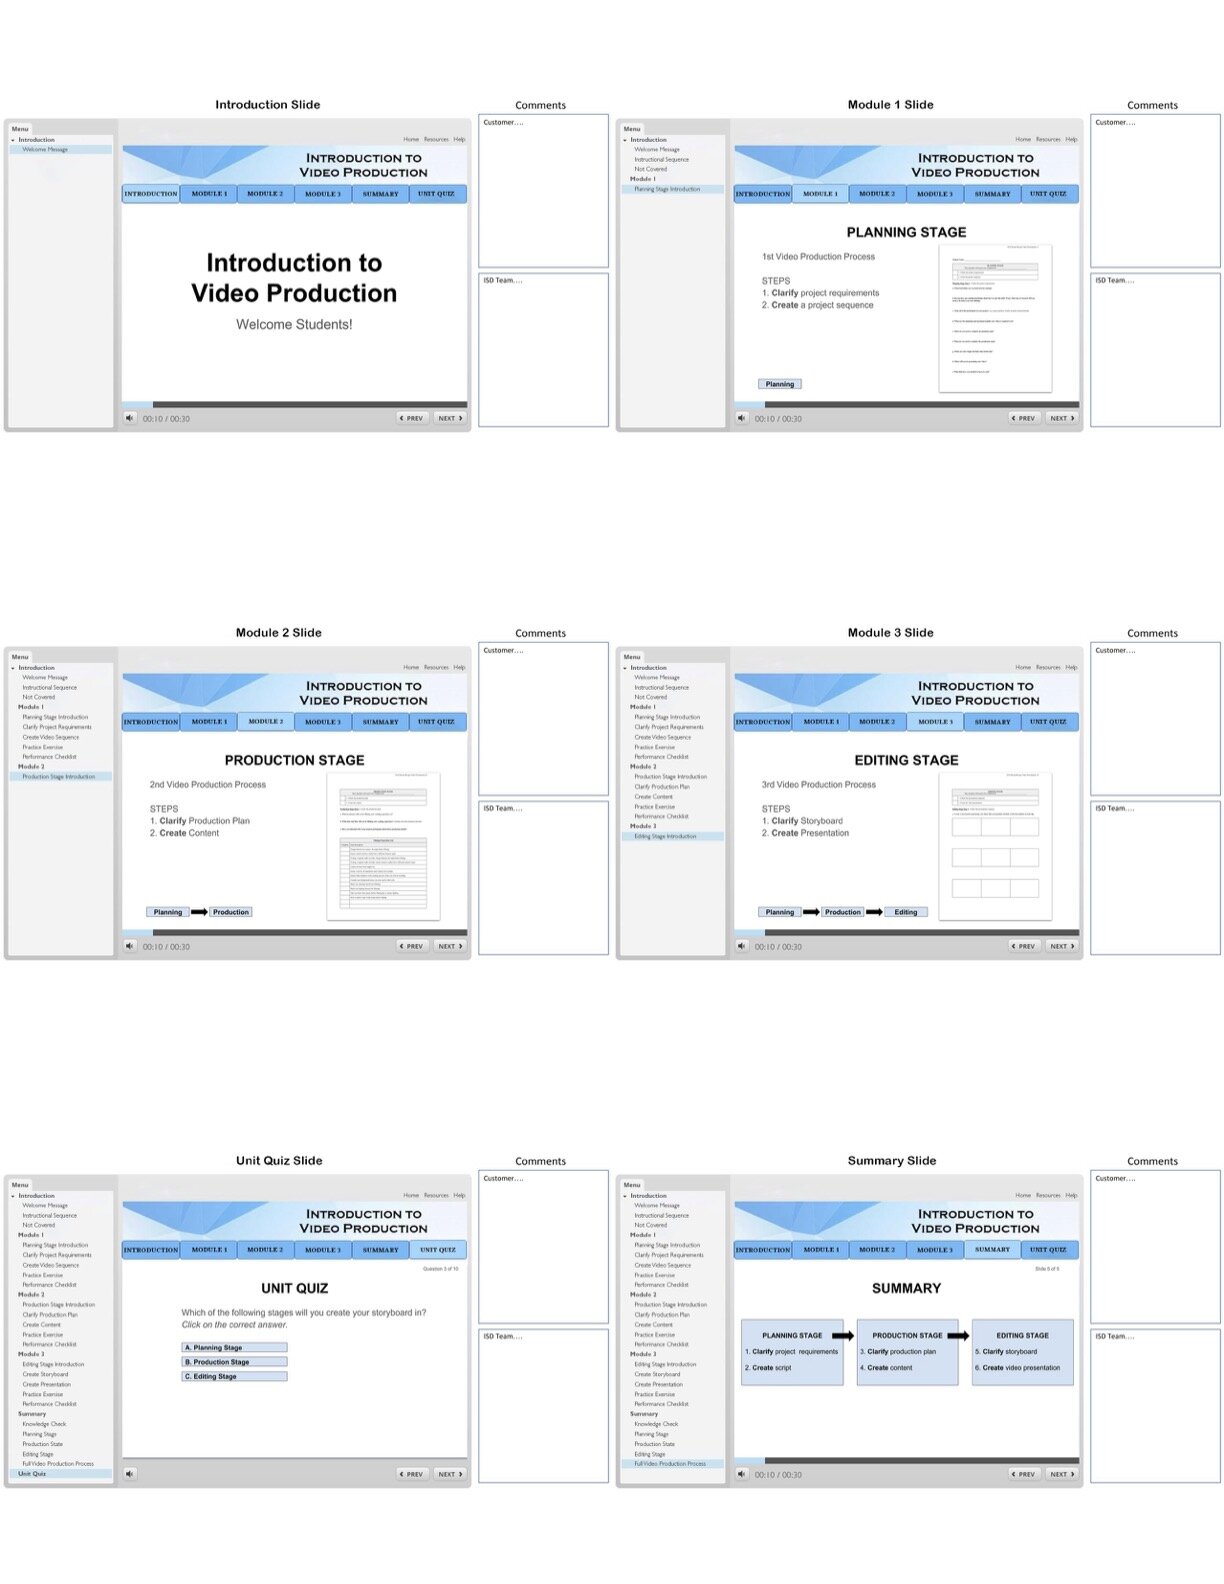
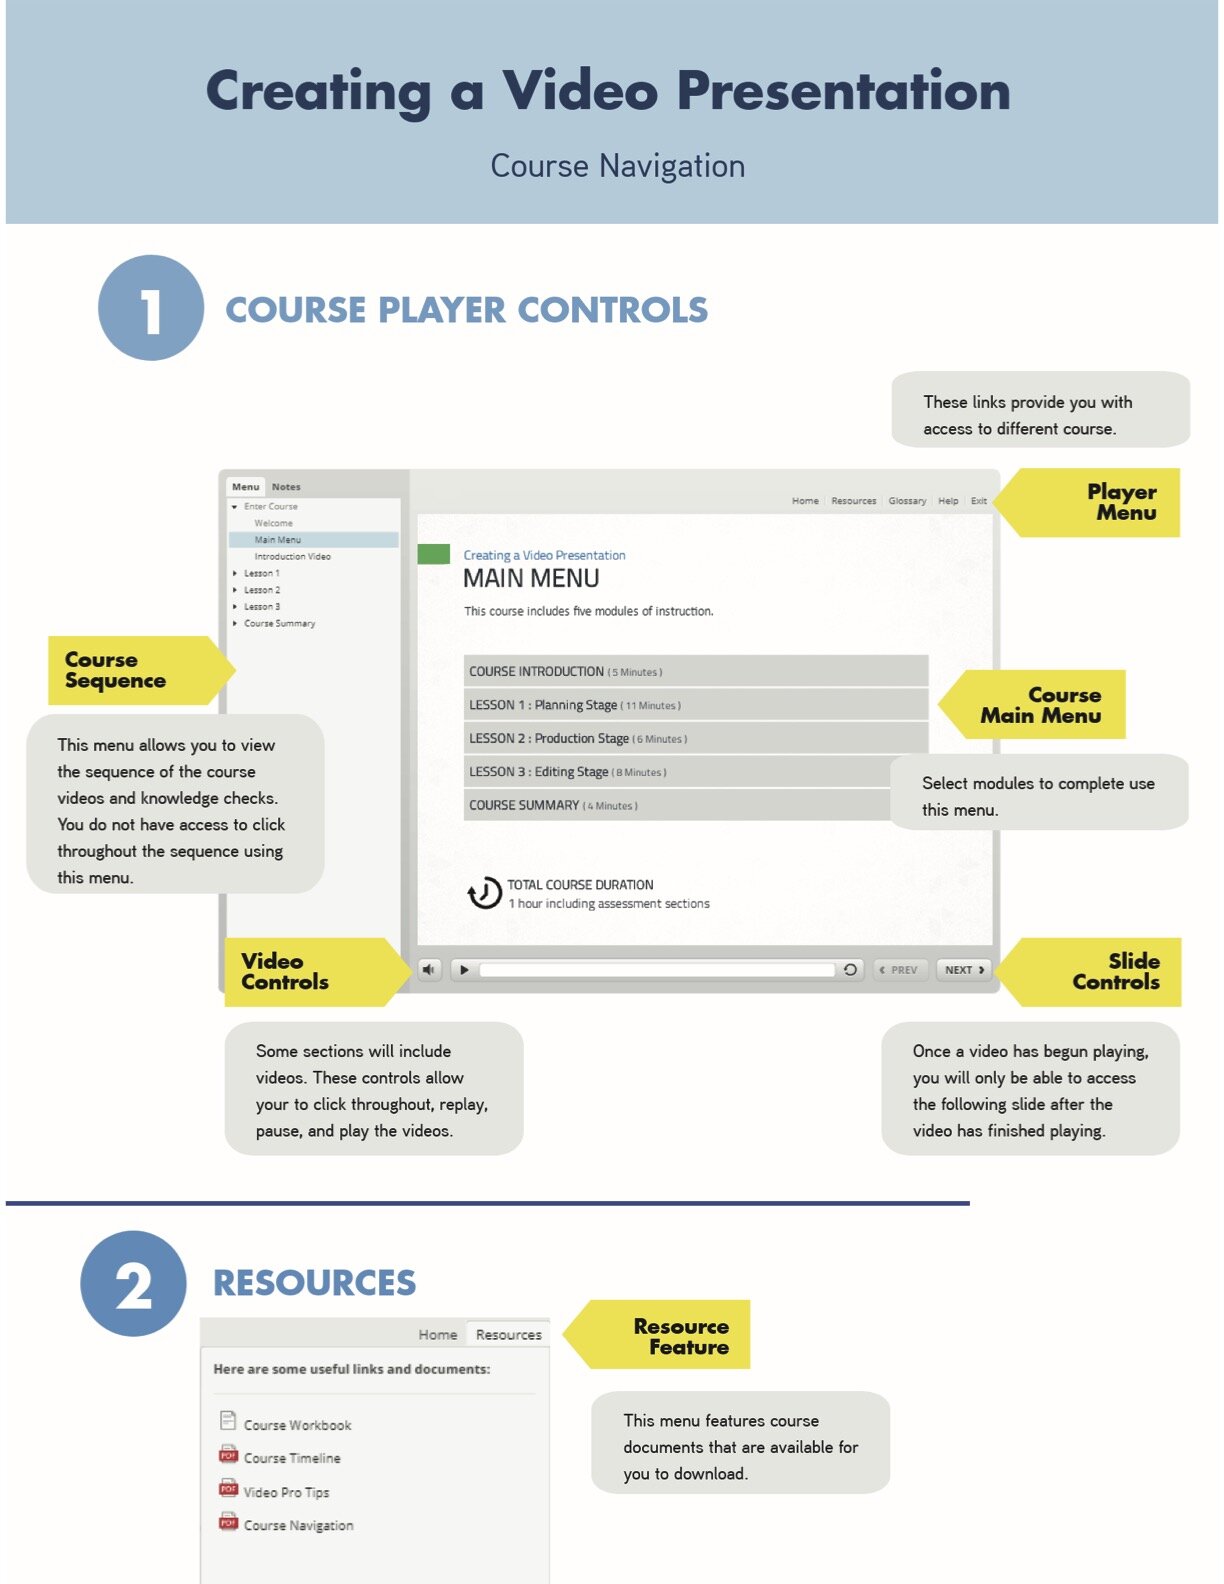
Learning Platform
We used Articulate Storyline to create our course. Below is a layout of the sequence we created. We included a feature to prevent students from skipping ahead, but once they completed a lesson they were given access to it in order to review it at their own leisure.

Screenshot of Storyline Project
Course Guides
Course Developer
The course developer was provided with the following items:
Instructional Guide for installing and updating course
Style Guide for Picktochart Assets
Zip File with Course Assets
Zip File with Media Project Files
Zip File with Published Course
Course Instructor
The course instructor received the following items:
Folder with Learner Documents
Instructor Manual

Learners
The course participants received the following handouts:
Production Workbook
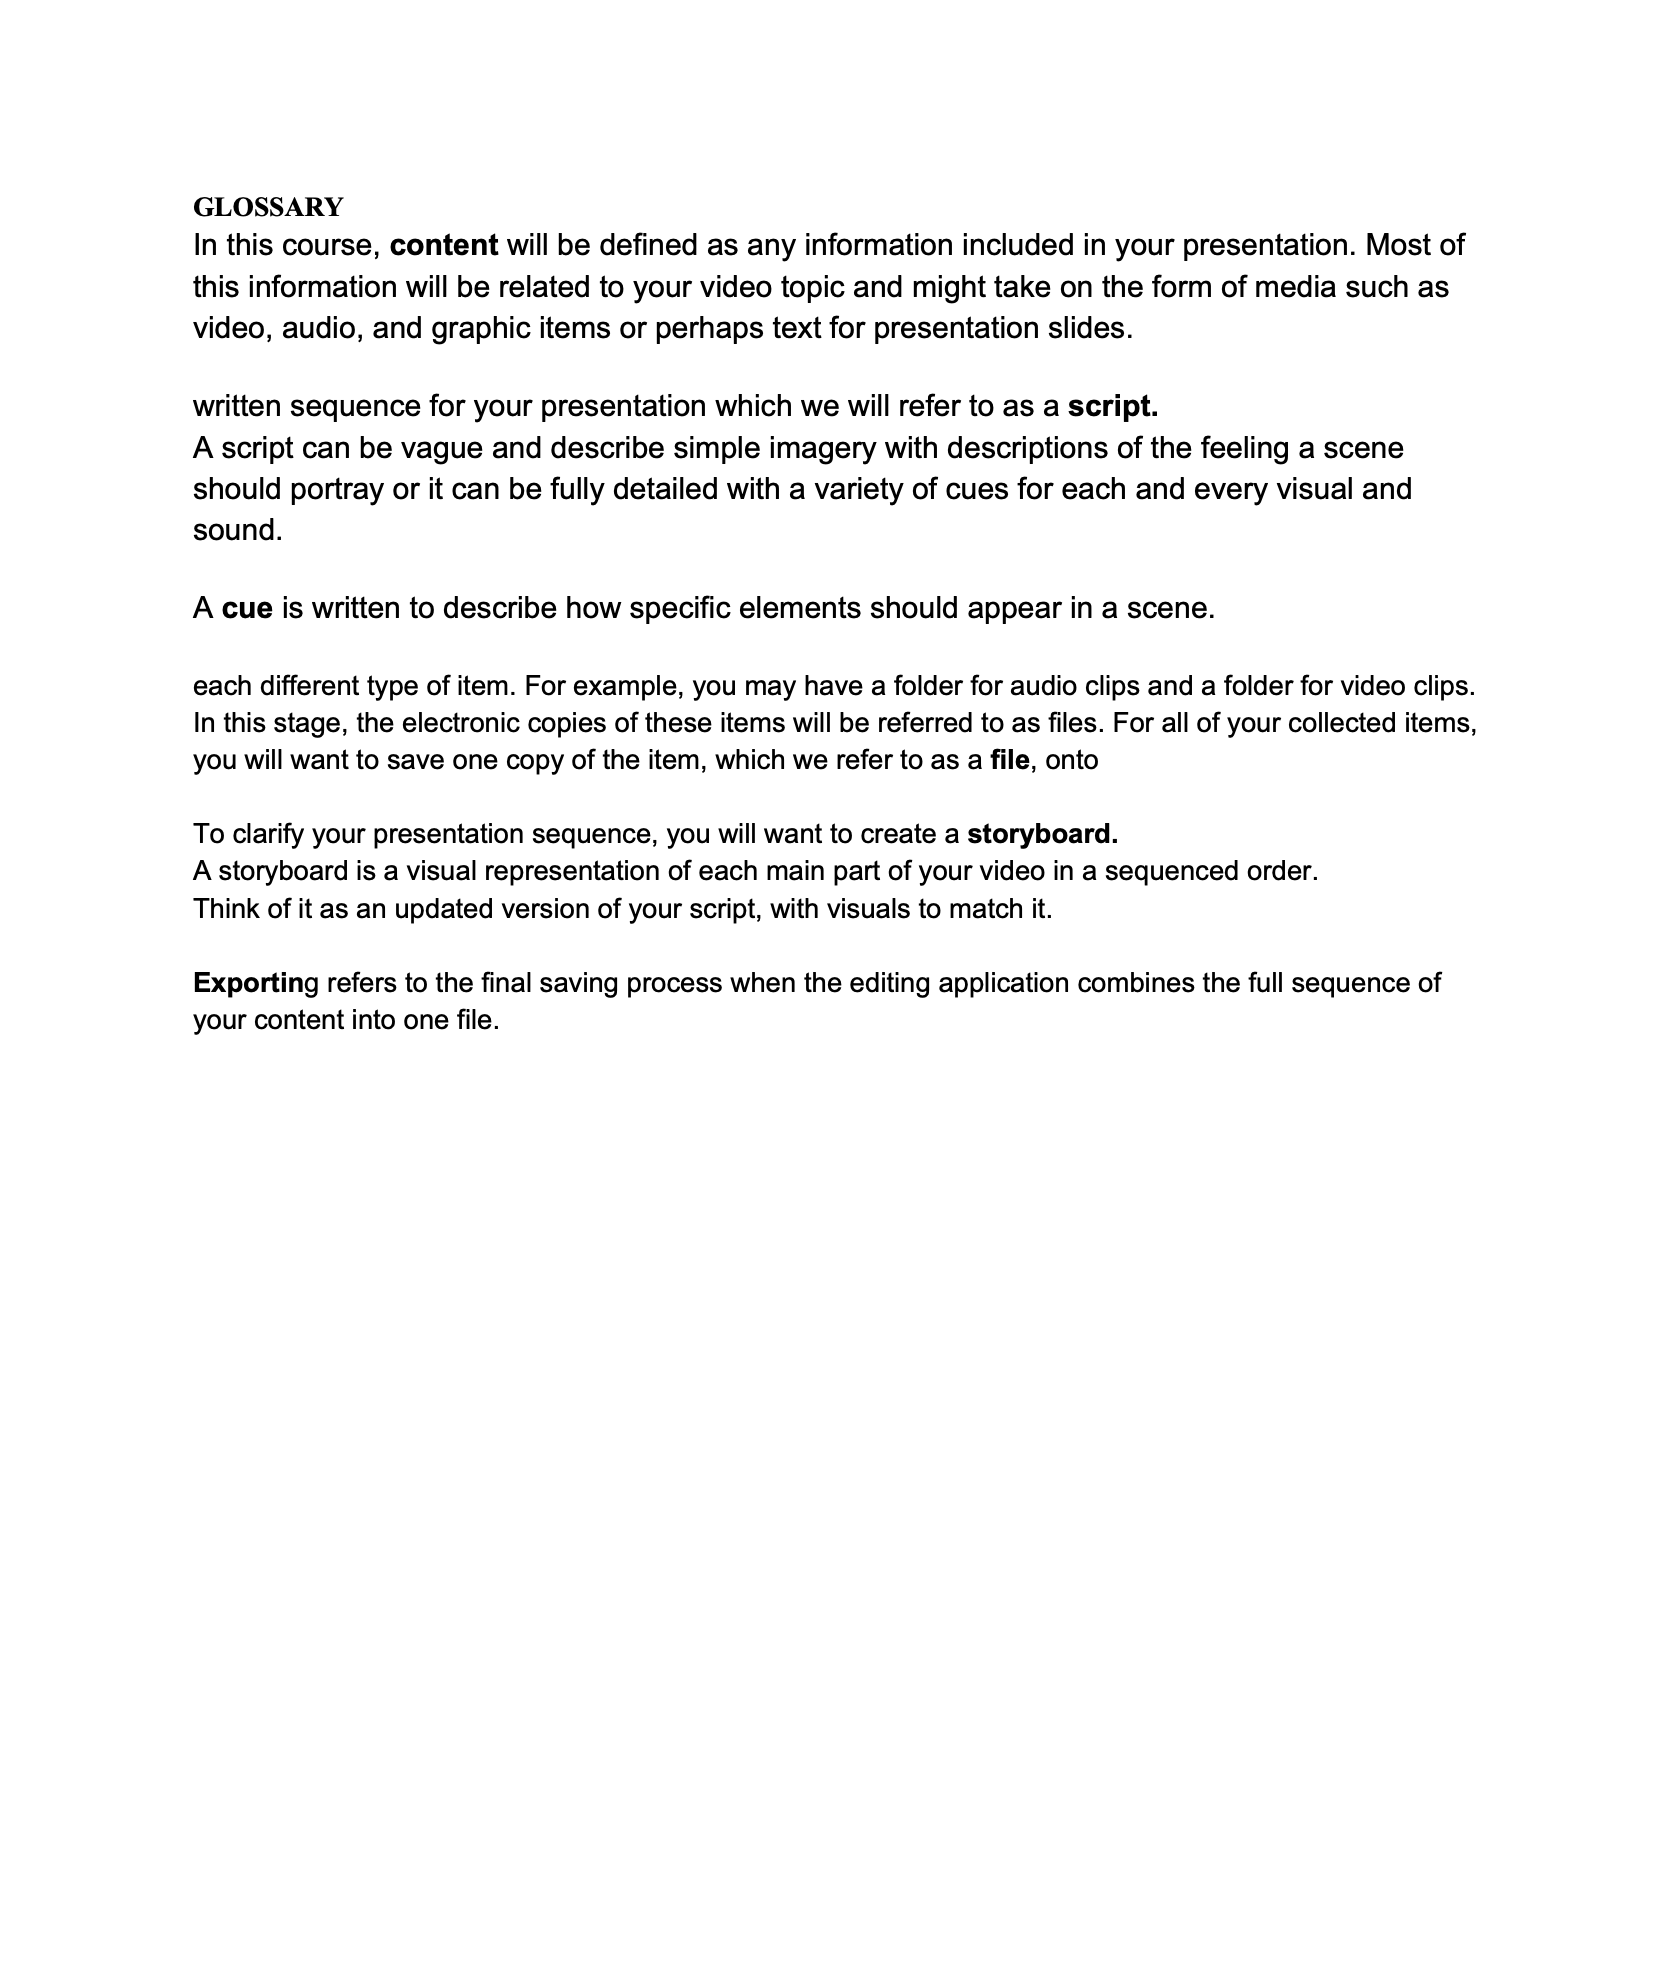
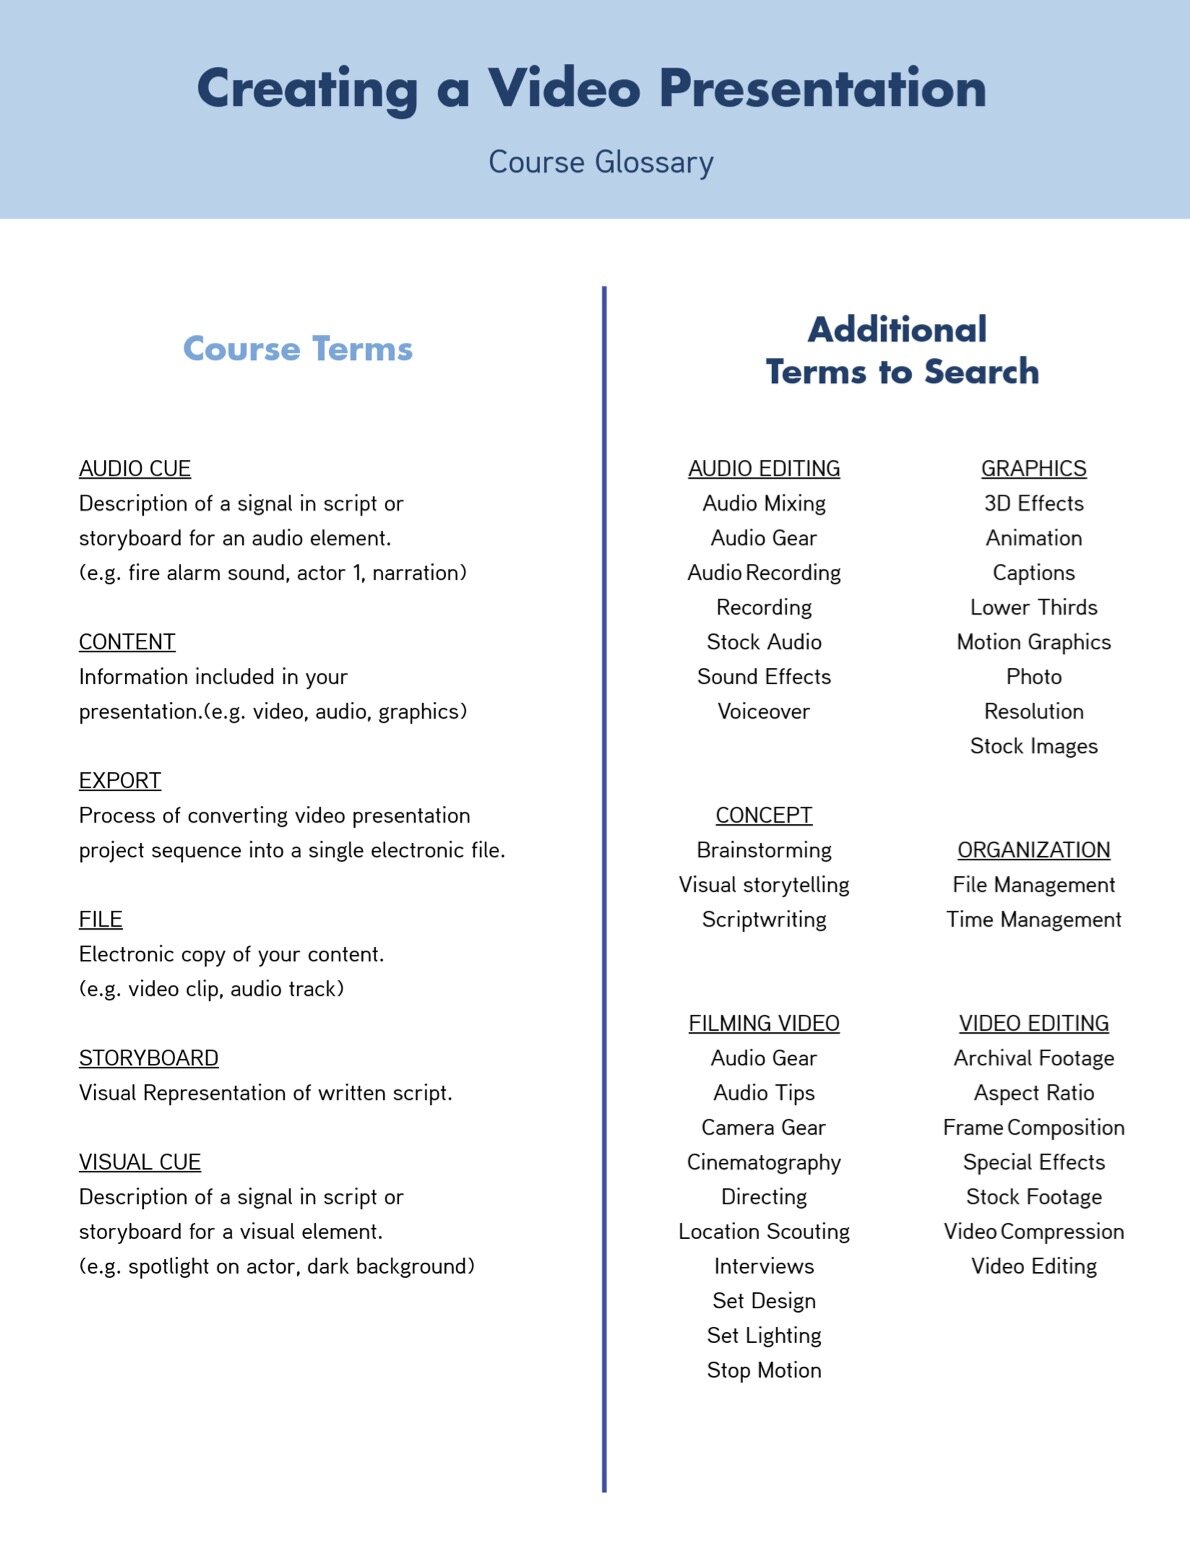
Course Glossary
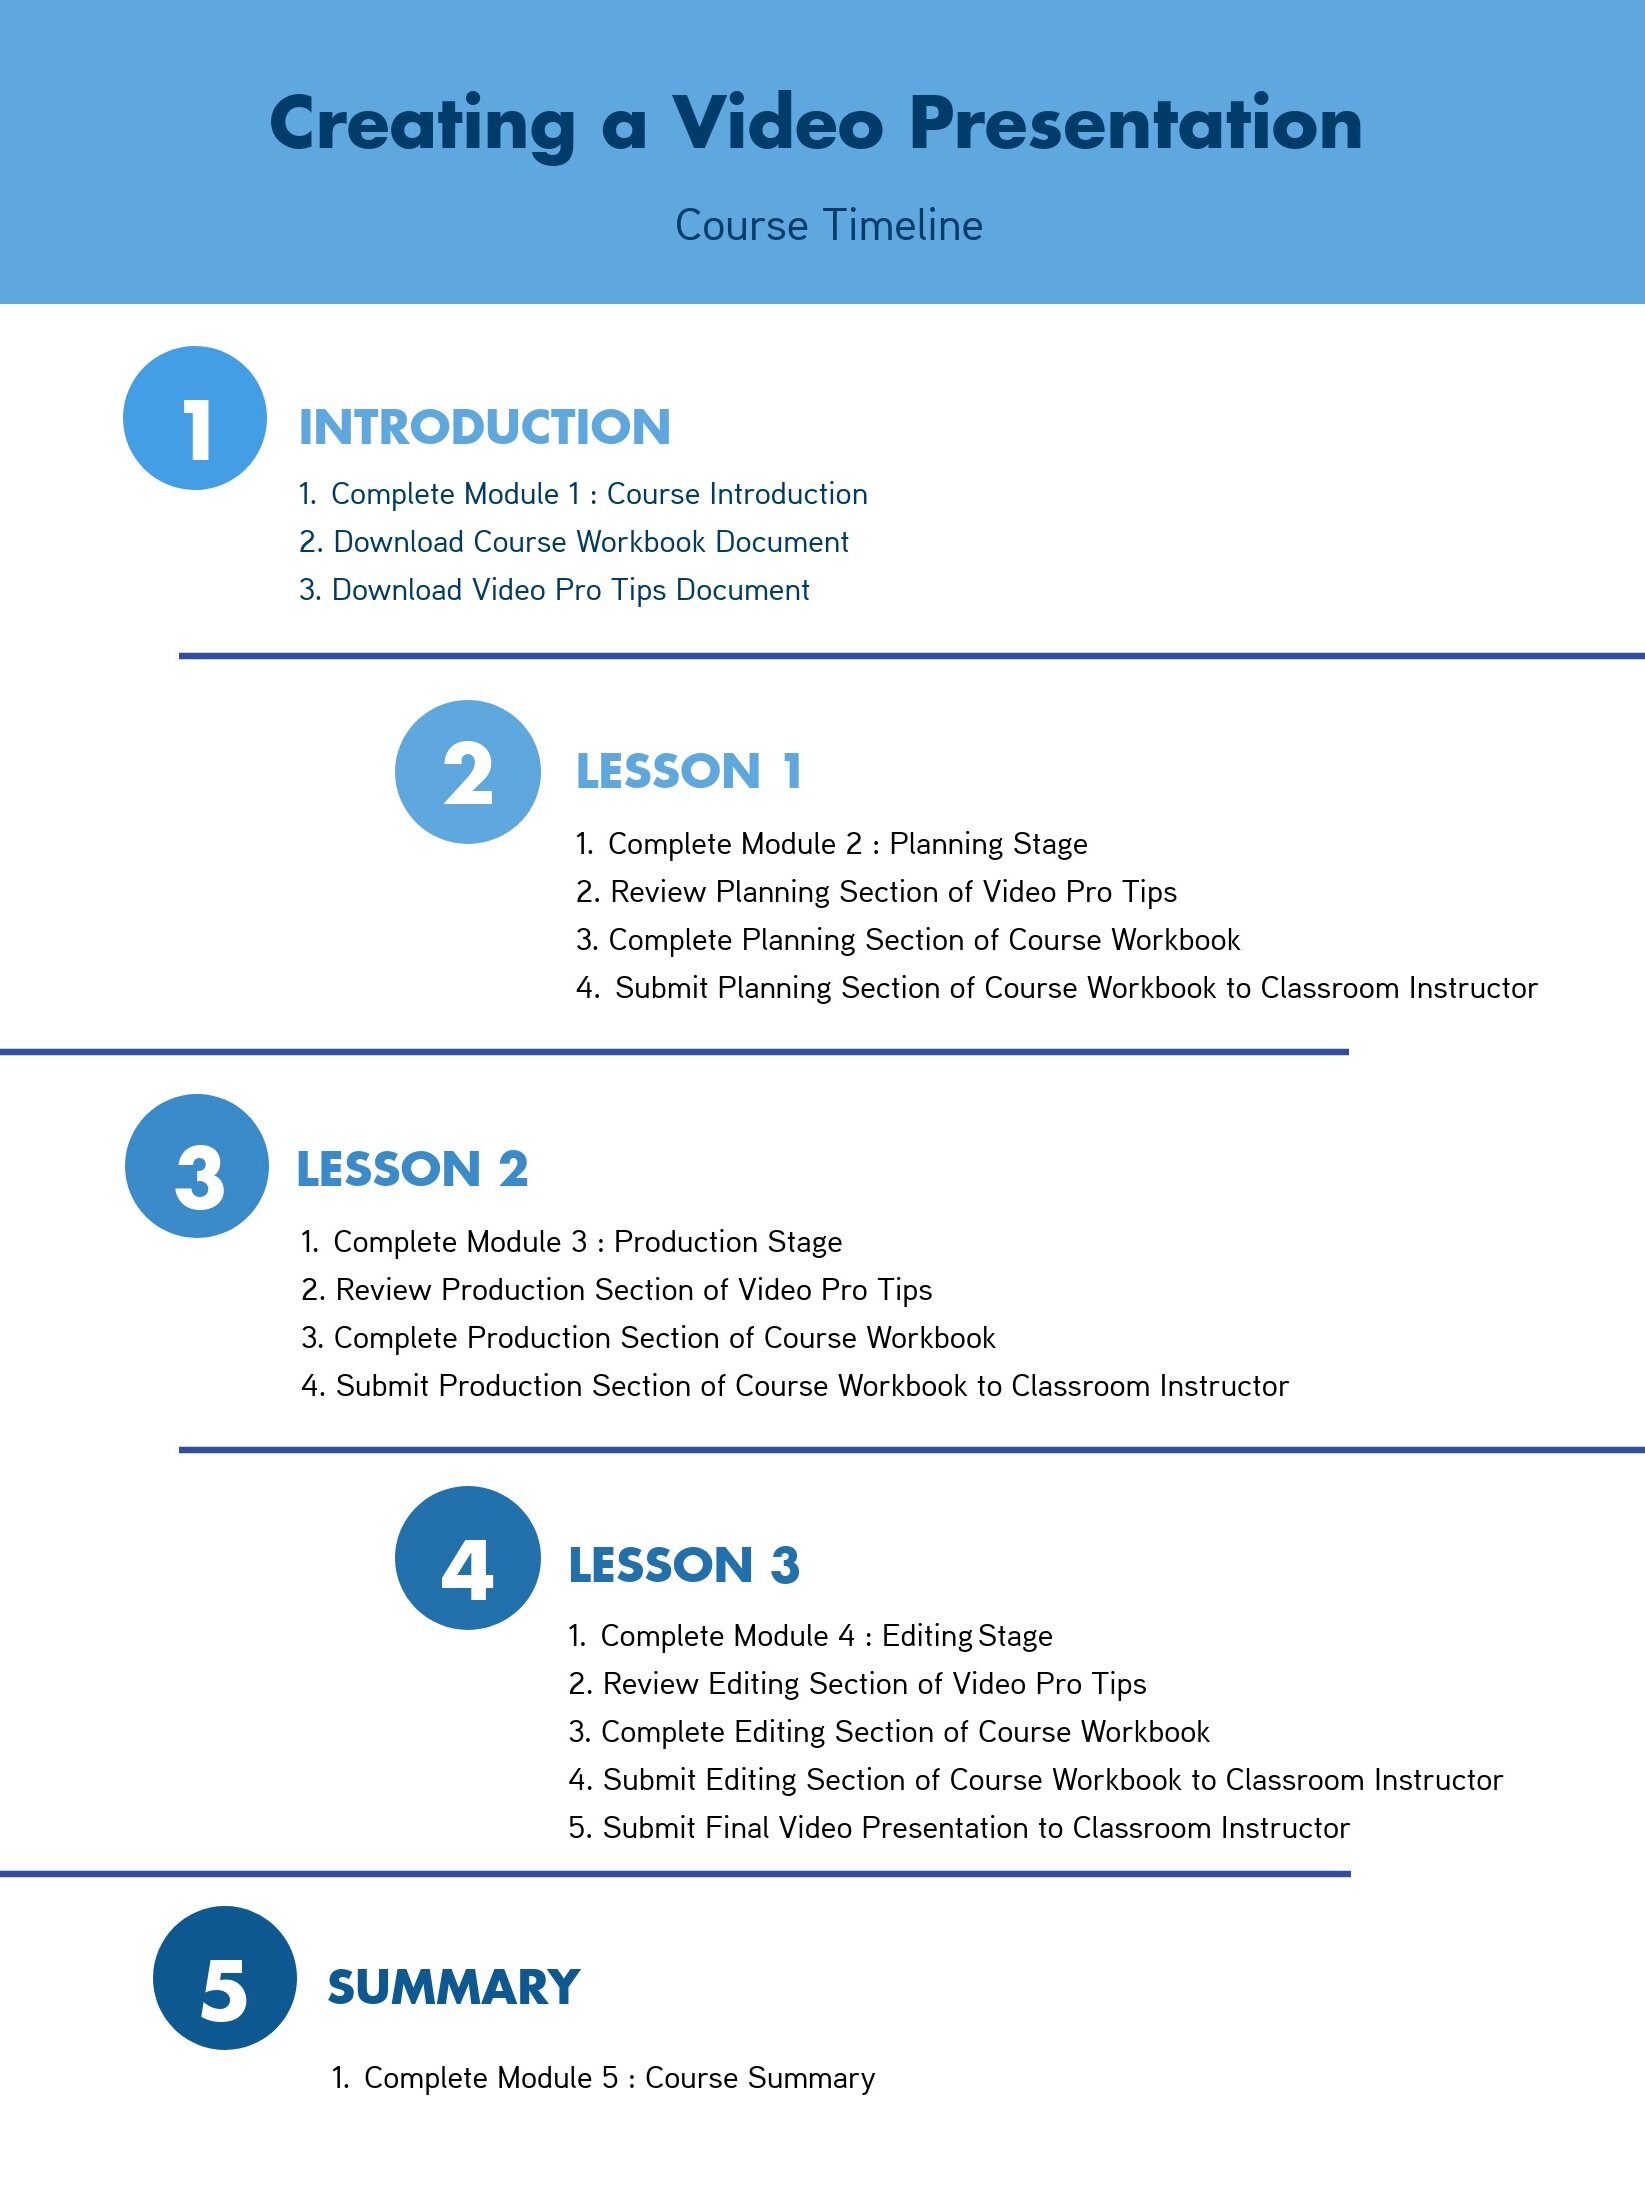
Course Navigation
Course Timeline
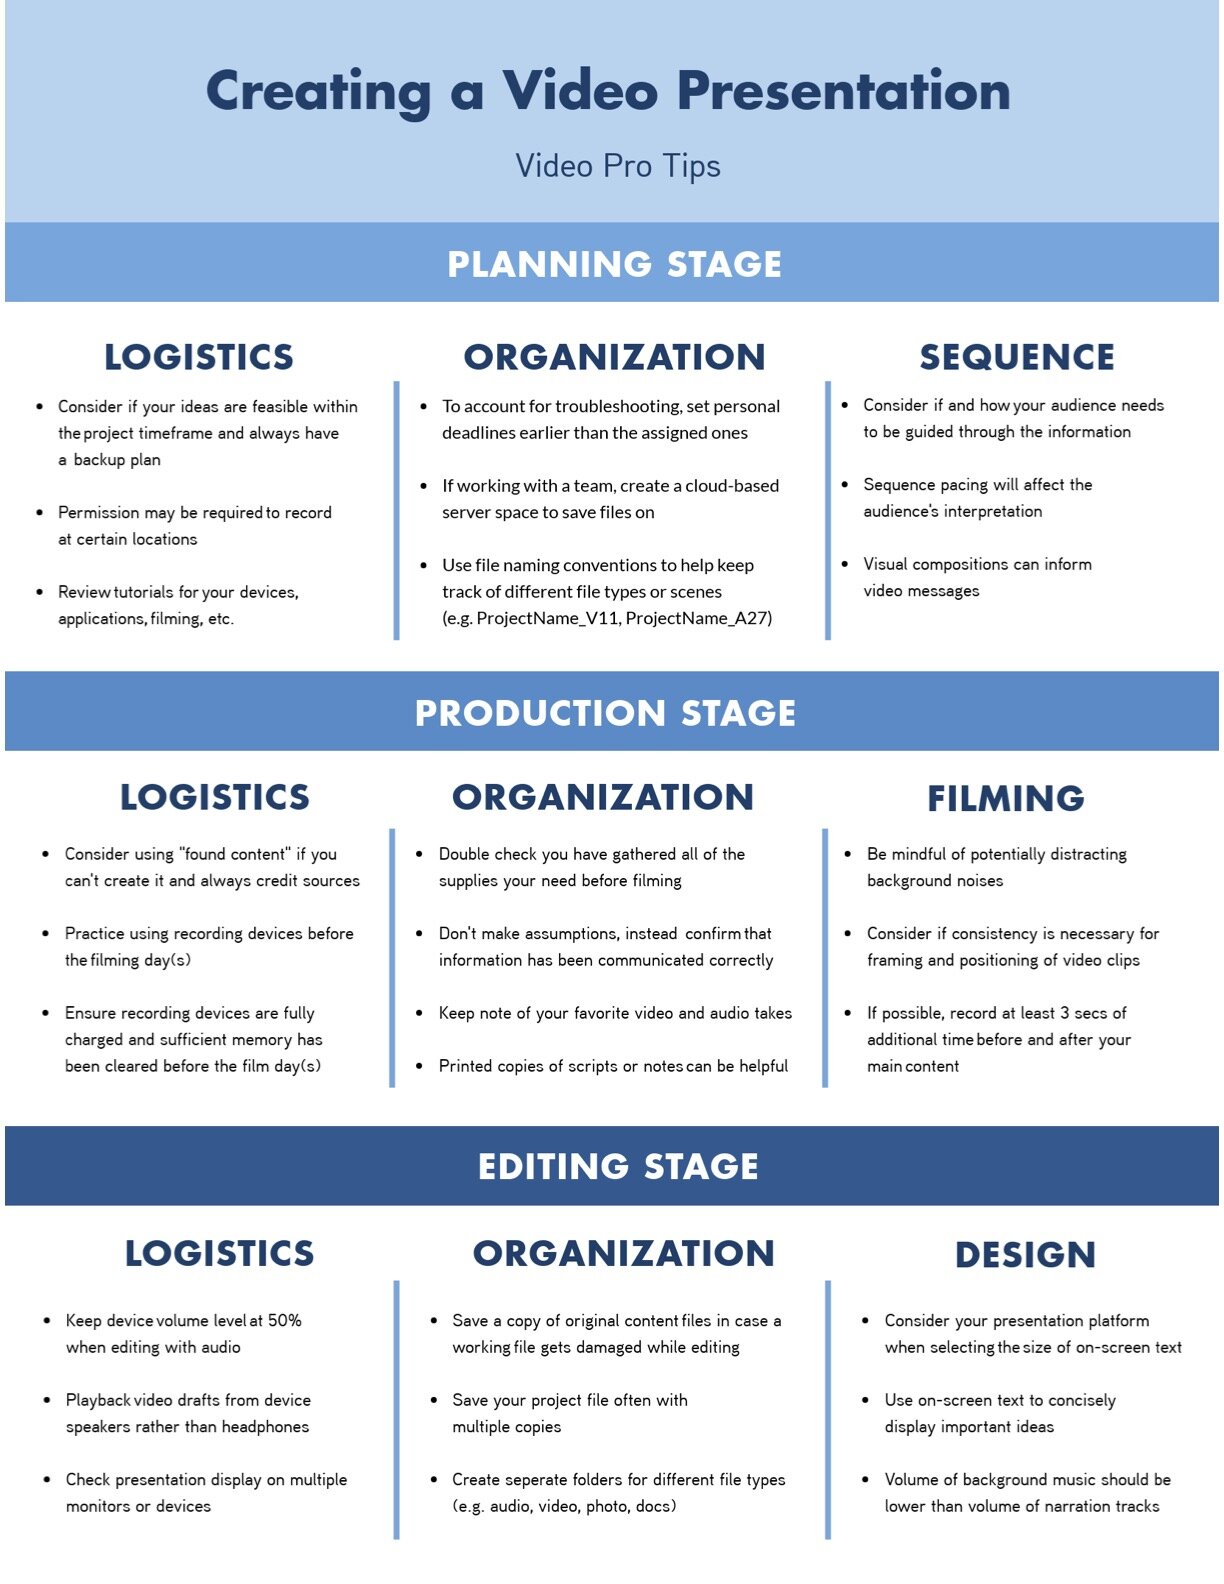
Video Pro Tips
Production Workbook

Course Handouts
Video Assets: Course Lessons
Recording and Editing Audio
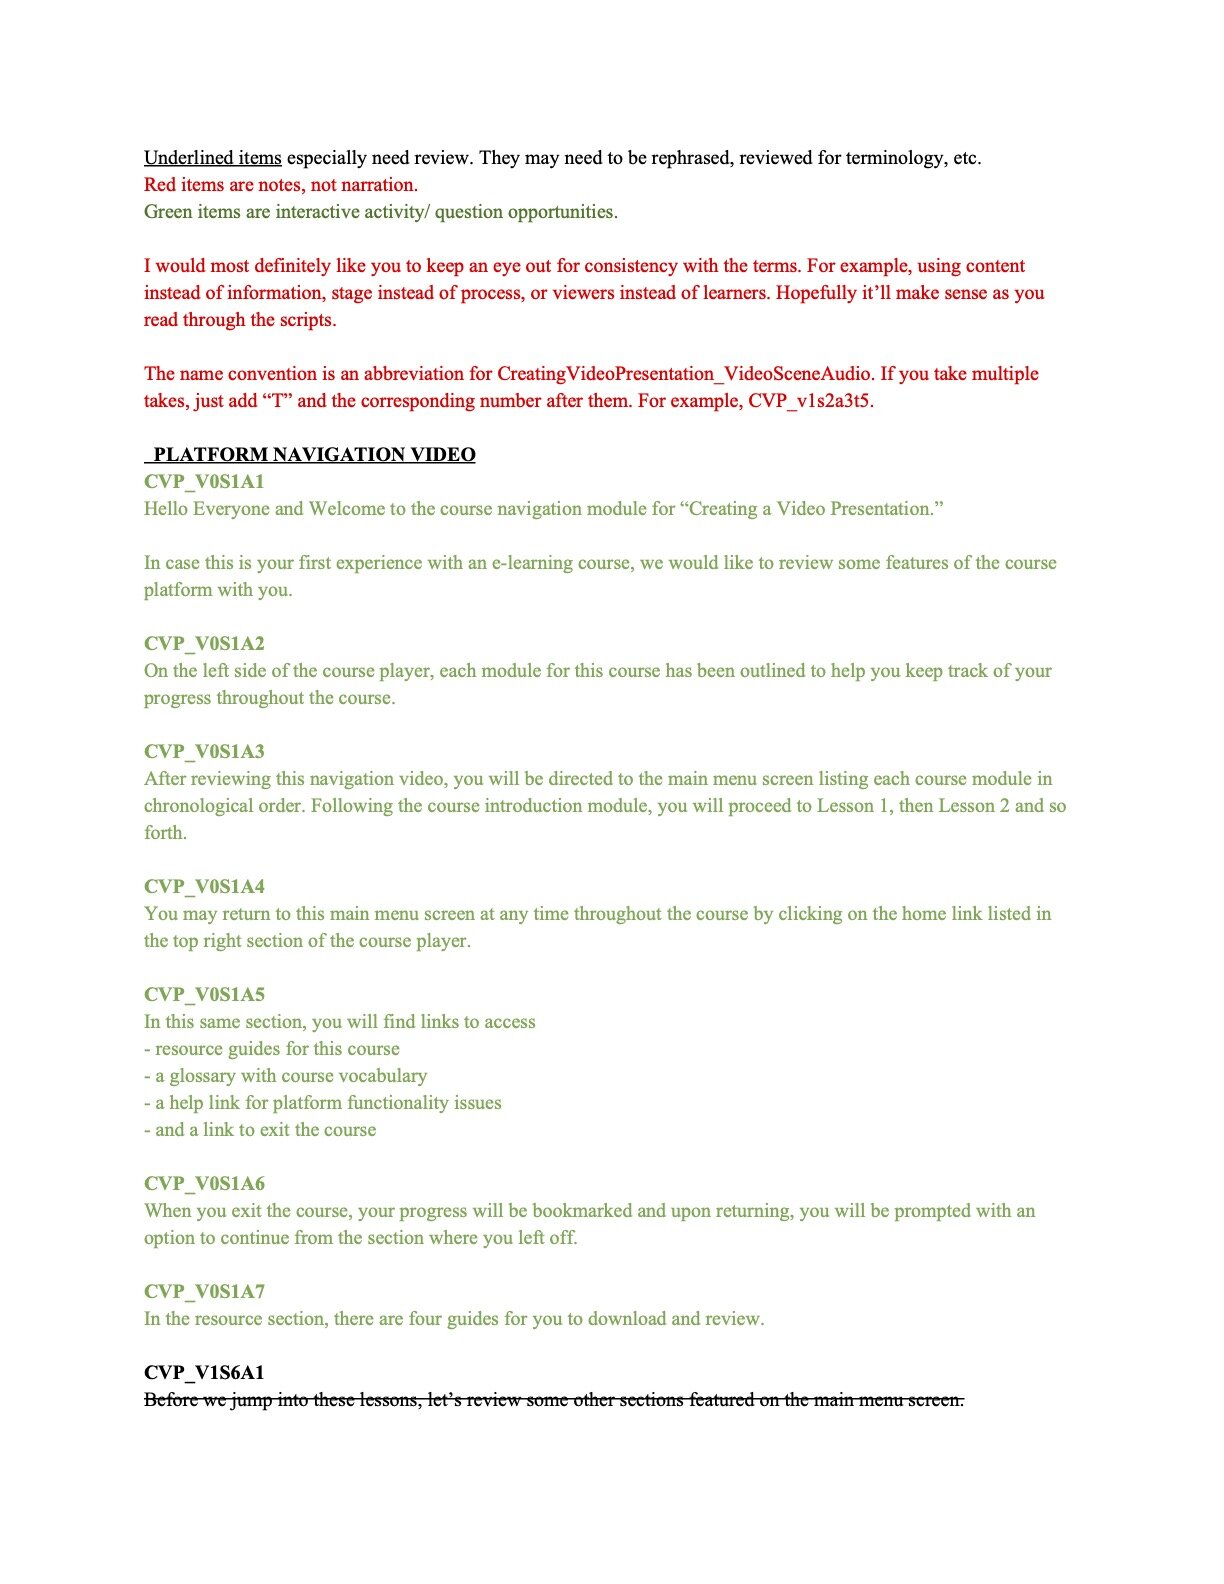
To create these videos I first started with writing the scripts. I separated the scripts into digestible chunks so that the narrator, my project partner Jimmy, wouldn’t get too winded while reading through them. This also helped us get clean breaks between each section so it would be easier to read later. File names were provided over each section which would help us with editing in post as well.
I then shared the scripts with Jimmy who recorded audio clips using the voice memo app on his phone. Each script was recorded as one long audio piece. I didn’t want him to have to keep worrying about stop and starting back up again. I culled through the audio by listening to each track and marking the best takes for each section. I exported each clip with their preassigned file names.
Creating Graphics
While Jimmy was recording the narration, I referenced the script and started creating a presentation deck for each video using Piktochart. When I make original animations I usually create my own graphics using illustrator and animate them using after effects. Unfortunately, I didn’t have that kind of time for this project so I used a clever powerpoint animation method that I learned from Jimmy, who is not familiar with advanced animation techniques.
Jimmy first creates a finished version of a slide and then creates addition versions of the slide, but subtracts an item. This technique is similar to traditional animation or like a flip book. He then reverses the order of the slides so that when he transitions to the next slide the next object appeared. This method accompanied with using preset graphics from Piktochart helped me create the decks much faster.
Editing the Videos
After the decks were done for each video, I downloaded each slide as a jpeg. I imported these jpegs into after effects along with the audio clips. Splitting up each track ahead of time helped tremendously because my animation rate was limited to the original speed of the narration. I was able to chop up audio and add pauses easily.
Each video ended up needing to be split into several videos because we decided to insert knowledge checks throughout the lessons to enhance learner engagement. Earlier I mentioned splitting the audio up into digestible chunks. This also worked to our advantage when we had to split up the videos later. We didn’t want the videos to be too long, but this also prevents the learner from having to scrub through videos to find essential information. Therefore, the titles of these mini clips build the outlines of each module while also creating a list of key topics for the user to remember. The videos featured below are the module videos compiled together.